Pages

Tuesday, March 31, 2015

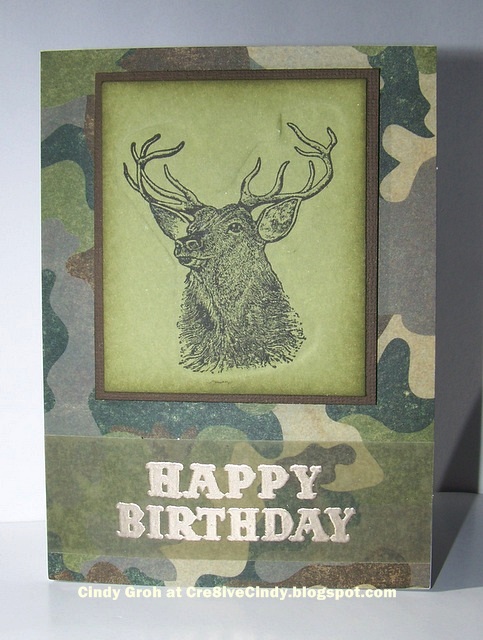
Manly Monday Buck

Welcome to Manly Monday. Be sure to stop by and check out the fun manly projects by clicking on the blog name. Check the bottom for my card.


Those were fabulous everyone. Thanks for letting me post to them.

My card uses a Jennifer Rzasa technique of debossing the image with a chipboard cut out of the image and running it through my die cut machine. I stamped the bucks head with Hero Arts black ink. The green cardstock is by Creative Memories, the brown behind it by Stampin Up and the patterned paper is by The Paper Studio. 

I heat embossed the sentiment with Versa Mark ink and Ranger Platinum embossing powder with a Fiskars stamp onto green vellum by Paper reflections. It's nice because it is a sticky back vellum.


Thanks for looking.

French Maid Card

My card today uses a digital stamp from Sassy Studio Designs. I printed her out onto Cryogen cardstock and colored her in with Copic markers. I added ribbon to the corners. which the purple is by Karen Foster and the black is from my stash. The label for the sentiment is an old Creative Memories sticker that I cut off the edges to make it fit on the image. The hello sticker is by Pebbles, the purple rhinestone by Want 2 Scrap and the black pearl is by Forever in Time. The purple cardstock is by Coredinations and the black polka dot paper is by Papertrey Ink.


Challenges:
http://opus-gluei.blogspot.com/ Black and one other color
Thanks for looking.

Monday, March 30, 2015

Manly Monday Fish

Welcome back to Manly Monday. Please click on the blog name above the photo clip to be directed to the masculine card. If you like what you see here, please consider becoming a follower.

Time to Play


Molecraft
I can't seem to make a clip with a PNG

Red's Card Corner

Marianne's Craftroom

Making the World Sparkle

For my card I colored in the fish stamp by Stamp N Plus with distress markers and sprayed the stamp with water before stamping it onto white cardstock. Then I inked the all of the cardstock around the fish before deciding to die cut the fish out with a Spellbinders die. I wanted to make waves for the bottom of the card so I took a stencil called Mini Wedding ring and used the side with the swirl. I inked that one side with distress ink, well actually 3 different distress inks. I tried to off set the pattern a little bit and then once I was finished I inked the edges. The sentiment stamp is by Stampendous and fit perfectly with this little circle punch by EK Success. I matted the white piece onto Color Aid paper. The image is popped up with foam sheets from Dollar General. {Sort of like Fun Foam}


Thanks for looking.

Sunday, March 29, 2015

Embossed Butterfly

My card today is a get well card which I don't find myself making enough of these or better yet I don't send enough of these out to people. I think this card is quite pretty and would cheer up someone's day if they received it. 


The butterfly stamp is by:
and can be found at:

I heat embossed the image with Versa Mark ink and Ranger's platinum embossing powder. Then I colored it in with distress inks, an ink blending tool, and also some nibs all by Ranger Industries. I picked the papers I wanted to use before coloring it in so that when I was finished I fussy cut most of the butterfly out and set it aside while I constructed the rest of the my card front. All of the patterned papers are by Basic Grey. The ribbon is by Pebbles, sentiment by K and Co, rhinestones by TPC Studio and flower sticker by EK Success. The sentiment sticker is on a Spellbinders die cut made of Recollections white cardstock. I hope you like it.


Challenges:
http://www.craftforthecraic.blogspot.ie/ Bingo {Image, More than 2 layers, and Die cut}

Saturday, March 28, 2015

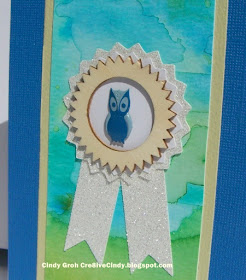
Water Coloring Owl

I did some water coloring yesterday with my Peerless watercolors on some Ranger watercolor paper. I cut this strip out of it and matted it onto some light olive colored cardstock and then onto the blue. One little trick I found to do with watercolor paper if it is warped is run it through your Cuttlebug with the sandwich as if you were embossing a Spellbinders die (for me that's A plate, 2 B plates, and a piece of chipboard.). It will straighten out your watercolor paper and make it easier to adhere onto other cardstock. 

The fun part of my card is the owl and it's die cuts. The wood veneer frame is by Maya Roads. I die cut a white and then a sparkly shape that mimics the wood. Then I die cut the two pennants hanging down from it. I used the Art Philosophy cartridge with my Cricut with Recollections paper. Then the owl in the center is a brad by Eyelet Outlet. I didn't add a sentiment yet because I'm still pondering if this would make a good graduation card or not.


Friday, March 27, 2015

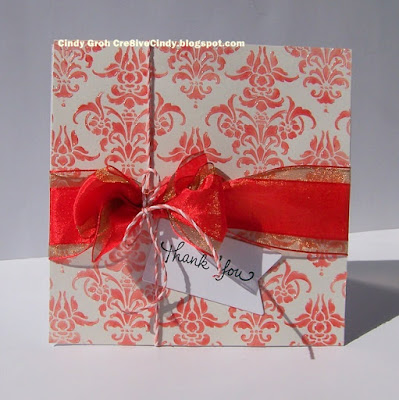
Embossing Paste on a Dreamweaver Stencil creating a present Card


This week we’re going to celebrate with the awesome Woodware Design Team and theDreamweaver Stencils Dream Team all of the the great Stampendous and Dreamweaver Stencils products that Woodware makes available to the UK market. This is good news for our crafty friends in the UK because we’ll be offering prizes and our UK friends are eligible to win!! We’ll be offering three prizes in the UK and three in the US. Each prize package will consist of Nathalie Kalbach’s terrific Grunge Mixed Media Cling Rubber Stamp Sets and the beautiful Zen Butterfly Dreamweaver Stencil! Both products are ideal for adding texture and backgrounds to your projects!
Deadline to comment is Sunday, March 29th, Pacific Time. Winners will be picked using random.org and announced Tuesday, March 31st, in the afternoon.
And that’s our theme!! Making Texture. We hope you’ll enjoy the wonderful inspiration that three talented teams will bring you this week! Be sure to visit all the blog links listed and leave your comments! Each comment will count as an entry towards one of the terrific prize packages.
Here are the designer’s sharing the projects today —
My card uses Stampendous stamp that can only be found at Woodware (404 error) Thank you Stamp and a Large Damask stencil can be found at Woodware or Stencil with Style
I inked the stencil with Ranger distress ink and an ink blending tool. Then I used transparent embossing paste over the whole pattern and set it aside to dry. The big ribbon is by May Arts which I've tied into a bow. The twine is by Lawn Fawn and I wrapped it around the bulk of the bow before tying it into a bow too. I stamped the sentiment by Stampendous in Hero Arts black ink on a Clearly Besotted die cut made of Neenah Solar White cardstock. Then I adhered the whole front panel onto a 5 1/4 square card base by The Paper Studio.
Thanks for looking.
Challenges:

Thursday, March 26, 2015

Dream It Up Potted Tulips


Ready for fresh air, sunshine, new leaves, and flowers blooming? Well, the Dream Team is right there with you! Our challenge for the month of March is...coincidentally...Marching into Spring. Per usual, we'd love to have you play along with us, and link your own creations to the Inlinkz tool on the Dream It Up! blog, or at the bottom of this post. Play as many times as you'd like. Those of you who work Dreamweaver and/or Stampendous products into your projects receive bonus points, but everyone has an opportunity to be the winner who receives the stencil of their choice.

Here's my hint of Spring:


My card is made with the stencil Potted Tulips by Dreamweaver Stencils which you can find at 


I dry embossed the image in my Cuttlebug and then while the stencil was still taped to the cardstock I inked the image with distress ink and an ink blending tool both by Ranger. I trimmed down the image and layered it onto Bazzill patterned paper and then onto a piece of pink patterned paper also by Bazzill. The ribbon is by May Arts and under the ribbon is a border punch by EK Success in pink cardstock. Then the sentiment is a stamp by Stampendous stamped in charcoal ink by Hero Arts.


The "B" team would love to share their interpretations of this theme:


Challenges:
Outlawz Thursday Anything goes

Wednesday, March 25, 2015

Dreamweaver/Stampendous Blog Hop Day 3

This week we’re going to celebrate with the awesome Woodware Design Team and the Dreamweaver Stencils Dream Team all of the great Stampendous and Dreamweaver Stencils products that Woodware makes available to the UK market. This is good news for our crafty friends in the UK because we’ll be offering prizes and our UK friends are eligible to win!! We’ll be offering three prizes in the UK and three in the US. Each prize package will consist of Nathalie Kalbach’s terrific Grunge Mixed Media Cling Rubber Stamp Sets and the beautiful Zen Butterfly Dreamweaver Stencil! Both products are ideal for adding texture and backgrounds to your projects!
Deadline to comment is Sunday, March 29th, Pacific Time. Winners will be picked using random.org and announced Tuesday, March 31st, in the afternoon.
And that’s our theme!! Making Texture. We hope you’ll enjoy the wonderful inspiration that three talented teams will bring you this week! Be sure to visit all the blog links listed and leave your comments! Each comment will count as an entry towards one of the terrific prize packages.
Here are the designer’s sharing the projects today —
My card uses the new stencil called Spiral Dots which you can find at

or

To make my card I mixed white embossing paste with Richeson acrylic paints and applied the paste with a palate knife by grabbing the different colors and letting them organically mix together. The ribbon is by Offray and the sentiment sticker is by American Crafts.

Thanks for looking.


http://useyourstuff.blogspot.com/ Stickers {Sentiment}

Tuesday, March 24, 2015

TTCRD Truck Guy card


We are sponsored by:
 SandiSamples

I chose a truck image which is great for guy cards and you know how much I love a guy card. I printed the image out onto Ranger watercolor paper and colored the image in with Peerless Watercolors and a water pen by Ranger Industries. The patterned paper is by Studio Calico and the black cardstock is by Recollections and the blue is from Hobby Lobby. The blue is a portion of a Spellbinders die cut that I stamped the sentiment by Clearly Besotted with Hero Arts black ink. Then the brad is by The Paper Studio.


Thanks for stopping by.
Challenges:

Monday, March 23, 2015

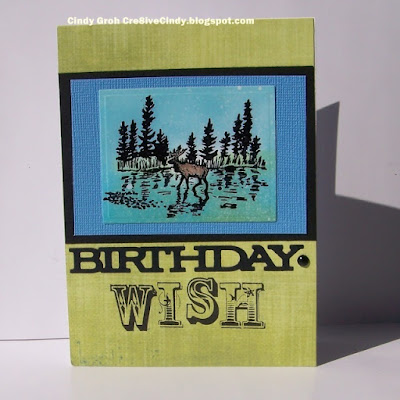
Manly Monday Buck Scene

Welcome back to this week's edition of Manly Monday. There are a bunch to see today so click on the blog name over the photo to be directed to the masculine card or a couple of boy cards or a mixed media for a male. First up is my masculine card and the supplies and directions are at the end of this post. Thank you.


Today's Manly Monday card for me features a scene stamp by Stamp N Plus. I stamped it with Hero Arts black ink onto Ranger's Specialty Stamping paper. When I first stamped it I was like...umm, it's still really wet and I can't do anything with it. So I let it dry overnight and when I came back to it, it looked the same wet. I braved it out and decided to try inking the image with distressed ink and an ink blender both by Ranger. It worked out. I added a little bit of green around the horizon and a little in the water so the sky and water didn't like too much alike. I took a Ranger nib and some brown distress ink for the body of the buck. After  I added the color I sprayed the paper with water and die cut it with a Spellbinders die. 

I started with a piece of Fancy Pants patterned paper and taped it on a piece of black cardstock by Recollections. The next layer is a piece of blue Coredinations cardstock and then the image cardstock on top of that. Then the birthday die cut is by Papertrey Ink, wish stamp by Fiskars, ink by Hero Arts, and brad by Stampin Up.


If you like what you see please become a follower of my blog so you can see Manly Monday every week.
Thanks for looking.