Friday, December 30, 2011


Welcome to my last Fabulous Friday fun post. This week I am doing a masking technique that is quite easy and gives such a great look.

I cut a die cut using a Spellbinders heart die and then sprayed the heart with Glimmer mist. 


After it dried completely, I used removable double sided tape to adhere the die cut to my white card base. 


I used a distressing tool by Ranger Industries and distressing ink to create my background.


Holding the tool at the base instead of the handle, I was able to distress an even coat of the Fired Brick ink. Here it is partially done.


From this picture above I continued bringing small bits of ink onto the card base. A little at a time is the best way to go. You can always add more but you can't take away excess ink.


After I was finished I took off the die cut heart and revealed a white heart.


The two smaller hearts were sprayed with glimmer mist. Next I needed to color my smallest heart on the back side so when the heart was folded up you could see red. Once dry from the mist and ink, I bent the smallest heart in half and adhered just that seam to the center of the larger heart.

From here I sewed the two hearts together at the seam.and then attached them to the center of the white masked heart. Flip up the sides of the smallest heart to add interest and depth. 

From here I added rhinestones to the center and colored the thread with a Copic marker.

I stamped the sentiment using red ink onto another Spellbinders die cut and colored the heart in with red Stickles.


I am doing a special large giveaway for anyone that does my FFF and posts it HERE by January 1st, 2012. I'm out shopping and picking up fun scrappy stuff to add to the prize with each trip out. They may have something to do with the FFF posts. Don't miss out.


Like I said above this will be my last Fabulous Friday Fun. Things are so busy that I just don't have the spare time like I did before. They are requiring me to work more hours which cuts into my creative time. I hope you have enjoyed this 3 month series of tutorials.
Thanks,
Cindy

Sunday, December 25, 2011

Gingerbread Woman Christmas Card

Merry Christmas to all.

This week at I Did it Creations Challenge #87 our challenge is "A Gingerbread Christmas" and we are sponsored by Robyn's Fetish.


I painted this gingerbread woman using distressing inks, sprayed with water and applied with a fine tip paintbrush. 

The frosting is Liquid Pearls and the button and pockets are Stickles. 

The red square is chipboard with sentiment stickers applied. 

I wrapped the lace around the patterned paper on the left side of the card


Thanks for looking
Updated7/2021

Friday, December 23, 2011

Fall Calendar with Tutorial for Fabulous Friday Fun 12-23-11

This week I am going to show you a fun thing to do with twine, hemp, floss or you could even do it with ribbon. I stamped a background stamp onto my cardstock and there was a seam I wanted to cover up. Here are the end results:


Here are the supplies I used:
A paper piercer, cardstock, hemp, and leaf brads.


I taped a piece of hemp to the back of the paper with regular scotch tape. If you were doing this for a scrapbook they sell acid free regular tape for things like this. Since this is for a calendar I didn't worry about it. I taped it to one side of the scalloped border.


From there I wrapped it around the front to the back and end up with the hemp in the front.


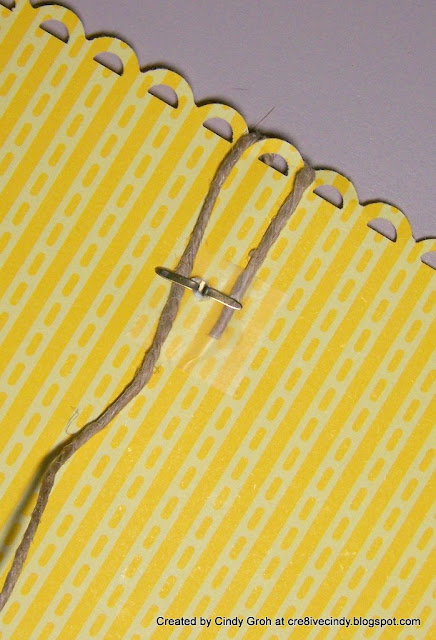
When I came back around from the top I crossed the hemp. This is where my first brad is going to be. If spacing is important to you it may be best to use a ruler and make marks on your paper as to where each brad should go.


I poked my hole and inserted my brad. Tuck the hemp under the brad where you want it to line up on your paper-like me covering the line of the overlapping stamp.


On the backside of the paper use the brad prongs to secure the hemp to the cardstock. This way you don't have to use glue to hold the hemp in place.


From there you cross the hemp again, poke your hole and insert the next brad. Tighten the hemp for a clean crisscrossed look.


Secure the hemp in the back with the brad prongs and move on to the last one.


 To make my crosses tighter I snipped the hemp in the back and secured it down with the last brad prongs. After that, I taped the remaining piece of hemp to the back. (the last step not shown)


Here is what it looks like once I was finished tucking and arranging the crosses of the hemp just right.


Here is the final layout I made using this technique.


Thanks for stopping by and taking a look.
UPDATED PICS ON 9-30-21

Thursday, December 22, 2011

Tis the Season Stamped Christmas Tree Card

I love the way the border punch resembles snow. This card was made with a bunch of scraps that were on my table. I sprayed the white cardstock with Perfect Pearls and water mixture to give it sparkle like snow. 
Thanks for taking a look.


http://stampinroyalty.blogspot.com/-Winter/ Christmas cards (Blog closed in 2017 but still has cards posted to see)

Updated 7/2021

Wednesday, December 21, 2011

Blue Christmas Card W snowman

Love the snowman stamp by Inkadinkado that I heat embossed and used distressing ink to highlight the image. All the paper is by Hot off the Press and the snowflake stickers are by Jolee's and Hobby Lobby.
Thanks for stopping by.


Updated 7-2021

Tuesday, December 20, 2011

Vintage Style Santa Claus Christmas Card

This is similar to the one I posted last week. 

For this card, I used an old book for the matte behind the Santa stamp. 

I used my Spellbinders rectangle dies and a snowflake punch from Creative Memories. 

The border punch is by Martha Stewart. Distressing inks by Ranger Industries.


Thanks for looking.

Sunday, December 18, 2011

Sunflower Cross Image for I Did it Creations Challenge #86

This week I Did it Creations challenge #86 is Thank you and we are sponsored by Stitchy Stamps.
I chose this fabulous fall image with sunflowers and the cross behind as my image but Stitchy has a ton of images to pick from. This one just spoke to me:)


Thanks for looking.

Friday, December 16, 2011

Paper Piecing Technique for Fabulous Friday Fun 12-16-11

This week for Fabulous Friday Fun I am going to show you paper piecing with a digital image.
I selected this image from Robyn's Fetish.


I printed two images on my regular printer paper. This way I could see what one would be the best one to line up my card.


Next, I placed double stick removable tape by Scotch on the printer paper in the middle of the image. This way when I peel the card off the paper the tape will more than likely stay on the paper and not the card.


I use my ceiling light to line up the card with the image and where I want it to print on the card.  Push the card onto the paper when it's lined up where you want it.


I ran the piece of paper with the card temporarily attached to it through my printer. 


Using the same piece of tape, I placed scraps of Christmas paper to the image and ran them through my printer.


After I had all the patterned paper printed on I cut them out keeping the black line around the image the best I could.


Adhere the heart and the star to the ornaments.


Start adhering the pieces of patterned paper cut outs back on to the image you printed on the card base.


This is what the final image looked like once I adhered the patterned paper pieces. 


This technique is best done with images that are easy to cut out. 
Give paper piecing a try. It really adds dimension to your digital images.

Wednesday, December 14, 2011

Vintage Christmas card

Don't forget to check out my post where you use a Fabulous Friday Fun tip or product for a chance at a fabulous prize.

I'm going a little old school today with my Christmas card. The Santa stamp is by Inkadinkado which I heat embossed with ink by Versa Mark. The Die cuts are by Spellbinders (rectangle) and Creative Memories (Snowflakes)

Thanks for looking


Challenges:
http://cachallenge.blogspot.com/(TU12/13)-Embossing (Santa is heat embossed)
http://useittuesday.blogspot.com/(TU#21)- Holiday {I have had that patterned paper for 3 years}

Tuesday, December 13, 2011

Embossed Christmas card

Today I have another Christmas card to show you. I love the embossing folder that my friend let me borrow. It is so beautiful. 
Patterned paper by The Paper Studio and Off the Press. Cardstock by Halcraft (card base) and Stampin Up (sage) The stickers and brads are unknown but the sentiment is by CTMH. Ink by Ranger Industries.
Thanks for looking.


Monday, December 12, 2011

Manly Monday Man’s Silhouette with an Umbrella card

This week for Manly Monday I made a card using a Tim Holtz stamp set, alcohol inks, Provo Craft embossing folder, Memento and distressing Ink, tag by Making Memories, sentiment by Maya Road and some cardstock and brads from my stash. Thanks for looking.

Don't forget to check out my post where you use a Fabulous Friday Fun tip or product for a chance at a fabulous prize.


Sunday, December 11, 2011

Reindeer Christmas Card for the I Did it Creations Challenge

This week at I Did it Creations challenge #85 is Santa's Getting Ready. We are sponsored and given images to work with by  Gingerloft Digi Stamps.

Here is my cute reindeer card. I used a border and rub on sentiment from K and Co along the bottom along with some cording. The die cuts are by Spellbinders (scalloped circle and Label #2). On the scallop circle, I inked or shaded the inside of the die cut while it was still in the die by using my Ranger distressing tool and antique linen distressing ink. The star stickers are by Me and My Big Ideas.

I painted the reindeer in with distressing inks and Perfect Pearls mixed with water. The gloves and skates have Stickles on them.

Thanks for stopping by and taking a look.


Challenges: