Thursday, April 30, 2015

Dreamweaver Stencil Last Post

Today is my last post with Dreamweaver Stencils. I would like to thank Lynell, my fellow design team members and Stampendous for this wonderful opportunity to create with such an amazing team of ladies and awesome products. It has been such a dream and a thrill to be a part of this team and to learn so many new things these past months. Thank you from the bottom of my heart.

My card today is going to my cousin for her upcoming bridal shower for our Shower to Shower challenge on the Dreamweaver blog. I used the Rain stencil  for my background by applying distress ink (Salty Ocean) with an ink blending tool and then came in with the translucent embossing paste to give it added dimension. I had left over paste with the blue already in it so I grabbed the Rain sentiment stencil and applied the left overs to it. You can tell the raindrops are darker then the sentiment because the sentiment didn't get distress ink before the paste. The cardstock is by Recollections and Coredinations.


Thanks for looking and be sure to check out what everyone else has made for the challenge Shower to Shower:

Elsa Birthday Shaker Card

Welcome back on this Thursday for the Sassy Studio Design for the challenge of 

ANYTHING GOES

You can earn an extra chance to win if you use a Sassy Studio Design image. Then link up twice: One time to your project and The second time to your blog. If you have questions on how to do this leave me a comment and I will walk you through it.

For our anything goes challenge I chose to pull out Elsa because she is so beautiful and people keep asking for cards with her in them. Well this one is a little bit more than an Elsa card-it's a shaker card too! Very fun for a young lady that may like the shake it when Taylor Swift comes on the radio. Just a thought:)

I did a card at the end of March where I was making a water scene for a fish which you can see HERE. While making the fish card I wanted the fish die cut out after taking all this time to apply blue distress inks to the rest of the cardstock. I threw the piece into the recycles. A week or so later I remembered that cardstock and pulled it to give it new purpose. 


The stuff I put into the shaker card is such old materials that I've been saving for a while in the hopes that a technique will arise where I can use them. The acetate is old from the school when teachers wrote on them as an overhead projector. That's been brushed aside leaving found acetate for a crafter to use.


The image of Elsa is small making her challenging to color with distress inks as watercolors. But I think she look awesome the way she is and so I die cut her out using the same shape die as the window. 


The word dies are by Clearly Besotted (happy) and PTI (birthday). The were die cut out of glitter paper by Recollections and glued on with Ranger's Multi Medium Matte.


Thanks for looking

Wednesday, April 29, 2015

Love 2 You Hot Air Balloon Card

My card today could be used for a couple of different occasions like anniversary, just because, graduation, or maybe even changing jobs. Heck it could always be a birthday card but I think I'll keep the inside of this one blank until that special occasion arrives to use this card.

The hot air balloon is a stamp by Unity Stamp Co. I inked it with red and brown pigment ink by Clearsnap onto off white cardstock that I got free from a friend. It has some flecks on it but it still works well. I die cut it out with a Spellbinders die and set it aside to dry while I configured the rest of the card. The red cardstock, embossing folder and the die cut "love" are all by Stampin Up. The brown cardstock is by Coredinations and has a small sparkle to it. I did layer two "love" die cuts onto each other but then I changed my mind on the dimension. The "2" die cut is by Dreamweaver Stencils and the "you" die cut is by Ellen Hutson. The final product in my card is the baker's twine and that is by Lawn Fawn.


Thanks for looking.

Tuesday, April 28, 2015

Pink Mom Card

These pictures look so gloomy I may have to rephotograph them. The top part of the card is patterned paper Recollections that has a light pink design and then the bold black polka dots. The bottom of the card is a small background stamp by Inkadinkado that I stamped with Versa Mark ink and heat embossed with white embossing powder on white cardstock. Then I inked the area with Spun Sugar distress ink by Ranger using an ink blending tool. Then background is an odd size because it is too small for a card lengthwise and too big if you turn the stamp on quarter turn. (I'm trying so hard to explain myself and I don't think it's clear what I'm trying to say.) But anyway I had to cut the piece down to fit across the bottom and once I did that I placed a black cardstock strip of paper over the seam of the top and bottom pieces of paper. I used Lawn Fawn alphabet stamps for my sentiment along with Stampin Up white pigment ink.

The flowers and stems stamps and dies are by Stampin Up. I stamped the flowers with Clearsnap pigment ink and the stems with Hero Arts shadow ink. I layered and staggered two stems on top of each other to extend the length for the higher flower.

Lots of stamping in this card but that's what I love to do.


Thanks for looking.
http://stampandcreateblog.blogspot.com/
http://memascrafts.blogspot.com/2014/04/april-2015-challenge.htmlAG w a die
http://notjustcardschallenges.blogspot.co.uk/AG
http://craftycardmakers.blogspot.com/ dots
http://www.craftyourpassionchallenges.blogspot.com/
http://www.craftindesertdivas.com/Mother's Day
http://craftingfromtheheartchallengeblog.blogspot.com/AG
http://cardmaniachallenges.blogspot.com/ flowers
http://creataliciouschallenges.blogspot.com/embossing
http://die-cut-divas.blogspot.com/ in the garden
http://emeraldfaeries.blogspot.co.uk/ flowers
http://brownsugarchallenge.blogspot.com/ AG
http://myshericrafts.blogspot.com/Mom's day
http://www.craftforthecraic.blogspot.ie/ die
http://chocolatecoffeecards.blogspot.com/die cut
http://crafts4eternity.blogspot.com/AG

Monday, April 27, 2015

Manly Monday Deer

Welcome back to Manly Monday. I have just a few blogs for you to visit today and then two cards at the bottom from me. Click on the blog name above the clip to be directed to the masculine card.


Check out her card too


For my cards today I have a simple Forest Deer Scene die cut by Crafty Cutz in different papers as my focal point. For the background I inked up white cardstock by Recollections with the blue sky some Vintage Photo for the brown color and then some Peeled Paint for some grass. I layered those pieces together and then on to some wood grain patterned paper by Stampin Up. The sentiment is a Hero Arts stamp in Hero Arts black ink.


This one the die cut was a light colored patterned paper so I inked it with distress ink.


Thanks for looking.

Sunday, April 26, 2015

Sailing Away Card

Hey there. My new card today is wishing for summer to come quicker then it is. But anyway, I think this card may be good for graduation or retirement although I will probably use it for another birthday or maybe anniversary card. Those are in high demand over here. I'll leave it blank until it's needed.

I stamped the Inkadinkado anchor stamp onto Ranger's watercolor cardstock with Versa Mark ink and heat embossed it with platinum embossing powder (also by Ranger). I die cut the image out with a Sizzix die and heavily inked the inside of the image with distress ink while it was still in the die. Then I sprayed the image with water and let it sit to dry. 

The scalloped oval and banner were cut out using the Cricut and Bazzill cardstock. I used Lawn Fawn Harold alphabet stamps to stamp my greeting with Hero Arts charcoal shadow ink. The patterned paper is by Quick Quotes and it is cut a little bit smaller than the Recollections card base. The grey cardstock is by Momenta with the border die by Spellbinders. he cording by The Beadery and I had to use foam adhesive on the image because the cording is so thick.  


Thanks for looking.

Friday, April 24, 2015

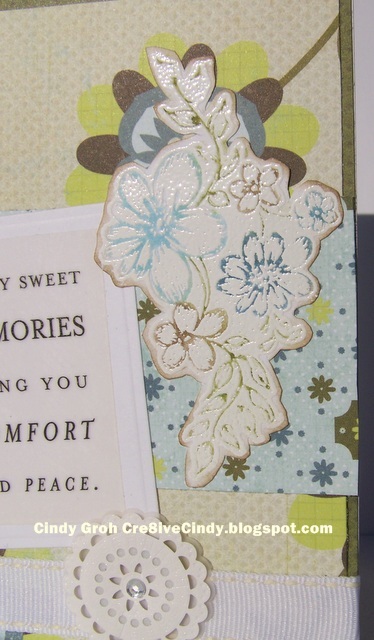
Comfort and Peace

My card today is a sympathy card with patterned papers by Basic Grey.


The Violet Chalk Flowers stamp by Deep Red Stamps that I used can be found at

I heat embossed the stamped image with Versa Mark ink and white embossing powder by Stampendous. I then colored in the image with a water pen and distress inks both by Ranger. I fussy cut the image out and inked the edges with brown distress ink and an ink blending tool. 


The rest of my card came together with ribbon by Pebbles, a doily sticker by EK Success, a Spellbinders rectangle die cut and a sentiment sticker by K and Co.


Thanks for looking.

Thursday, April 23, 2015

Sassy Studio Wings

Today is Thursday and that means there is a new challenge at Sassy Studio Designs. This week's challenge is
Things with Wings

I'm using the Praying Portrait for my card today. I printed her out onto Cryogen cardstock and colored her in with Copic Markers. Then I fussy cut her out and foam adhered her to a Spellbinders die cut. The flower paper is by My Mind's Eye and the yellow polka dot is from my stash. The butterflies are a punch by Creative Memories with a Want 2 Scrap pearl in the middle of each of them. The sentiment is a die cut by Clearly Besotted that I covered with Stickles. I also put Stickles on the lips and eyelids of my image.


Thanks for looking.

Dreamweaver Stencils Birdbath

Hi everyone. Thank you for joining me this week at Dreamweaver Stencils. Our challenge for the month of April is Showers and I made a bridal shower card. I paste embossed the Birdbath stencil and applied Fx metallics to the finished image. It's very soft and pretty with the colors I have chosen. The patterned paper is by Die Cuts with a View. The sentiment is a die cut from my Cricut that I inked with yellow Stampin Up ink. 


Be sure to stop by the other team members blogs to see what they did for this week:

Wednesday, April 22, 2015

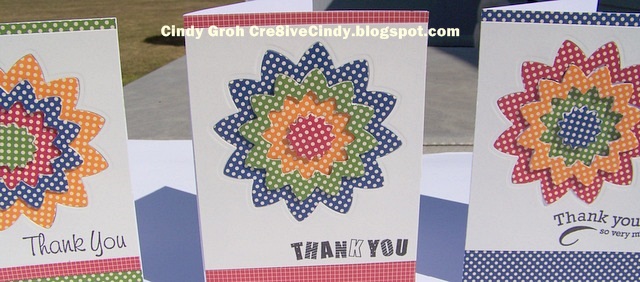
Thank You with Inlay Die Cutting

Today I have three cards to share with you. They are a rainbow of colors and use the inlay die cutting technique. I learned this technique from the wonderful Jennifer McGuire which you can learn on her You Tube video. She uses hearts but I had these flower shaped dies by DO Crafts in my stash that were getting zero love. I felt this technique really made these dies invaluable and gave them new life.

The patterned papers I used by Studio G are a little busy but I just went with it and thought they would brighten someones day. So you can watch the video to get the technique and I'll just finish by telling you the stamps I used for these cards and tell you the black ink is by Hero Arts. I also used a Wink of Stella pen on all the raised die cuts. The first one uses a thank you stamp by The Paper Company Studio.


The second stamp is by American Crafts.


The third card uses a different stamp set by The Paper Company Studio.


Here's a look at all three.


Thanks for looking.

Tuesday, April 21, 2015

Through the Craft Room Door Challenge

This week at Through the Craft Room Door our challenge of 

Always Anything goes

is sponsored by 


The image I was paired to work with made me think of say a woman who has breast cancer and has maybe finished her last round of chemotherapy. She is toasting to her victory.


My image was printed onto Strathmore watercolor paper. My printer didn't want to take that thick stuff but it finally did however it cut off two of the 6 images. That kind of narrowed it down to which image I was going to use. I colored her in with Peerless watercolors and then her dress is Black Sout distress ink with water. I die cut the image out using a Spellbinders die (#8) and inked the inside with Spun Sugar distress ink.

The pink patterned paper is by Studio G and the black by My Mind's Eye. The black strip between the image and the sentiment is washi tape with the pink flowers and flowers' center by Recollections and the black and white paper flower is by Creative Memories. The sentiment is a Just Rite stamp that was heat embossed with Versa Mark ink and MyStamp Box white embossing powder. I did use a gold Wink of Stella pen on her crown and the champagne and then a clear pen on the other sparkly parts of the image.

Thanks for looking.
http://creativecardcrew.blogspot.com/ Sentiment
http://www.aurorawingschallenge.blogspot.com/ Flowers
http://www.cardsinenvy.blogspot.com/ Pretty in Pink
http://craftingfromtheheartchallengeblog.blogspot.com/ AG
http://www.craftyourpassionchallenges.blogspot.com/ AG
http://digisketchchallenge.blogspot.com/ FLowers
http://lovetoscrapchallengeblog.blogspot.co.uk/ AG
http://www.lovesrubberstampschallenges.com/ Add flowers
http://partytimetuesdays.blogspot.ca/ AG
http://pinspirationalchallenges.blogspot.ca/ AG

Monday, April 20, 2015

Manly Monday Iris Truck

Welcome back to Manly Monday. I've gathered up a bunch of masculine cards for you. Click on the blog name to be directed to the card. 


Weren't those fabulous. I love to have all this inspiration in one spot. If you like what you see please consider following my blog.

In today's card I used an truck iris folding stamp by Stamp N Plus. 


I did the iris folding with a plaid patterned paper which isn't my favorite but it will do. The stamp was stamped with Hero Arts ink and colored in with Smooch ink by Clearsnap. I inked the edges of the truck with distress ink; Tumbled Glass for the sky and Antique linen on the road. I added gear dies by Spellbinders to the left and a Celebrate die by Die-Versions. All of the die cuts use Recollections cardstock. The patterned paper is by Die Cuts with a View.


Thanks for looking.