Wednesday, November 30, 2011

Christmas card with flowers

**Click here for my Challenge with a prize

I made this lovely card to sell at the local scrapbook store. Apparently the ladies like cards with flowers. I hope they like this one. I sure do. The best part about this card is that all the paper used was scraps I found in my stash. It makes me feel good to use those little pieces that I save for "someday". Thanks for looking.

Challenges:
http://craftycreationschallenges.blogspot.com/(W#147)-Christmas with a sentiment

Tuesday, November 29, 2011

Friends card


**Click here for my Challenge with a prize


Today is my birthday. Yahoo, right? I've been celebrating all month with random online purchases. The credit card bill came over the weekend and it too the happy out of the birthday. Lol
Anyway, I really love this card so what better day to show it to you then today. Thanks for looking.


Challenges:
http://partytimetuesdays.blogspot.com/(TU)-Anything goes
http://craftybootschallenges.blogspot.com/(M)-Anything Goes
http://craftycardmakers.blogspot.com/(M#57)-Heat embossing
http://hippitywithippity.blogspot.com/(M#10)-Embossing
http://www.stampsruschallenges.blogspot.com/(M)-Embossing

Monday, November 28, 2011

Manly Monday Aluminum foil embossed background

This week's Manly Monday is brought to you by Aluminum Foil because that is exactly what I used in my embossing folder in my Cuttlebug, :) The toolbox and screw stickers are by Jolee's, die cut by Spellbinders, and patterned paper by DCWV. Thanks for looking.


UPDATED LINKS, PICS, WORDING, AND LABELS 10-4-21

Sunday, November 27, 2011

Tea Time Card for I Did it Creations Challenge

**Click here for my Challenge with a prize

This week at I Did it Creations our theme is Eat, Drink and be Merry.
We are sponsored by Floppy Latte Designs where I received this great teacup image. Check them out 
http://www.floppylattedesigns.com/catalog/.


Thanks for looking.

Saturday, November 26, 2011

Challenge with a prize

I would like to do a grab bag challenge with a prize. I have some Tim Holtz stamps and various other goodies up for grabs.
**Added 12-8-11 I'm working on getting a gift certificate to add to the prize package.

Why do this?

*I'm close to reaching my 1000th post on my blog.
*My birthday is Tuesday.
*I have 145 followers. Thank you:)
*I'm going to be published for the very first time.
*I like to give things away to crafty people that will appreciate it.
*It's the season of giving.
*It would be great to see you use the tutorials I have been putting together.

Take your pick.

What do you have to do?

1.) Use one of my Fabulous Friday Fun Tutorials (links listed below)
Folded box
Alcohol inks
Crackle Paint
Glossy Accents
Painting with Distressing inks
Shaped card with Spellbinders dies
Inking dry embossing folders
Liquid Pearls
and tutorials from the month of December

2.) Become a follower of my blog if you are not already

3.) Mention the contest and link back to this post on your blog

4.) Leave me a link to your posted project  before January 1st, 2012 at noon EST
*(not a link to your entire blog and no backlinking)

5.) If you don't have a blog please email me your creation (see right sidebar)

I can't wait to see what you come up with.

Christmas card trio

I made this set of Christmas cards using a package of Jolee's stocking stickers. The ribbon is by American Crafts and the patterned paper is by K and i Memories. The embossing folder is by Provo Craft. The card bases are by Halcraft. Noel stamp by The Paper Co and ink by Memento and distressing ink by Ranger Industries. Thanks for looking.


Challenges
http://fairytale-challengeblog.blogspot.com/(F#29)-Christmas
http://thepoodlesparlour.blogspot.com/ (F)-Christmas
http://simplycreatetoo.blogspot.com/ (F#1)-All about Christmas
http://www.sewmanychallenges.com/ (F#76)-Twine
http://totallypapercrafts.blogspot.com/ (F#94)-Christmas
http://www.charismacardz.blogspot.com/ (T#46)-Snowflakes
http://delightfulsketches.blogspot.com/ (W)-Red and green
http://www.sarahhurleychallenges.blogspot.com/ (W#54)-Buttons

Friday, November 25, 2011

Fabulous Friday Fun

This week I am going to show you a fun technique of folding your paper to create a point of interest or embellishment for your project.

You need:

A square piece of either a double sided piece of patterned paper
a single sided piece of patterned paper that you can stamp on the back
or a piece cardstock.

I used a piece of patterned paper on one side and cream on the other. The size I used was 2 3/4.

This first picture is the patterned side of my patterned paper.


The other side is cream and I wanted to stamp a pattern on it. Here is the stamp I used:


I flipped the stamp over so the image was facing up and pressed my ink pad to the stamp.


With my stamp full of ink I took the piece of paper and placed it on top of the stamp. Be sure to hold the paper in place with one hand and run your fingers across the back of the paper with the other hand.


Here is a picture of the first time I stamped the paper.


I need the whole piece of paper to be stamped. Ink the stamp again and line it up the best you can.


Not bad but I still need those edges stamped as well. Repeat stamping just the edges. It's not of great concern if the image doesn't line up exactly.


Next we need to fold our square. Take two edges and fold them inward to make a point.


Proceed with folding the other two ends. You can see I got some ink on the patterned paper and that will be hidden with the next folds. If not use ink to ink the edges or a distressing tool to ink the edges and make it look like you wanted it that way:)


Next we will fold the four tips back onto themselves. You can use a bone folder to do this but personally I just eyeball it.


Next thing you need to do is adhere it. I open the folds and run a tape runner along the inside of the first fold as seen below. It's hard to see but the adhesive is a bunch of little lines in a row.


Then I use a glue stick to adhere the smaller tip.


Do this to all the edges to make your square.


Then I assembled my card together by adding a cake sticker to the center of the of the folded square.


Here is my final card using the square and an embossed sentiment.


I hope you have enjoyed this fun paper folding technique to create a visual interest point to your next project. If you use this tutorial on a project, post me a link in the comments field and I will send you a prize. You must be a follower of my blog to be eligible and so I can get a hold of you.

Supplies used:
Patterned paper for square by Sunborn and for background of the card by The Paper Studio
background stamp by Anne Griffin and sentiment by Stampin Up
Ink by Versa Mark and Stampin Up
cardstock by Sunborn and The Paper Co
embossing powder by Stampendous
Sticker by Jolee's/ EK Success.

Thursday, November 24, 2011

Thanksgiving Day Cricut Cornucopia card

I am very thankful for my little family. My husband is so amazing and gives me unconditional love every day. My baby girl is such a joy to have around. I can't imagine life without her. With all that being said I have a Thanksgiving day card to share today. I made the cornucopia and leaf with my Cricut's Autumn Celebrations cartridge. The sentiment stamp is by Stampin Up and it's embossed with Ranger embossing powder. The background stamp is by Anne Griffins with ink and Perfect Pearls by Ranger Industries. I used green Glimmer Mist by Tattered Angels on the green cardstock behind the sentiment. Thanks for stopping by. See you tomorrow with a new tutorial.


UPDATED PIC ON 10-4-21

Tuesday, November 22, 2011

Butterflies

I made this card for a call and it didn't get picked but that just means I can show it on my blog.
Patterned paper by Glitz and flourish by Studio 112. All the rest is stuff from my stash.
Thanks for looking.


Challenges:
Creative Inspirations(SU11/20)-thanks

Monday, November 21, 2011

Doily, Ribbon, and brad make a green Thank you Card.

This week I have to cancel Manly Monday. This week only. I have two big things to post today.

I won a Guest Design Team spot at Die cut Dreams from the Feline Playful blog hop in September.
This week's challenge is a Thank You card using circles. The sponsor is Sentiments 4 You, which has a fabulous selection of sentiments and much more. Here is my card:


I used ribbon by Webster's, patterned paper by Crate papers, stamps by Martha Stewart (doily) and Lawn Fawn (sentiment), cardstock by Recollections and Bazzill, embossing powder by Stampendous and ink by Ranger Industries, Stampin Up and Versa Mark.
Thanks for looking.

Sunday, November 20, 2011

Snowman Christmas Card for I Did it Creations Challenge

This week at I Did it Creations our challenge is "SNOWMEN" and we are sponsored by Robyn's Fetish. It's a great time to buy digital stamps at Robyn's Fetish with all products 35% off until the end of November.


Cardstock by HL, OTCo, Recollections, Provo Craft and Pioneer. Stickers by Chatterbox and Hobby Lobby. Liquid Pearls and distressing ink by Ranger Industries. Stamp by CTMH and ink by Stampin Up. Border punch by EK Success, scallop oval made using Cricut and oval with a fancy edge is by Spellbinders. I used Copic markers to color the snowman in. 
Thanks for looking.

Saturday, November 19, 2011

Happy Thanksgiving

Another Thanksgiving card to share with you today.


Basic Grey patterned paper Curio
Colorbox Chalk ink
Inkadinkado stamps
Embossing folder Distress Stripes
Cricut cartridge Autumn Celebrations
We R Memory Keepers floss

Friday, November 18, 2011

Fabulous Friday Fun

UPDATE LABELS, LINKS, AND PICS ON 10-1-21
This week I am going to touch on Alcohol Inks by Ranger Industries. It is hard to show the process in still pictures since you have to work kind of quickly. I learned how to use alcohol inks from a scrapbook store owner. It's different from the way Tim Holtz demonstrates them in THIS old YouTube video. It just goes to show there's more than one way to use products. I think everyone likes to learn new ways to use products they may already have or were thinking of trying.

Here's a little bit of information about this card that I'd like to share with you before we start. First, I had this image from Robyn's Fetish  (see below) already colored in and wanted to match the green in the leaves to the paper. I have the alcohol ink color Citrus but the green I was looking for was more of blue-ish green. We were all taught at a young age that yellow and blue make green and so I was willing to mix Sailboat Blue and Sunshine Yellow to find the color that matched my colored image just perfectly.

Second, I didn't buy a blending solution or the tool to apply the alcohol inks. The store owner taught me that regular under your bathroom sink alcohol would work for a blending solution. I had an empty bottle from a dollar store three-pack that I poured the alcohol into and that serves as my blending solution. Then I had my husband cut me a few pieces of wood and put some self-adhesive Velcro on them to act as my tool. I bought some cheap felt from a craft store and cut squares the size of my block. The felt sticks to the Velcro making this a cheap alternative to the Ranger tool. Here's the thing, I've never used the Ranger blending solution or their tool and they may work better than my homemade alternatives. But for cost sake, I would rather be able to buy different colors of alcohol ink with the money I saved rather than the tools.

OK, on with the show!!

Supplies:
1.) I used this image from Robyn's Fetish:
2.) Inkessentials Glossy paper
3.) Alcohol ink pack 
4.) Pearl Mixative
5.) Copic markers G02, G05, G07, R24, R29, R39 and R89

The rest of my supplies came from my stash.

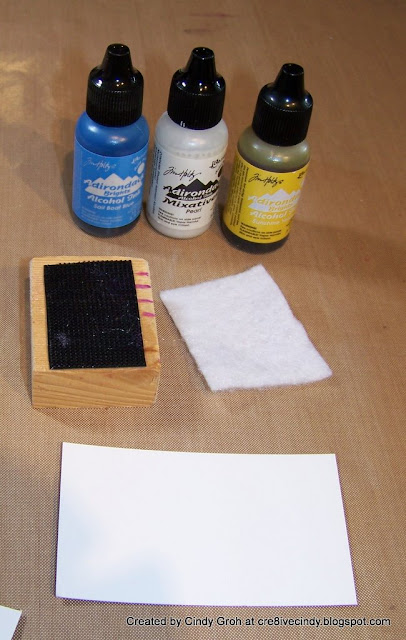
Let's begin. This first picture shows my alcohol inking supplies (minus the "blending solution" AKA rubbing alcohol).


Then I'm going to mix the blue and yellow together on the felt. I started by lightly squeezing the bottle in three different places on my felt like my picture shows.


After the blue, I added the yellow to the felt and then some alcohol to the felt as well. On the paper, I place little drops of Mixative all around. It gives the whole paper a sparkle instead of just a couple areas that you get when you add it to the felt.


From there you just twist the felt block onto the drops to mix them all together. For my first attempt at matching the green I ended up with this:


It was too yellow to match my holly leaves. I cut another piece of paper, added more blue to the felt than yellow, and came up with this:


So you are probably thinking they look pretty similar. Here is a picture of them side by side:

Now you can tell the top paper is bluer than the bottom paper. As you may recall I said you have to move quickly with the way I do it and the pictures prove that. The small circles you see in the papers are the mixative. If I were to blend the colors faster before the mixative absorbs into the paper, I wouldn't have those circles. I would come up with a more even distribution.

Here is a close-up of my card with the alcohol inked paper (the top paper from the last photo). Once it dries and with a little strategic placement of embellishments you can't see the circles of mixative on the paper as much as you do in the pictures above.


Here is my card all done (the sun decided to poke out for the picture):


I think the green in the holly leaves matches the paper well. I hope you enjoyed this brief tutorial on how I used alcohol inks on my card and you will be inspired to pull yours out for your next project.

Remember if you do use alcohol inks on your project and post me a link in the comments field of this post I will send you a prize.

Thursday, November 17, 2011

Circle Christmas card

I made this fun shaped card for something different. My creative juices are not flowing lately. I tried to do different things to get them going but I still feel like I am in a rut. 
Thanks for looking.


Challenges:
Stampaive and More(W#156)-Anything but square
Whimsy Stamps(W#15)-Flower power


Tuesday, November 15, 2011

Happy Thanksgiving

I made this Thanksgiving day card and thought I'd share. I use dthe Cricut cartridgeAutumn Celebrations for the leaf. The square paper is by Crate Papers, stamp by Stampin Up, orange paper by Provo Craft and brown PP by Recollections.


Monday, November 14, 2011

Robyn's Fetish Christmas stamps

Today I bring you a new stamp from Robyn's Fetish. She has just released a new set of Christmas digital stamps for this holiday season. Be sure to stop by her store for all kinds of digital stamps from animals to holidays. Right now is a great time to buy with images 35% off until the end of November.


I used patterned paper by Bo Bunny and Stampin Up, water color paper from Hobby Lobby, distressing inks, Liquid Pearls and Perfect Pearls by Ranger Industries, rub-ons by Bo Bunny and Fancy Pants and the card base is by The Paper Co.
Thanks for looking.

Sunday, November 13, 2011

I Did it Creations Challenge

This week at I Did it Creations our theme is bears and we are sponsored by JLJ Designs. I picked out this cutie bear with stitching and decided to make a baby card.
The bear was colored in using Ranger Distressing inks and Perfect Pearls. The circle was cut out using my Cricut and the scallop circle is by Spellbinders. The patterned paper is by K and i Memories and epoxy stixker by K and Co. The sentiment stamp is by Sweet Stamps. It was a prize I won from them. Thank you for the wonderful stamps they sent me. The pink ink used in this card is Spun Sugar by Ranger. Thanks for looking.


Manly Monday

After a horrible weekend I think I'm glad it's Monday. To start this week off on the right foot, Manly Monday. Last weeks card did not get the proper approval from the husband but I liked it so I posted it. This week I took him every step of the way when making my card. My post is inspired by opening deer season which starts tomorrow. Enjoy.


supplies: Stamps- Stampin Up, Lawn Fawn, Fiskars and TPCo, sticker by Mrs Grossman's (1995), ink-Ranger Industries, orange paper-Creative Memories, white circle-Jillibean.
Thanks for looking.

Friday, November 11, 2011

Fabulous Friday Fun 11-11-11

This week for Fabulous Friday Fun I am going to show you a few ways that I like to use Crackle paint by Ranger Industries.

When my seven year old nephew was over we played with Crackle paint and he kept waiting for the crackle sound. To his disappointment there isn't a sound that goes along with it. The paint dries on the surface with a crackle texture or pattern. The more paint you use the more the finish will be crackled. 

Crackle paint comes in many of the distressing ink colors including a clear. The plastic jar of paint comes with an applicator on the lid. This makes it so easy to use. Open the lid and paint on to your surface. I would suggested placing wax paper or something similar under your painted object. It will dry on the wax paper and then come off it very easily.

There are many things you can paint with crackle paint:
*chipboard
*stickers
*patterned paper
* cereal box board
*cardstock
*die cuts
*whatever you can imagine. 

Here is a picture of two that I have and the applicator out of the jar.


I made a few examples for you to see the effect you get when you use crackle paint. This first one I used the crackle paint on the chipboard leaf. I was very generous with my paint on this piece giving the leaf a realistic effect. The color I used on this example is Old Paper.

Supplies: Patterned paper by Basic Grey, cardstock by Halcraft and OTCo, stamp by Hero Arts, ink by Ranger, leaf die cut by Cricut Plantin Schoolbook cartridge and lace is unknown.


You can see on the close up that a little bit of paint is still on the edge. If you want a smoother edge simply flick off those extra flecks of paint off with your finger or you could use a sanding tool too. I find that when I use chipboard I like the edges to appear finished and not raw chipboard color. Therefore when I use the crackle paint I try to get the edges painted too. It helps that the colors of crackle paint match the distressing inks because I have used the ink to finish my edge as well.


This next card I also used chipboard from Colorbok. Again I applied the paint on quite heavy so they would have a large amount of crackle to them. This crackle paint is color Old Paper.

Supplies: Patterned paper by Basic Grey, cardstock by Halcraft and Bazzill, chipboard corners by Colorbok, chipboard circle by Making Memories, sticker by Bo Bunny and brad is unknown.


On this next card I used cereal box board to paint and create the three panels. I ran the center panel thru a crimper to get the wavy texture. Then I painted it with crackle paint lightly to get less of a crackle effect. The colors from left to right are Brushed Corduroy, Fired Brick and Picket Fence. 

Supplies: Sticker by Jolee's, die cuts by Spellbinders, ink by Versa Mark and Ranger Industries, stamp by TPC Studio, and embossing powder by Stampendous.


This last example I painted Clear Rock Candy crackle paint onto patterned paper that I had cut into a tag. The sentiment had been stamped onto the tag before the paint was applied. The border was stamped after the paint had dried. I used Colorbox Chalk ink which worked great because it dries so quickly. Pigment inks would take forever to dry and water based ink would just rub off.

Supplies: Patterned paper by Creative Memories, stamps by Lawn Fawn and Fiskars, ink by Colorbox and eyelet is unknown.


If you use crackle paint on a project this week post a link in the comments section of this post for your chance to win a lovely gift. You must be a follower of my blog in order to win a prize. That's all though. Sounds easy to me. Thanks for checking out today's FFF.

Many of the supplies that I have used for this project can be found in our OUTLAW WOMEN SCRAPBOOK EMPORIUM.

It is a Yahoo Group that you can join if you would like to be a part of a fabulous group of people who chat about everything under the sun, hold swaps and challenges, too.

It is a discount club, so once you are accepted, you can get great discounts on so many paper crafting supplies, like those that I used for my project.

We hope that you join us there for a lot of fun and learning!

Just click on OUTLAW WOMEN SCRAPBOOKING EMPORIUM and it will take you right to the HOME PAGE!


See you all next Friday for another FABULOUS FRIDAY FUN!

Cindy