Showing posts with label sewing. Show all posts

Tuesday, November 28, 2023

Christmas Ornaments Card


I fussy cut these ornaments from patterned paper by The Paper Studio at Hobby Lobby. I then added Stickles to their design. I used my sewing machine to quickly sew the lines in to look like they are hanging down. The Hero Arts sentiment stamps were stamped onto cardstock and cut them out to fit the card’s design.

 Thanks for looking.
Here are some other Christmas cards that have sewing on them. Keep in mind that these are OLD cardso
3rd card down (I hand sewed the floss into the holes of the border punch.)


Tuesday, March 21, 2023

Sew Lovely Border to Background cards


The border stamp that I used to make a background is by Stampendous. I upcycled a thank you card from the funeral home. They have a nice dry embossed frame. 


The card above was stamped with black ink and colored in with Copic markers. Then I matted the panel onto red and black cardstock before adding them to the base. The sentiment is a Fiskars stamped in black on red cardstock.


For the card above, I used different ink pads on the same border stamp using the following colors: SU Daffodil Delite, SU Pink Passion, Hero Arts Tomato, SU Ballet Blue ink pad infested with other blue inks, and the last blue is HA Cornflower. 

I heat-embossed a Lawn Fawn sentiment, pink powder onto the vellum. (I used vellum because I was covering up an oops but didn’t want to cover up my background.)


Do you see my error? Thanks for looking have a great day.

Sunday, October 16, 2022

Yellow Balloon Birthday Card


These are not my favorite cards but I made them. This blog is a place for me to look at all the things I've made for the last 13 years. I wouldn't be true to myself to not have the ugly cards posted too. Creative Memories sticker borders. Sizzix die cut. Distress ink. I added a sentiment over the wrinkle in the die cut.

Stampin Up-polka dot paper. Tag Creative Memories. Spellbinders doily die cut. Thanks for looking.

Monday, May 30, 2022

Manly Monday Happy birthday Cards

Patterned paper by Studio G. I did some sewing down the center to join the papers together. The yellow foam scalloped circle punch is by Stampin Up. The sentiment is by Echo park. Thanks for looking.

Thursday, April 21, 2022

Birthday Card Orange balloon cards

I think the top card is my favorite of all of my balloon cards. The patterned paper by Studio Calico was inked with distress Inc. The fence at the bottom is by Tim Holtz. The border punch is by Martha Stewart. The border patterned paper is by Colorbok.

For the second card, a used patterned paper by Stampin Up. The balloon is on a Sizzix die cut. I inked the white cardstock to look like the sky and the grass. I used my sewing machine to make a string for the balloon.

After I took the picture noticed a blemish in the white die cut. So I added this die cut sentiment to cover it up. I used a brad for the dot on the i.

Thanks for looking.

Monday, April 11, 2022

Manly Monday Sewn Banner birthday cards


Cindy Cre8iveCindy

The patterned paper of the blue card with screw heads is by Adorn It. The pennants are Hero Arts stamps and I stamped the Close to my Heart alphabet letters on top of each. I use my sewing machine to connect the penanent across the top with blue thread. The birthday die cut is by Papertrey Ink. Problem with doing these banners on a card is that they end up being five and 3/ fours x 4 instead of my usual 5 1/2 x 4. So I have to make a new card base for them which is something I’m not used to doing. I buy my card bases from Michael’s they come with the envelopes and although they are thin and not the larger pound cardstock they are convenient. Also, I don’t like to make my own card bases. The cutting, scoring is not the greatest on my wrist, then you have color choices, and then you have to buy envelopes. Nah. I’ll buy the pre-made. As a matter of fact, I was running out of white cards so I purchased enough packs to get free shipping from Hobby Lobby. Well Hobby Lobby cards are size 4.25 x 5.5 and Michael’s card size is 4 x 5.5. I should write a post it note on my computer to be reminded.

I’m entering the Simon Says Stamp Happy Birthday challenge.

Tuesday, February 22, 2022

Blue and Yellow Balloon Birthday card


I’m using those Stampin Up birthday stamps again. I have a bunch of cards that I made with that stamp set and I’ve decided not to post them all at once. I find that when my posts contain a ton of cards, I don’t really look at all of the them. Lol. 
So besides the balloon stamps, I used a Lawn Fawn Happy stamp and die. The birthday die cut is by Clearly Besotted. The patterned paper is unknown. I did use my sewing machine for the strings of the balloon. Thanks for looking.
I’m entering these challenges:
Fab and funky Birthday 
Polka doodles anything goes

Tuesday, December 21, 2021

'Tis The Season Banner card

The background is a Stampin Up stamping wheel the same color as cardstock. The sentiment is a Cricut cut and inked. The banner is a punch from Stampin Up that I was able to match with a Hero Arts pennant stamp set. The trees were a Cricut cut. I sewed the top of the banner with my Husqvarna sewing machine.
Thanks for looking.

Thursday, August 19, 2021

Blue Sewing Swirls Happy Birthday Card

The swirl design that I poked into cardstock came from a stencil by Oriental Trading Co. I backstitched the design with blue floss by DMC. 
I show a picture of the stencil at the end of the post.
The sentiment stamp is by Lawn Fawn.
The blue paper is an old folder.


I love the beautiful card and can only imagine the joy it would bring to someone receiving it. But I hate poking the holes. Tedious and hard on my wrists and right elbow.

Thanks for looking


            Blah, Blah, Blah...
My card today has a little story. I’ll keep it brief.
About 4 years ago I used a stencil by Oriental Trading Co. The stencil is designed for you to poke the holes of the design through cardstock and then to do a backstitch in the holes and so I did just that on this paper/cardstock.
This paper has traveled around my craft room being placed in this drawer and then moved to another drawer.
So here’s my first problem with this card front, it was an odd size, and a lot of times it wasn’t bagged up.

 It’s ridiculous because I have a lot of baggies. When I would find it I just could not figure out what I wanted to do with it. It’s so pretty and time-consuming and maybe I didn’t want to make it into a card and give it away.

Well, the latest time that I moved it, I noticed that the sewing was starting to come loose. 
It looked frazzled. 
It was time to make it into a card. I didn't want all of the time spent on this card to be wasted.
Thanks for looking.

Thursday, December 03, 2020

Thinking of you With some sewing in it Card

The flower Stamp is by Stamp N Plus.


The Sentiment stamp is by Forever in Time and it is on Die Cuts With a View patterned paper.
I sewed around the edges for something different.

The haystack patterned paper is by ProvoCraft.


Thanks for looking

Monday, September 07, 2020

Mollicone Wedding 1963 Layout

I know this isn't a Manly Monday project but it's the day they got married 57 years ago.
This should be the end of 1960 scrapbook layouts, hopefully. I'm going to start bringing in the '70s layouts and try to go more in chronological order.

The patterned paper is by My Mind's Eye
Cardstock from my stash
The gold flourish die-cuts at the bottom are very beautiful 
The off white flourishes were pieces that fell off and were on the floor from a different project. A card I think. 
The date along with the above were cut out with my Cricut. 
The names of the bride and groom are stamps by Sizzix. The and in between is a sticker.

The arrow punch is by Stampin Up and its off white cardstock was overspray from a different project too. It is Glimmer Mist from Tattered Angels. 
I was asked to point out the in-laws in photos like this. I know where they are but future generations even my SIL didn't know where they were. So I'm using her suggestion/good idea.
.


I sewed a pocket so I could include these fun ephemera. 


So check out this amazing ephemera that was with these wedding photos. I don't think the book has ever been opened. I tried to open it and the pages stuck together like how a new book does.
The problem-the book would fall to the bottom of the pocket.


I tried putting chipboard into the pocket to hold the book and that was a fail.


So without digging around forever, this is the first paper clip I came to and it works for me.
I put it into a baggie to preserve it.


I appreciate you stopping by today and thanks for looking

Sunday, July 26, 2020

23rd Wedding Anniversary

Yup, you read it correctly, I've been married for 23 years. That means I have had my married name longer than my maiden name. 
I'm sharing some layouts that I have finished in the past month.

These are my in-laws. Stampin' Up paper and border by Martha Stewart

Pocket page on the other side


They put the wedding announcement in multiple papers back in 1961.


I used some October Afternoon patterned paper and borders by Martha Stewart for the pocket page


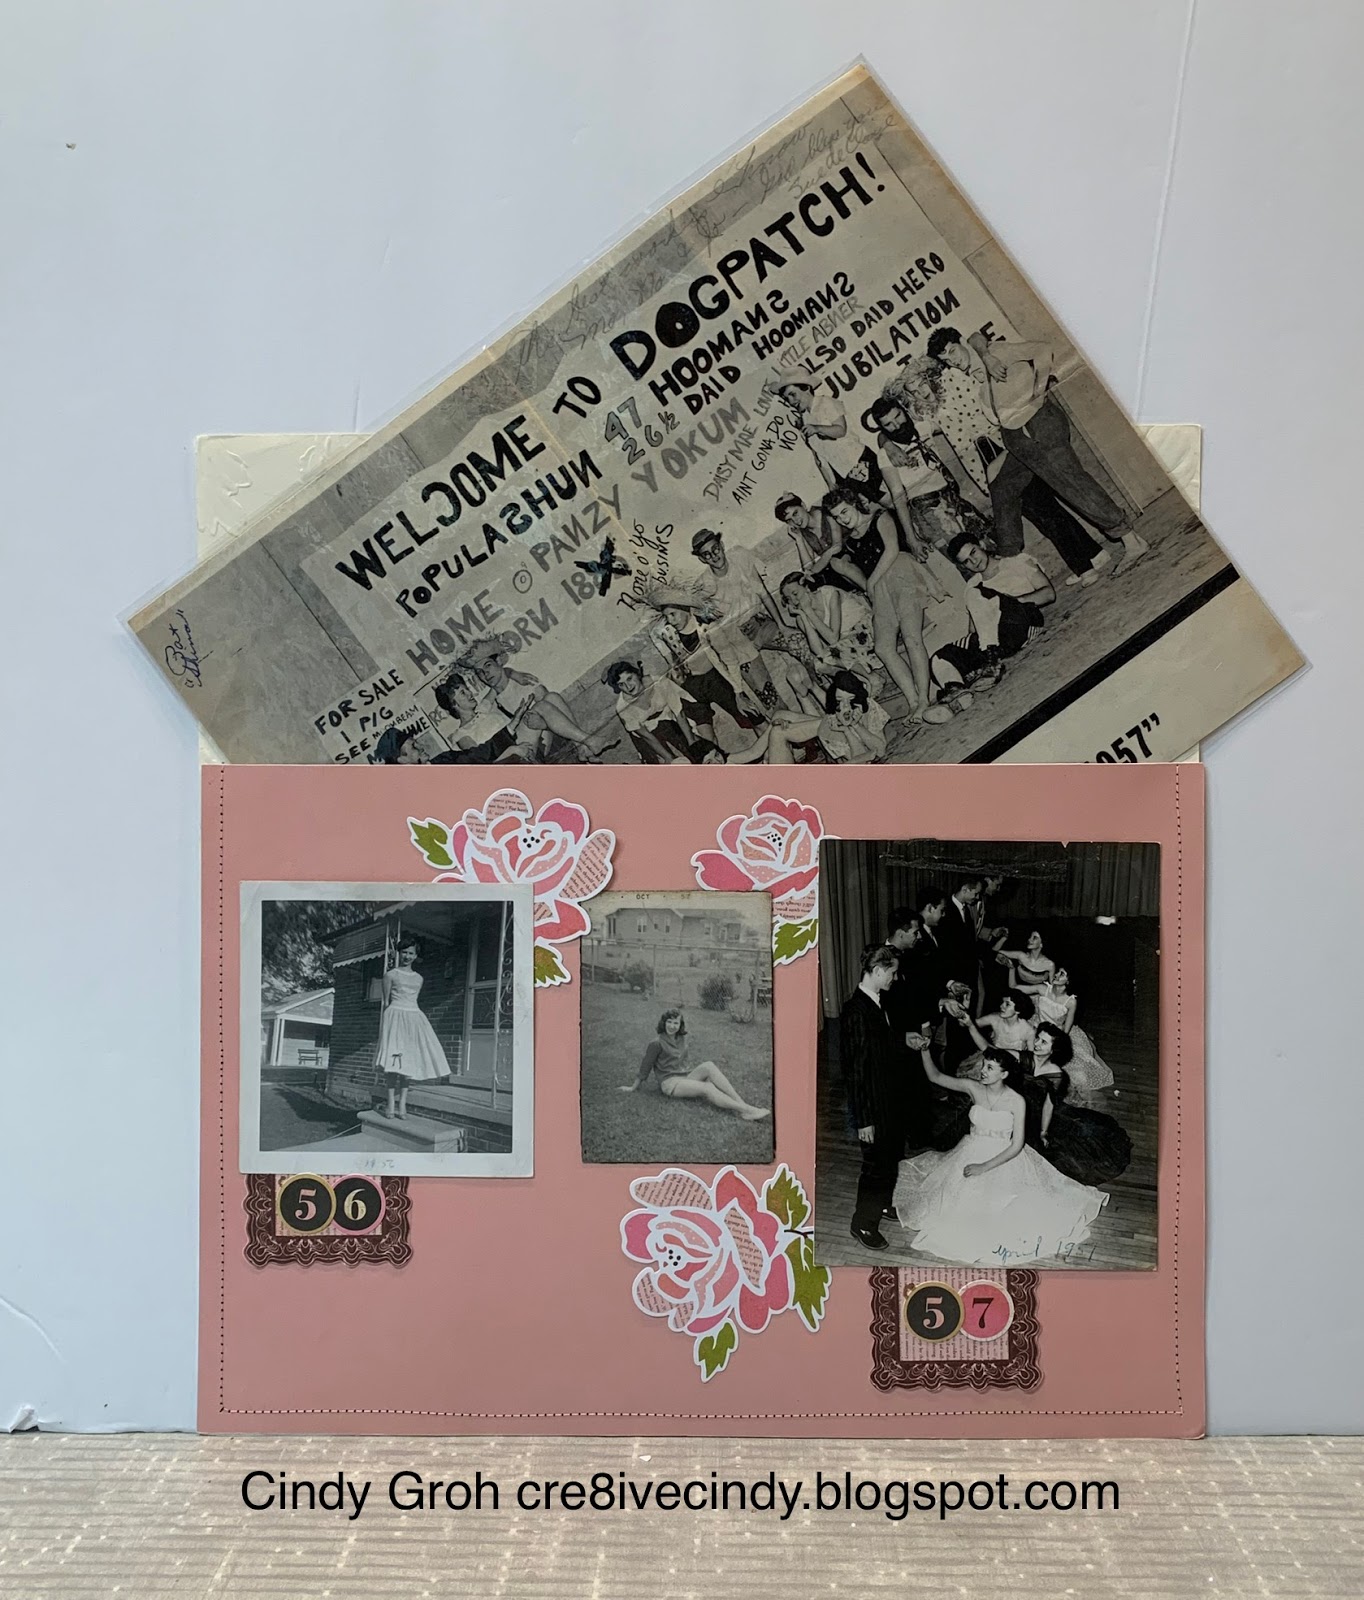
This next one is my MIL's younger sister.
Patterned paper by Colorbok called Wild Roses
The sewed on the vellum behind the bride which made a pocket for the invitation.
Note to self, don't use vellum as a pocket. It is more likely to rip.
I need to add the date somewhere


The heart brad allows the invite to hinge and show the reception card.


My FIL is the best man at this wedding. The kids called him uncle Paul
Patterned paper from the same as above.
Letter Stamps from Stampin Up
Border punch by EK Success.
Small die-cuts on each said are by Cricut. There is also a brown sticker that covers the seam. The love paper is by Making Memories (I think)
It is the pocket for the invitation.
I laminated the invitation and left a border so I could cut a slit on the top.
I put a die-cut through that slit and folding it in half.
I stamped the "Two Shal Become One" on one side.
Then, I adhered the two halves of the die-cut together making it pull out mechanism.
In time, it will probably rip but it looks cute now.


Thanks for looking

Tuesday, July 07, 2020

University of Detroit Layout

Another layout for my MIL's book.  
Nothing really special. 
I sewed a pocket for the paperwork that
 I found and laminated.
The title and the pen writing is from my Cricut.
Other than that it's cardstock. 


Thanks for looking

Saturday, June 20, 2020

Deep Red Stamps Potted Plants cards

I used a stamp by Deep Red Stamps called
I colored them in with Copics and watercolors
The sentiment stamps are by TPC Studio
The label die is by Cuttlebug
The embossing folders are by Darice and Cuttlebug
The ribbon is from my stash and I did some machine stitching around the edges of the first two cards.


Thanks for looking

Friday, June 12, 2020

Deep Red Stamps Victorian Seamstress card

I used a stamp by Deep Red Stamps called 
I colored her in with Copic Markers
The sentiment is by Clearly Besotted
The die- cuts are by Sizzix and The Paper Loft
I made the patterned paper using a stencil by The Crafter's Workshop and distress ink
I sewed around the image.


Thanks for looking

Friday, April 17, 2020

Mimi’s sophomore year layouts

My layouts are of my MIL and will be placed into the family albums.
The alphabet stamps are from Michael’s 
The die- cuts are by The Girls Paperie and Cricut Cut flourishes.
The flourish by each of the lists, point to her name. 
The patterned paper is by K and Co and there’s some old Provo Craft Paper in there too.
I did a little bit of inking but nothing fancy.


I sewed a pocket into the other layout to hold a few ephemera from her school years.


Thanks for looking

Tuesday, March 17, 2020

St. Patrick's Day Layouts

I used shamrock stamp by SNP (no longer in business)
Inside each shamrock, I stamped Lawn Fawn alphabet stamps letter with the month and year.
The graduation paper is by Karen Foster.
I sewed around the edges of the paper and created a pocket for the commencement program and a few other things.


The shamrock was the mascot of the East Detroit High School.
This was their newspaper and my MIL was news editor.
 Again I made a pocket by sewing the edges. I
 laminated the article and then that's her senior picture.


Thanks for looking