Thursday, June 30, 2016

Happy Together Card

Today's card could be used for a wedding or an anniversary. The grey and cream colored cardstock and the grey patterned paper are all by Recollections. The red cardstock by Stampin Up is half of a die cut I cut out with my Cricut. The cream colored die cut is by Spellbinders and the hearts die cuts by Lawn Fawn. I covered all the tiny stars with silver powdered chalk and paint both by Stamp N Plus. The sentiment sticker is by Karen Foster and I'm not sure who makes the red strip of paper in the center.


Thanks for looking.

Wednesday, June 29, 2016

Sleigh Ride Card

I know it's kind of early-like six months but I'm sharing a Christmas card today. I made a handful of Christmas cards last week so when the holidays come I don't get overwhelmed or get sick of making them. 

I start with a pre-made white card base size 4 x 5 ½ by Recollections and adhere a piece of green paper to the front (Sunborn). To create the embossed background I added gold pigment ink (Galaxy Gold/Tsukineko) to the snow patterned embossing folder (Darice). I placed a white cardstock inside the folder and ran it through my Cuttlebug. Let it dry completely. 

On a small scrap of white cardstock, I stamped the sleigh ride stamp with green ink by Stampin Up. This ink worked really well on this solid stamp because it is a newer pad and is still very moist with ink. I matted a piece of patterned paper (We R Memory Keepers) behind the image but to only show on the top and bottom. Once the embossed paper dries, adhere the image to the top of the card and add a sentiment and gold sticker below the image.


Thanks for looking.

Tuesday, June 28, 2016

Red, White and Blue ATC's

I made two sets of red, white and blue ATC's (Artist Trading Cards) both of which use stamps by Tim Holtz and have the square embellishment. I punched a large square out of white cardstock and inked it with blue distress ink. I set it aside to dry. Then I punched a smaller white square and set a large red brad in the center. Once the blue square was dry, I adhered the smaller square on top of the blue square with 3M foam adhesive. 

On a separate piece of white cardstock I stamped the "Carte Postale" stamp in the same blue ink and then on the two outside cards I stamped the word Artist in red ink. The bottom blue swirls and the red polka dot patterns that are added to the bottom and right are two different washi tapes. I adhered the square to the bottom right and added some sequins to jazz it up a bit.


The center card has a few differences:
*I stamped birds on a wire in red at the bottom
*the red washi tape is at the bottom
*the right side is home to a piece of blue cardstock that has been dry embossed by a Darice edge embossing folder
*the red glitter on the right side is Scrappy Tape that I covered one side with red glitter


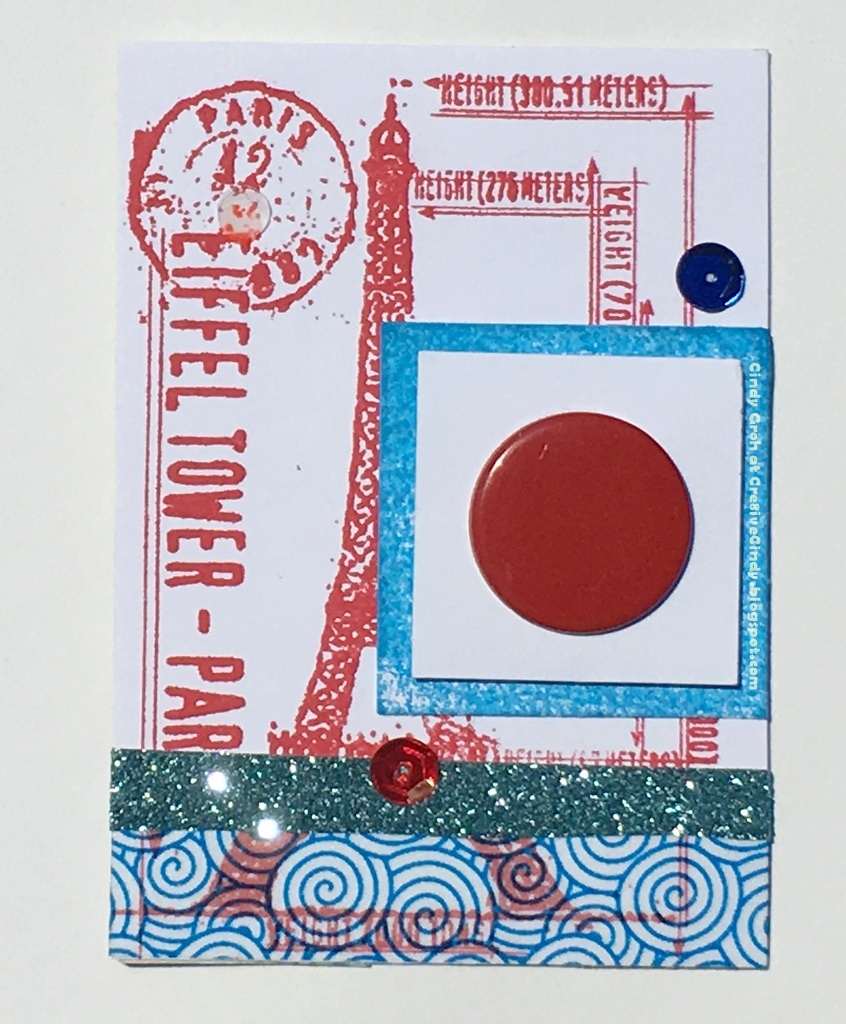
For the second set -outside two cards, I stamped Eiffel Tower in red ink (SU) and used the same swirl washi tape on the bottom. I covered the seam of the washi tape with some blue glitter tape that I cut in half because it was the same width as the washi tape and I didn't want to cover up too much of the Eiffel Tower. I finished the cards up by adding the same square and sequins as the above cards.


The center card has a few differences:
*I stamped off the red ink on the Eiffel Tower making it lighter
*there's a piece of blue cardstock behind and on both sides of the stamped image-no embossing
*the red polka dot washi tape, which is not on the other two cards, has been added to the right side 


Thanks so much for looking.

Monday, June 27, 2016

Manly Monday

Hi all. 

I'm recently struggling with making cards and I think it's because I'm no longer selling them in a store. Any new cards I make {I feel} must have some sort of purpose. Otherwise, I run into storage problems with these cards that I don't know what to do with or who to give them to.

My next problem is, I feel like all my cards look the same weather that be the same design/layout or the techniques or even the same colors. I'm not getting the wow factor lately from my creations. {OK the lighthouse card turned out really nice}. 

Next problem was my workflow pattern in regard to product placement {that sounded all professional;)} I've made some organization changes in my room which, helped me to realize all the fun stuff I have all around me. Although I have a crafty wish list in the back of my head, I don't feel like I need to run out and buy more to be a better card maker or scrapbooker. {besides, you kind of need a job for that;)}. 

Finally, when I sit down to craft, my desk looks like a storm came through and threw things everywhere. I'll pull stuff for five different card ideas that I have, has now taken over my desk making the situation stressful, overwhelming, and giving me anxiety. 
Here's a wonderful example of my desk at a time when I wanted to make a bunch of Manly Monday cards to get ahead. This is what happened:


I believe there are three cards started in this photo plus I know there are three cards not in the picture I counted seven images that are ready to rock out on a card. I will say this, the photo shows only masculine products, My heart was in for this post but with life always going on, enter big sigh, the card didn't get finished, YET. It's still early meaning it's before midnight. 

Thanks for sticking with me. If you have the same issues please leave me a comment or write me at email, grohcm@gmail.com 
I would love to chit chat and find out what works for you in a rut situation

Do you know of a website that helps people get out of their creative rut? Please share.
because I am in need.
Thanks for stopping by.

Sunday, June 26, 2016

Doily ATC's

There was another theme for the ATC (Artist Trading Cards) swap at scrapbook.com; Doilies.

I stamped the larger Martha Stewart doily stamp with purple ink (SU-Lavender Lace). The inside doily was stamped off before stamping it into the center of larger doily (ink also by SU-Sage Shadow). 

I sprayed the whole card with Glimmer Mist (Purple Pansy) with one of their stencils on top. Then I roughed up the edges with  a pair of scissors before inking the card with Antique Linen distress ink. I used an Exacto knife to cut a space under and to the right of the doilies to insert the metal tag embellishment by Freckled Fawn. 


The center flowers were called "Fast Color Embroidered Appliques" by the Franken Trimming Co. Inc. The packaging says they are easy to sew but I adhered the appliques with Ranger Multi Medium Matte. 

A few other fun facts about these flower appliques that are printed on the company label: 
They were purchased at Steketee's in Grand Rapids, MI
Whoever bought these paid $0.65 for the four
and
The New York address of the company they were made by is so old there's no zip code. 

Thanks for stopping by.

Saturday, June 25, 2016

Friend Masterpiece Card

I love this background stamp by Hero Arts. I've used it on two other posts: Best Wishes and Friend and I'll have another won to share coming up in the next few months.

 For my card I stamped the background with Versa Mark ink and heat embossed with white embossing powder on watercolor cardstock by Strathmore. I colored the images in with Peerless watercolors and a water pen by Ranger. The sentiment is vellum by Quick Quotes. I die cut the vellum with a Spellbinders die before I ran it through my Xyron sticker maker to adhere to the card front.


Very simple but anything more would make it look cluttered. I will say it took a while to color in that background, which made me not want to do anything more to it.

Thanks for coming by and checking out my new card.


Friday, June 24, 2016

Lighthouse Card

I really like today's card. It took awhile to achieve the look but I think it was worth the time. I made it as a birthday card for a friend who loves lighthouses. 

I stamped the lighthouse with Hero Arts black ink. I inked and stamped the light rays with two different colors of distress ink. I made a mask of the lighthouse with Inkadinkado masking paper and covered the the lighthouse with it. I took about five pieces of the same masking paper and tore them to create an uneven edge for each piece. I also covered the light rays with a piece of typing paper before adding the blue and brown colors. 

Then I inked with a light hand with blue and brown distress ink using an ink blending tool by Ranger. I used different torn masks each time to create this water and sand. I added some yellow ink within the light rays with the same color ink as I stamped them with. I uncovered the mask on the lighthouse and colored it in with Stampin Up watercolor pencils. I took a water pen by Ranger and smoothed out the lines the pencils leave and added the seagull die cut on the left which is a Cricut cut from Life's a Beach cartridge.


Thanks for looking.

Thursday, June 23, 2016

Thanks a Ton Card

Today's card is so cute and I think a lot of fun. This fun whale stamp, spout and sentiment come from Clearly Besotted. I stamped the whale with Charcoal Shadow ink by Hero Arts and the image looks full and crisp. Love it! The spout is stamped with Stampin Up ink. For the border, I stamped it with Versa Color ink and embossed it with clear embossing powder. 

I'm not sure if you've noticed that I never write the company of the clear embossing powder and it's because I had 4 semi filled bottles all by different companies and so to save on space (You know because those bottles take up a lot of space-silly I know) I poured them all into one container. I was surprised that it actually turned out fine. I was worried at first thinking I'm going to ruin the only clear embossing powder that I have and nope it was all good.

The border stamp is by The Paper Co with cardstock and patterned paper by Recollections. This card is a little bigger then I usually do. I made the card base with the darker teal cardstock which is 4 x 6 inches.

The die cut the whale is a Cricut cut from a freebie at Cricut Craft Room. The sentiment die cut is by Tim Holtz and Sizzix which is a great set for people just getting started with manual die cutting because it has the small sizes for sentiments and the larger ones are big enough for an image. You can die cut, emboss, and ink them even though they are not Spellbinders dies. They also work well for scrapbooking for say journalling or labeling a name or date below a photo. I also like the shield looking dies for masculine cards or layouts. So anyway, I just wanted to share with you a product that I really like.


Thanks for stopping by and taking a look. 

Wednesday, June 22, 2016

Bouquet Card

Today's card uses stamps by Taylored Expressions. The water color paper is by Strathmore. I heat embossed the bouquet with Versa Mark ink and silver embossing powder by Stampendous. I used Peerless watercolors to color in the image and then used a Lawn Fawn die cut to cut it out. The background papers are by  Studio G and the hexagon paper is by Quick Quotes. I stamped the sentiment with Hero Arts black ink on the patterned paper and looking back on the card I should have stamped it on a lighter paper.


Thanks for looking.

Tuesday, June 21, 2016

Geotag Balloon ATC

Today I have an ATC (Artist Trading Cards) that I made for a swap at Scrapbook.com. The theme: Balloons. I found this geotag cut with a how air balloon on one of my Cricut cartridges and really liked it. To add to it I decided to stamp a regular balloon stamp inside using a stamp by Stampin Up and charcoal ink by Hero Arts. 

I masked off some clouds using a small cloud Marvy punch and Post-It tape. I masked off the sun using a circle punch. The sun rays stamp is unknown but I can tell you that I used two different colors of distress inks to ink the stamp. Then I used Tumbled Glass distress ink and ink blending tool (Ranger) to ink the card except for some yellow ink on the corner of the sun and brown ink for the bottom.

Since this is a Geotag I thought it fitting to pin it to a map. So for bottom I decided to use vellum for my map. I inked up a map background stamp (Stampin Up) with Versa Mark ink and heat embossed it with clear embossing powder. I proceeded to color the back of the vellum with two Copic markers so it would match the background of the card. I used a Xyron 250 to adhere the vellum to the card. The travel word is ribbon (Queen and Co) that covers the line of the vellum. 


Thanks so much for looking.

Healthy Pregnancy card

My card today would be great for a baby shower card. The image stamp by Studio G was stamped onto a piece of white cardstock. I then matted a yellow and black cardstock behind that image. I stamped the sentiment by Gina Marie onto yellow cardstock. Both stamps were stamped with Hero Arts black ink. 

The embellishments above and below the sentiment took a little work but here's what I did:
I punched a square shape by Creative Memories with black Recollections cardstock. I punched a smaller square punch out of yellow Bazzill cardstock. I cut the sides of the yellow squares with scallop decorative scissors by Pioneer. I adhered the two squares together. Then I came in with the Fastenater by EK Success, which is basically a big stapler, and stapled the silver baby icons into the two squares. 

I adhered all the pieces together and this is what I came up with.


Thanks for looking.

Monday, June 20, 2016

Manly Monday Sandpiper

My Manly Monday card this week is a thank you card. I think guys like thank you cards too. (although my husband prefers a pack of beer as a thank you)

I stamped this Sandpiper Stamp by Deep Red Stamps onto X-Press cardstock and colored him in with Copic markers. From there I trimmed the image down to the size you see here and matted brown patterned paper behind it. The blue background paper is by Basic Grey and the green strip of paper is and old one by Provo Craft. I love being able to incorporate old product into my projects. It shows that I kept it for a reason. Anyway, the striped paper is by K and Co and the sentiment sticker is by Karen Foster.


Thanks for looking.

Sunday, June 19, 2016

Cupcakes For You Card

A nice and easy card today. The patterned paper and both pink papers are by Echo Park. The cupcakes are a border punch by EK Success. The sentiment is a stamp by Ki Memories and is stamped with Stampin Up pink ink on a piece of Bazzill yellow cardstock.


So simple but I think it's so cute.

Saturday, June 18, 2016

Sparkle Graduation Card

This is another easy graduation card today. The patterned paper is by Best Creations and I've wrapped around and tied into a bow Michael's shear ribbon. The grad cap is a Studio G stamp stamped with Versa Mark ink and heat embossed with gold powder by Stamp N Plus. I die cut the image with a Spellbinders scallop circle die and inked the inside with distress ink while the paper was still in the die. The blue scallop circle is out of Color-Aid paper. I adhered the circles to the card with foam adhesive.


This is the last of the graduation cards. Thanks for putting up with me as I posted so many of them this year.

Thanks for looking.


Friday, June 17, 2016

Dragonfly Card

I love this technique with the square and the die cut using a Stampin up scallop punch that I found at Splitcoast Stampers. Be sure to check it out. The patterned paper is by K and Co. The brown cardstock is by Coredinations and the green speckled cardstock is by Memories Forever. I sprayed the inner die cut with Glimmer Mist (Tattered Angels) and inked it with distress ink (Ranger). The dragonfly is a Stampin Up stamp and the sentiment is a stamp by Inkadinkado. They are both stamped with Stampin Up brown ink. I wrapped Darice hemp around the card front panel before adhering it to the card base by Recollections.


Thanks for looking

Thursday, June 16, 2016

Sympathy Card

Today's card is a deepest sympathy card. The stamps used in this card are by Hero Arts. I inked the background stamp with two colors of distress ink (Ranger) before stamping it onto white cardstock. I matted a piece of K and i Memories patterned paper behind the background image. The sentiment label is a Spellbinders die that I cut and then embossed with my Cuttlebug. I stamped the sentiment with white pigment ink (SU) and set with eyelets by Eyelet Outlet.


Thanks for looking.

Wednesday, June 15, 2016

Congrats Grad Card

I'm so sorry if you are tired of the graduation cards. I had so many to share and can promise you that once we hit July done or not I will stop posting them.

I started off with black, white and blue cardstock by Recollections. I die cut the cap and the circle using my Cricut. After I assembled the cap and adhered the circle to the blue cardstock, I used foam adhesive to add the cap. For the bottom, I cut a piece of Best Creations patterned paper and matted black cardstock behind it before adhering it to the card panel.


Thank you so much for looking.

Tuesday, June 14, 2016

With Love Card

Today's card came together using stamps and matching dies by Clearly Besotted by using distress inks to make the image multiple colors. The cardstock is by Recollections and the patterned paper is by My Mind's Eye. The sentiment is a Kaisercrafts rub-on.

Nice and easy. I think this card would be great for any occasion. Just leave it blank inside and add one when needed. 


Thanks for looking.

Monday, June 13, 2016

Manly Monday Awarded Birthday Card

The card today is a mini card base by Coredinations. I inked the outside edges with brown distress ink. The green cardstock is by Creative Memories and the brown cardstock that has been embossed with a Provo Craft folder and inked with distress ink, is by Recollections. The ribbon and sentiment are Stampin Up stamps that I fussy cut out. The ink for those two stamps is by Memento/Tsukineko. The circle in the middle has been punched out by a Stampin Up punch and adhered with Zots 3D adhesive.


Sunday, June 12, 2016

Celebrate with Cupcakes Card

The heart background paper in today's card is by K and Co and started as white with white hearts on it. I used distress ink and an ink blending tool to make it pink with white hearts. I cut a piece of My Mind's Eye patterned paper and used a border punch by Fiskars to the bottom edge. I stamped the sentiment with brown Stampin Up ink onto white cardstock by Recollections. The pre-made border of cupcakes is by K and Co. This would be a fun birthday card for a little girl.


Thanks for looking.

Saturday, June 11, 2016

Star Graduation Cards

Today I have two similar graduation cards to share. I bought the background paper by Best Creations at a outlet store and it came with a bit of warping to it. I kind of don't mind because I think it adds a "want to touch it" interest. I think it's fun to watch people open the card and put their fingers over a certain spot that they're not quite sure about. The grad caps on the paper are like heat embossed with a sparkly black color which also adds the "want to touch it" appeal.

I die cut the stars with my Cricut and the Home Decor and More cartridge. It was a freebie in Cricut Craft Room and I love stars. I did all the layers to the image using blue Coredinations cardstock and grey by Recollections. I used foam adhesive on the last star of the die cut image to pop it up away from the other pieces. I'm not sure where the black congrats sentiment came from on the first card but on the second card I used a Clearly Besotted happy die and a Reminisce graduation sticker. The second card has a Spellbinders die behind the star which is paper by Stampin Up.

It just occurred to me that these two cards do not have any stamping on them. That rarely happens.


Thanks so much for looking.

Friday, June 10, 2016

On Your Wedding Day Card

Here's a nice little wedding card for my post today. I won the white patterned paper in a challenge so I don't know who made it but I do known black and white cardstock is by Recollections. The embossing folder is by Darice. The sentiment stamp by Great Impressions has been heat embossed using Versa Mark ink and Stamp N Plus gold embossing powder. I covered the white cardstock with gold powdered chalk also by Stamp N Plus.


Thanks for looking.

Thursday, June 09, 2016

Graduation Cards with Border Stamps

I have two similar graduation cards to share today. The patterned paper is by Best Creations. I used an off white cardstock for the stamping and blue and red cardstock for the matting. All cardstock is by Recollections. The sentiments, diploma and grad cap stamps are all by Studio G from Michael's. The circle punch is by Creative Memories and is adhered to the card with Zots 3D adhesive.

For the blue card, I used a border stamp by Inkadinkado, blue distress ink and ink by Close to my Heart. The red card uses a border stamp by The Paper Co, red distress ink and ink by Stampin Up.


Thanks for stopping by.

Wednesday, June 08, 2016

Congratulations Card

Today I have an unconventional graduation card to share. I used a stencil (a dirty one hence the green hue in the embossing paste) by The Crafter's Workshop and applied white embossing paste (Dreamweaver Stencils) to the stencil onto grey cardstock (Recollections). In the meantime, I stamped the fish with green ink (Tsukineko) and the circle stamp (Fiskars) around it with blue ink (CTMH). I inked the edges with distress ink (Ranger) and matted behind it blue patterned paper (Die Cuts with a View) and green cardstock (Coredinations). After the paste dried I assembled the pieces to the card front with green grid line paper (Studio G) closest to the card base. I finished up by adding the sentiment, (Sticko), the grad cap (Jolee's) and the diploma (Frances Meyer) stickers to the front.


Thanks for looking.

Tuesday, June 07, 2016

Sketches in Thyme Project Life June

It's my turn to share a layout on the Sketches in Thyme Project Life blog. Since I haven't been able to do much pocket scrapbooking, so I've been using the sketches for small cards on my regular scrapbook layouts. Here is the sketch:


And here is my card:


Here's a rundown of the products I used since I'm low on time today:
Green cardstock by Stampin Up
The border stamp along the sides are stamped  with green Memento ink and the boarder stamp is by The Paper Company
Some of the word stickers are by Little Yellow Bicycle and some are unknown
The epoxy stickers on the border come from Sticko/EK Success


The supplies for the above layout include:
Title by Cricut with cartridge Creative Memories Holiday Frames and Tags
Red cardstock by Recollections
White cardstock unknown
Pre-made border sticker by K and Co
Rub-ons by American Crafts
Snowflake foam stamp by Imaginisce with red paint by Making Memories and red ink by Simon Says Stamp
 Stars and angels unknown

Epoxy stickers by Sticko/EK Success

And here is the left side of the layout:


Thanks for stopping by to take a look.