Showing posts with label glimmer mist. Show all posts

Tuesday, July 22, 2025

Ribbon runs thru my heart card


This was the negative of a Cricut heart cut out. I sprayed it with Glimmer Mist before layering ribbon to the back side. The sentiment is a sticker by SRM Stickers. Thanks for stopping by.

Thursday, June 12, 2025

Ice Cream 🍦 cards


The background stamp is by Fun Stampers Journey. I inked it in separate colors and rolled the rubber stamp in all different areas. I then sprayed it with Glimmer Mist. 
The ice cream stamp is by Avery Elle. I colored it in with Copic markers before cutting the image out very close to the edge. I took a marker around the edges to give it shape. 
The ribbon is by Stampin Up. The oval die cut is by Spellbinders. The sentiment is by Stampendous. 

Second card is a fun fold that gave me a hard time. I put things on up side down…twice. 

Moving on. The pink patterned paper is a recycled card by American Greetings. The ice cream was created in the same way as the first card. The die cut is also by Spellbinders but I inked the paper while it was in the die. The sent is from the same stamp set Avery Elle. Thanks for looking. HAGD! 

Saturday, May 24, 2025

Floral Friday Part of a Flower Die Cut

The die cut in this card is by Scrapbooking Made Simple. I colored the cardstock with Copic markers. The die is a frame but I cut it apart and added it to the card base. Thanks for looking. HAGD! 


Monday, April 07, 2025

Manly Monday Star stencil card


 I made this birthday card with glimmer mist and two stencils: The obvious one, the stars, and then underneath that is a polka dot. Those stencils are by The Crafter's Workshop. The sentiment stamp is by Paper Smooches. The star die cuts were in my stash. Thanks for looking.

Friday, April 04, 2025

Floral Friday with pre-made card base card

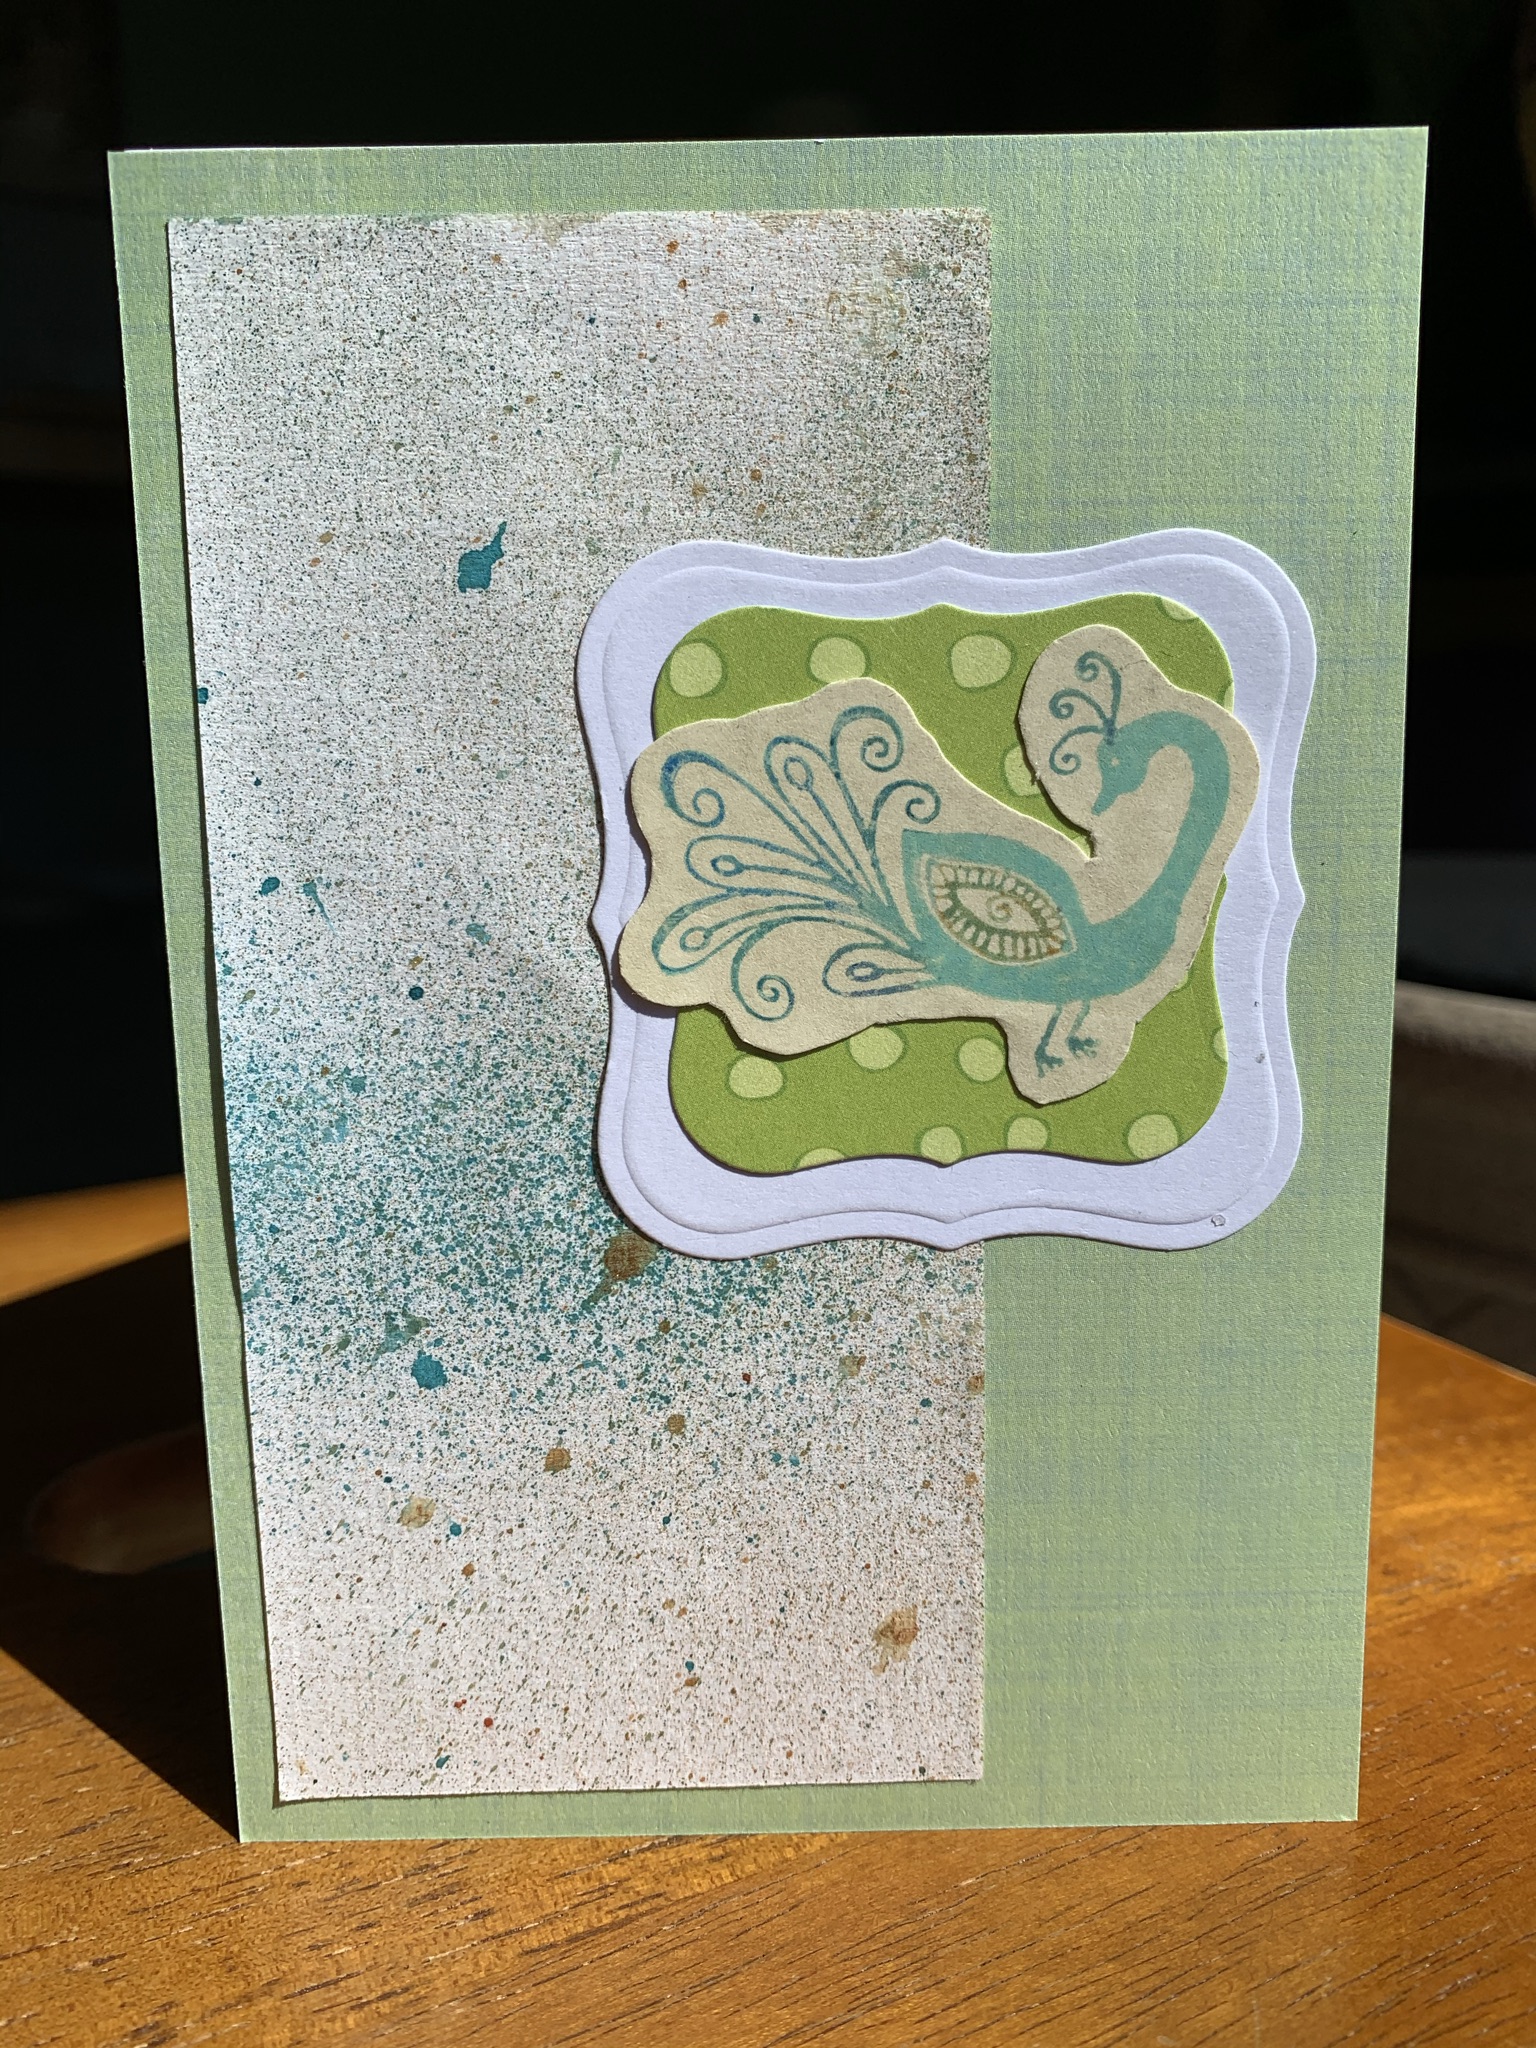
I used a card base with a patterned card front. Then I sprayed a separate piece of white cardstock with Glimmer Mist. The floral die cut is by Sizzix, the square was cut out with my Cricut, and the label is from eBay. The sentiment is unknown. Thanks for looking.

Monday, January 06, 2025

Manly Monday Cheers to the New Year

Happy new year with a Craft Roulette card Manly Monday style. It’s from episode #246. The parameters were:

Project-holiday card

Color-Trees

Element-Drinking vessel

Random-something from your floor.

Wednesday, July 06, 2022

July Calendar Layout using a former card


July Calendar 2019 and this calendar is done!!!
Bell stamp by Deep Red Stamp. It was heat embossed silver
Patterned paper by Bo Bunny. White cardstock by RE that was inked with distress ink. Star stencil is a Cricut negative with glimmer mist. Star border is by Cricut and also sprayed with glimmer mist
Star brad by Creative Imaginations.
I had a hard time finding all of my 4th of July creations. But here are a few.
Layout using the bell stamp
July fourth Calendar LO
Star Card
Statue of Liberty
Statue of Liberty-2

Thanks for looking

Wednesday, May 04, 2022

May Calendar Layout Vitale’s with UT family

Brian’s 2019 calendar May-Family time
BG PPby CM. Doilies  (Paper), one by Doodlebug different die cuts from Authentic, K and Co. 
Other die-cuts by Spellbinders. Peach sticker by K and Co.Sprayed background by Tattered Angels.
Thank you for stopping by. 

Friday, March 11, 2022

Floral Friday purple and red cards

Here’s the next tier of cards from these donation cards. The images are by Accord Publishing. Thanks for looking.

Sunday, October 24, 2021

Peace and Paisley cards Part 2

For these first three cards, I doubled up the fabric paisley circles ironing them onto the paper with border die cuts behind them.
The peace sign punch is from Oriental Trading Co.


On the card below, I layered Spellbinders die cuts under the fabric.
Here is another Peace card. 


For this next card, I dry embossed the blue paper with a Sizzix folder.
I punched out some leaves and adhered them to the orange cardstock and spritzed them with Glimmer Mist.
The ribbon is from Offray.
I layered Spellbinders die cuts under the fabric.  


This next picture is yesterday's two cards with this one.


These cards were made as thank you cards for the parents that helped/contributed to the homecoming float. Long story short, Hubby and other friend teachers are advisors for the class of 2025. The theme this year was decades. The Senior class chose the 1980's. The Juniors were 2000's. The Sophomores were 1990's and the Freshman were 1970's hence the funky cards. 

Along with designing these cards, I used my Cricut to cut out a bunch of 1970's type die cuts that the kids glued onto signs. They waved the signs during the Mock Rock (a dance that I choreographed).
So, I had a few extra fabric circles and adhered them to the sunglasses die cut.
This picture makes me giggle because it reminds me of the next picture.


Hubby and BIL check on my dad's cottage when going to our cottage. My Dad's cottage is a 5-minute walk from ours. So they went in, checked on things, and drank one of my Dad's beers.
They found these glasses on the table and in an effort to find out who they belonged to, they took a selfie wearing the glasses and sent it to the family GroupMe app. LOL.


The family didn't think it was as funny as I did.
Thanks for looking.

Tuesday, June 08, 2021

Lighthouse card with a stencil background

The stamp by SNP. Sorry, but they are no longer in business. I colored the stamp with distress markers and then stamped it down. The die-cuts are by Sizzix and Spellbinders. I inked the paper with distress ink. The patterned paper is actually a stencil sprayed with Glimmer Mist. Stencil by The Crafters Workshop.


Here's a picture of one part of the background. 


Here are a bunch of different looks with this stamp. 
Apparently, I like this stamp.
2015
Thanks for looking

Thursday, May 27, 2021

3 Rose Heart cards

I have three cards today. I used the same heart stamp in all of these cards and used the same color combo of different distress markers to color on the back of the stamp before I  huffed on it and stamped it onto white cardstock. The lighter-colored hearts are second-generation stamping. If you’re not familiar with the term second-generation stamping, let me explain. Like I said above, I colored the image with distress markers, huffed on the stamp, and stamped it onto a piece of white cardstock. Well instead of just doing the same steps again, I huffed on the rubber of the stamp and stamped it onto a different piece of paper. Because of the special properties of distress ink, the huff from my breath adds water to the ink on the stamp, reactivates the ink allowing it to make another impression. The image is lighter but still looks nice. So for my first card, I felt as though the card just needed something to make it not so blah to me. If you don't know, I was stuck upstairs for a while with limited supplies. My craft room is in the basement so my hubby helped me down the stairs to get supplies making this card a little bit better.

Drum roll, please
Tada! 
I inked the edges of all of the papers and the card base with distress ink.
 I created the background paper with a stencil by Gina Marie and a glimmer mist spray. I stamped the Lawn Fawn word “Sending” in black ink so that it would draw your eyes to it. I added a really old Colorbok oval sentiment sticker below, which completed the sentiment on the front card.
I really like the changes.


My second card has a small supply list except the background patterned paper is by K and Co.
The patterned paper strip at the bottom is by Making Memories.
I used a Fiskars border punch on the MM paper. (You can barely see it) 


For the third card, I used scraps of cardstock and patterned paper Provo Craft. The heart stamps in this card are the first generation stamping and the renovated card was the second generation.


All three together.

Below are links to my other cards with this stamp.

Thanks for looking

Saturday, May 22, 2021

Cousins Layout with a Banner


When it comes to blogging, I'm putting too much pressure on myself. I have 70+ drafts in my blogger account that I can post but haven't because I haven't completed the written portion where I talk about the project. 
The pictures are there but for most, that's it. Therefore, for the next little while, I will be chatting less in order to post more. I may not even give a supply list. Anyway, this was a calendar layout that I repurposed to make a 2-page layout for my nephew's graduation scrapbook. The title banner has a little bit to it. The pennants were cut out using Cricut, then sprayed with Glimmer Mist by Tattered Angels and inked with distress ink. Finally, the alphabet letter stickers are by Making Memories. The years, the left side is a stickers by SRM and the right side is a die-cut that I welded the white cardstock 2010 together using the font Don Juan and my Cricut. The patterned paper on the left is by Stampin Up and the paper on the right is by Imaginisice. On the left side layout there is a strip of words between the two pictures that is from Imaginisce.
<ClicK> Have you ever thought, why did they call their company Tattered Angels, SRM- what does that stand for, Lawn Fawn, Basic Grey, Cosmo Cricket, Bug-a-Boo stamps, Echo Park, Spellbinders, studio Calico, Sizzix, Bazzill. I could go on. But I won’t. If you think of other company names please leave in the comments OR if you know why or where do these companies come from leave me a comment. I have three examples of company names that I can’t understand. 
Colorbox has closed and Colorbok LLC 
 Thanks for looking

Thursday, May 06, 2021

Red Crossing Ribbon with Eyelets Card


So what do you think...could I use this design to represent stitches from surgery and send as a get well card??
It would need something else to tie that together because right now it looks like a corset or maybe shoelaces.


Anyway,
The background stamp is by Stampin Up.
It was heat embossed with clear embossing powder and inked with red distress ink.

The eyelets are by Making Memories and the ribbon is from Michael's.

The paper underneath the ribbon was scrap paper that I sprayed with Glimmer Mist  by Tattered Angels.

I could not get these pieces to lay flat on the card. It drove me nuts but I had to move on.


These were the pieces I used to make this card.


Here is a  close up of the glimmer mist and the back side of the ribbon and eyelet piece of paper.


Thanks for looking

Wednesday, May 05, 2021

Second set of peacock cards

This is day 2 of the peacock cards. I had to break up the post of peacock cards and make it a two day thing.

Let’s start with the peacock stamp by Fiskars. Like yesterday, I colored the back of the stamp with distress markers before stamping it onto cardstock by Forever in Time.
Then, here is a generalized list of products for today’s cards. 

The patterned papers are by My Mind’s Eye,
K and Co. inked with distress ink, a wallpaper swatch, and 
The green polka paper with patterned paper by Scenic Route (Very old.)

All of the die cuts are by Spellbinders

Border punches by Fiskars 
White cardstock sprayed with glimmer mist by Tattered Angels 
The embossing plate is by Fiskars 

The first card has a textured Spellbinders die cut is cut out from a wallpaper swatch See the picture below.


The next card has a before and after because I kept thinking that it needed something.

Before 

After

So,  I added the green border punch is by Fiskars and a “hello” die cut by Lawn Fawn.

I can’t say that I love the results but it does look better to have the sprayed paper enclosed with the borders as well as giving it a universal any occasion “hello” die cut sentiment 


I took a picture of these two cards together because they have the same glimmer mist cardstock. The pictures also show the before and after with the card above.

Before


After


This next card uses 1 white die cut that I cut into two and glued one on the top and one on the bottom of the die cut with the peacock on it. 

I’m not a big fan of liquid adhesive and this is a good example why. I pushed the white die cut cardstock into the card front too hard and it shaped around the middle piece of paper.

At first, I was going to throw the whole thing away because I thought trying to “fix it” would make it worse. However, I  just ended up deciding that it wasn’t that big of a deal.


I took a picture of these next two cards next to each other because they use the same Spellbinders die-cut behind the peacocks but in different paper.


Thanks for looking

Tuesday, May 04, 2021

1st set of Peacock cards


A long time ago, I colored the back of this Fiskars peacock stamp with distress markers and stamped it onto Forever in Time cardstock. I finally made all of the images into cards and have so many cards that I had to split them into two posts. 

I used epoxy square stickers down the center of the My Mind’s Eye patterned paper. The background paper is by Making Memories.
The die cuts on both cards is by Spellbinders.
The frame stamp is unknown.


The frame is one that I inherited from the same woman that I received all of those Christmas stamped images that I talk about every year. It is so beautiful and I have been hoarding it for a while. It was time to use it and there are others that you will see in the future.

Thanks for looking

Thursday, March 25, 2021

Blue and green flower with die cuts Card

I’ve been a card-making machine, and I've been busting out some layouts. The stamp and matching die are by Sizzix. The brads are by Making Memories and Basic Grey. The flower brads are inside a glittery flower sticker. The die-cuts are by Spellbinders. The background paper is white cardstock that I sprayed with glimmer mist over a Gina Marie stencil. I cut it down to the size of my card front and then inked the edges with distress ink.


Here are some examples where I used the same flower stamp 


Thanks for looking

Wednesday, March 24, 2021

Bright colore handmade Flower cards


I should have posted these with yesterday's post but I felt like the WoW! colors of these would overshadow the softer colored flower card.

I don't have it in me to list the products. If you have a question on something please leave me a comment.


I made these ATC's in 2017 and they were published in 

Swap Art

Thanks for looking