Saturday, October 31, 2015

Baby Card with Chalk Markers

 The chalk markers are by Chalkola and you can get them at Amazon US and Amazon UK for a low price. You can get 20% off your purchase price on Amazon by using the code CHALK20A at the check out. They have a set of 10 beautiful colors that have a 6 mm bullet tip for writing or drawing. The chalk marker flows very well after the initial prepping the nib, which is super easy to do and your kids will probably do it for you. I think these will be popular with teachers because they are great for chalkboards and dry erase boards.You can also give your kids hours of fun time playing and creating with the new Chalk Markers. The markers are suggested for Non Porous surfaces but I'm using them on paper and having a great time with them. 

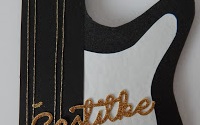
I just love the outcome of this card. I don't want to sell it because it's so dang cute. Starting with the Baby die cut, I colored white chalk marker onto what was grey cardstock and then I put polka dots on those letters. It's not perfect but I like the imperfections. The nib of the chalk marker is perfect for making the polka dots.

I followed a sketch at Scrapbook.com for one of their challenges. The white and brown die cuts were cut out using my Cricut and the Art Philosophy cartridge. The word baby Is also a Cricut cut from Cricut Fonts and Basic Shapes which I found in the Cricut Craft Room software. I did dry emboss the brown circle with a Darice folder. The flowers I used are by Petaloo and in the center is a baby bottle eyelet. The leaves of the flowers are a Elizabeth Crafts die that I die cut them out in white cardstock by Recollections and inked them with Ranger's Walnut Stain distress ink. Then I sprayed them with water mixed with Perfect Pearls so they would shimmer. The background paper is by Studio G.


Thanks for looking.
http://www.hidinginmycraftroom.com/ Freestyle
http://sweetstampinchallengeblog.blogspot.com/ Dies or Punches
http://craftygalscornerchallenges.blogspot.com/ AG
http://carabbiemomentsofcraft.blogspot.co.uk/ AG
http://www.simonsaysstampblog.com/wednesdaychallenge/ AG
http://kraftinkimmiestamps.blogspot.ca/ Wednesday AG
http://www.wordartwednesday.blogspot.com/ AG
http://www.4craftychicks.blogspot.com/ AG
http://chalknstock.blogspot.com/ AG with chalk {On the baby die cut}
http://craftingwithanattitude.blogspot.co.uk/ AG
http://brownsugarchallenge.blogspot.com/ Flowers
http://crafting-with-friends.blogspot.be/2015/10/challenge-9.html AG
http://creativefingerschallengeblog.blogspot.co.uk/ AG
http://fussyandfancychallenge.blogspot.ca/ Flowers
http://jwscrapshack.blogspot.ca/ AG
http://pdelinkyparty.blogspot.ca/ AG
http://simplypapercraftsforalloccassions.blogspot.co.uk/ AG
SB.com-Sketch #2
SB.com-Cricut for the Baby and the brown circle and white die on the left are from Art Philosophy cartridge

Friday, October 30, 2015

Happy Birthday Card

My next new card uses a new to me craft item called chalk markers by Chalkola. They are a marker that you can use on any non porous surface and then wipe away with a wet cloth. I've been experimenting with them for a couple of weeks and have some great posts coming up talking about them. They have a Facebook page for you to check out. There are a bunch of different videos on the markers for you to see.

For this card I used the marker as my ink for two stamps. The first one is the present in the circle. It is a clear stamp by, I think, Fiskars. I took the marker and colored the ink onto it and stamped on white cardstock. Since I used the chalk marker on paper if you swipe the present the ink will come off. I did the same thing for the stars in the background, however I did first and second generation stamping to see how I would like it. Since the markers weren't intended to be used on paper and the image may smear this card will be a family card. lol. My thought was I took the time to stamp them out I better make them into a card. This is an 11 layer card - Crazy, I know, right.

The coral/pink paper is by Color-Aid and black and white cardstock by recollections. The circle punches are by EK Success. The other patterned paper is by Kaisercrafts. The happy die is by Clearly Besotted and the birthday die is by Papertrey Ink.


Thanks for looking.

SB.com-Use your stamps
SB.Com-Sketch 3

Smile Bottle Cap Card

So I made this card using a sketch at Scrapbook.com that you can see at the bottom of this post. The background cardstock is by Sunborn and I've stamped it with circle stamps by Stampin Up. Then I inked the edges with distress ink and an ink blending tool.The next layer is the dark brown and I'm not sure exactly where that came from but the lighter strip of patterned paper on the right is by Studio Calico. The pennant in the middle is kraft cardstock by Oriental Trading Co and I've dry embossed it with a Cuttlebug folder. The dark brown cardstock is by Stampin Up and the white is by Recollections. I think the die cut is one by Lifestyle Crafts but don't quote me on that because I don't own the dies. I use to have a friend that I could borrow her dies for a week or more and die cut a ton of them out. 

But anyway, the bottle cap is by The Paper Studio, the smile sticker is by Studio 112, and the epoxy sticker over that is by Epiphany Crafts. I did run the bottle cap through my Cuttlebug to flatten it out a little bit more. I also adhered a one and a half inch circle punch behind it. Same kraft cardstock as mentioned earlier. 


SB.com-bonus Sketch
SB.com-Use your stamps {the polka dots in the background}

Deep Red Stamps Dress cards

Today I have two similar cards to share using a dress stamp by Deep Red Stamps that you can find at

or

I heat embossed each dress with Versa Mark ink and silver embossing powder by Hero Arts. Then I colored the dress in with powdered chalk mixed with white paint. It's a very soft pink color which matched the patterned paper by Making Memories. I die cut the image out with a Spellbinders die and then added Stickles to the flowers. The heart die cut is by Lawn Fawn and the rub-on sentiment is by Kaisercrafts. The grey cardstock is from Joann's.


For my second card, I fussy cut the dress out instead of using a die cut. I stamped the Stampin Up sentiment with Versa Mark ink and heat embossed it in silver. I punched the sentiment out using an EK Success punch as well as the next largest circle out of the grey cardstock from Joann's. The ribbon is by Fiskars.


Thanks for looking.

Thursday, October 29, 2015

Sassy Studio Designs Mummy

The new challenge at Sassy Studio Designs is a Halloween project and I made a card using the Mummy stamp. I printed her out onto Neenah cardstock and colored her in with Copic markers. I trimmed her down to this size and matted black cardstock behind her. The happy die is by Clearly Besotted out of Recollections white glitter paper.


Thanks for looking.

Wednesday, October 28, 2015

Dreamweaver Stencils Butterfly

Today's card uses a butterfly stencil and silver embossing paste by Dreamweaver Stencils. I only applied embossing paste on the big butterfly and kind of masked off the other ones. Then after it dried I fussy cut the butterfly out. The sentiment is a Recollections stamp set with Hero Arts charcoal ink. The patterned papers are by Stampin Up, Bazzill, My Mind's Eye, and Cherry Arte. My cardstock is by Stampin Up and Recollections.


Thanks for looking.

Tuesday, October 27, 2015

Baby Teddy Bear Pink Card

Here is yet another baby card using the teddy bear stamp but this one is geared toward a little girl. I stamped the bear onto Neenah Solar White cardstock and colored her in with Copic Markers. Then I die cut her out with a Spellbinders die and while the paper was still in the die I inked the inside with some Spun Sugar distress ink. The pink polka dot frame sticker under the image is unknown but the white cardstock behind it is by Recollections, The background paper is by Imaginisce. I thought the pink in the teddy's bow matched the pink in the patterned paper perfectly. Then to finish the card I wrapped some pink fibers around the card front and stamped the Sweet Stamps LLC sentiment with black ink onto white cardstock.
One thing I always do when making cards is work off the card first. So this card was made with this piece of patterned paper and once it was finished I added it to the card front. That way the fibers can't be seen inside the card and also if I mess up or don't like what I've done I didn't waste a card on it.


Thanks for looking.

Monday, October 26, 2015

Manly Monday Goal

Sorry for the delay. I have been out of town since Wednesday at our cottage. There is no wifi there and so I wasn't able to go around and find guy cards made by others. I have two similar cards to show today. I used some old Creative Memories hockey stickers as my focal point and patterned paper by Me and My Big Ideas. I cut out a circle with my Cricut and added the sticker to it. Then on the first card I distressed the edges with a pair of regular scissors. The second card I left the edges normal and matted a bigger black circle behind it. The sentiment on both cards is a Cricut cut from the CM Sports cartridge. I used some different colored cardstock for each one. It's fun to see the same cut out of different colors side by side.


Sunday, October 25, 2015

Just Because Flourish Latte

Today my card features one of my favorite Deep Red Stamps the Flourish Latte. I stamped the image with Versa Mark ink and heat embossed it with Ranger's platinum embossing powder. Then I die cut it out with a Design Objectives die and matted it onto a Spellbinders die cut. The background paper is by The Paper Company, the border paper is by Making Memories with the border punch by EK Success and the sentiment sticker by SRM Stickers.


Saturday, October 24, 2015

Happy Holidays

I stamped this bird many moons ago when I use to go to crops and therefore I have no idea who this stamp is by. It's stamped in brown ink and then colored in with powdered chalk mixed with paint both by Stamp N Plus. I die cut the image out with a Spellbinders die and inked the inside with distress ink. The border die cut is also a Spellbinders die. The background patterned paper is by We R Memory Keepers and the border on the side is Die Cuts with a View paper.  The sentiment is an Hero Arts stamp stamped with brown Stampin Up ink.


Thanks for looking.

Friday, October 23, 2015

Sweet 16 Birthday Card

A funny thing happened when I went to make 25th anniversary cards; when I die cut the numbers 2 and 5 from my Quickutz dies a 1 and a 6 are left over and they make for perfect 16 year old card. All the paper in my card is by Recollections. The polka dot ribbon is by The Paper Studio and the sweet stamp by American Crafts stamped with Versa Mark ink and heat embossed with Hero Arts embossing powder. The scalloped circle dies are by Spellbinders.


Thanks for looking.

Thursday, October 22, 2015

Sassy Studio Designs Color Challenge

Sassy Studio Designs has a new challenge for their Thursday blog and it is black and either orange, green, or purple or all of the above. I went with black and purple although there is orange is the patterned paper. 

I printed the image out onto Neenah cardstok and colored her in with Copic markers. I trimmed the image down and matted some black cardstock behind her. I die cut the fence with the Cricut and the Ribbons and Rosettes  cartridge with purple Bazzill cardstock. The background of the card base was stamped with a Stampabilities stamp with Hero Arts black ink. Then I drew lines from the spider to the web. The sentiment is from the same stamp set and has been heat embossed with Versa Mark ink and white embossing powder.


Thanks for looking.

Wednesday, October 21, 2015

Wedding Bells in Pink

I have a wedding card to share today. This one uses a bell stamp by The Embossing Company. The date on it is 1993 which would make this my oldest stamp. I heat embossed it with Versa Mark ink and Hero Arts silver embossing powder on to white cardstock. The I used a Spellbinders die to cut it out and inked the inside with distress ink by Ranger. The pink die cut behind the image is also by Spellbinders. 

The sentiment is from a stamp set by Stamping Scrapping which has also been silver heat embossed. The patterned paper is by The Paper Studio, the ribbon is unknown and the pink cardstock is by Die Cuts with a View.


Thanks for looking.

Tuesday, October 20, 2015

Woof Dog Card

This little dog card has some fun die cuts that I cut out with my Cricut using the Cricut Sampler cartridge. I cut the long white die cut also from the Cricut with the Lacy Labels cartridge. The cardstock is by Recollections and Provo Craft. The black rounded square die cut by Spellbinders is inked with Black Soot distress ink. The dog stamp is by Gina Marie and patterned paper by Moxxie. The ink I used on the dog is by Versa Color.


Monday, October 19, 2015

Manly Monday Start Your Engines

Edited 4-2021 see sidebar

Today's card uses a couple of stamps by Close to my Heart. I stamped them at a scrapbooking retreat a long time ago so I'm not sure of the inks. I matted the stamped image and sentiment with yellow cardstock and then black both by Recollections. The patterned paper is by We R Memory Keepers, the arrow die cuts are by Papertrey Ink and the gear brad by Eyelet Outlet.


Welcome back to Manly Monday where I showcase some masculine cards by other crafters and one from myself. Click on the blog tittle to be directed to the masculine card.


Thanks for looking.

Sunday, October 18, 2015

Floral Bouquet in Coral

Whenever I make wedding cards I Google trendy wedding colors of 2015 to get an idea of what colors are popular. This coral is one of those colors. I stamped the bouquet of flowers with Versa Mark ink and heat embossed it with a semi pink embossing powder by Stampendous. The image was punched out with an EK Success punch and I also punched a piece of white fun foam to go under it. The die cuts behind the image were cut out using the Cricut and the Lacy Labels cartridge. I fall in love with that cartridge over and over again. 

To finish the card I embellished with American Crafts ribbon and some Lawn Fawn baker's twine. The button is from my MIL's stash that I inherited. I threaded the twine through the button and then secured it onto the card with a Zot. The sentiment is hard to see but it is the circle on the right. The stamp and the ink are both by Stampin Up. I punched the sentiment with a Creative Memories punch. Then I set a large white eyelet into the circle and threaded the twine through the eyelet. 


Thanks for looking.

Saturday, October 17, 2015

Deep Red Stamps Flourish Latte Card

Here on the blog today is a nice simple card. I stamped the Deep Red Stamp Latte Florish with Versa Mark ink and heat embossed it with Ranger's platinum embossing powder. Then I die cut the image out with a Dreamweaver Stencil's nesting die. I created this frame using my paper trimmer out of Die Cuts with a View pattern paper. The green paper is by October Afternoon. The hi sticker is by Pebbles and the ribbon by Michael's.


You can find the latte stamp at A Cherry on Top or Scrapbook.com. You can find the nesting dies at Stencil in Style.

Friday, October 16, 2015

Wedding Day Ring Card

For today's card I did some heat embossing. First is the background with a Hero Arts stamp, second is the diamond by Sweet Stamp Shop {they no longer sell this set and I couldn't find an image of it either} and third is the ring itself. I used the same gold embossing powders by Stamp N Plus for all three. To make the ring I inked up an area with Versa Mark ink, poured embossing powder over it and heat embossed that area. I took a small circle punch and cut out a small circle then went in to the same area and punched a large circle. The circle punches are by Creative Memories and then EK Success. The die cuts the ring is on are by Spellbinders, kraft cardstock by Oriental Trading Co, and the sentiment sticker is by EK Success. 


Thursday, October 15, 2015

Sassy Studio Designs Halloween with Wednesday Sassy

Hi-dee-ho! I'm posting my design team card for Sassy Studio Designs. The theme this week is pick three in a row. I chose the center strip of goodies: Spider/Spider webs, Pumpkin, and Candy.


I've used the Wednesday Sassy as my image and even though you can't buy her in the store I have even better news; she will be free on October 30th for 24 hours on the Sassy Studio Designs Facebook group. It is so worth joining in this closed group of crafters because you can now get a free image each week and also a free monthly image. I'll tell you a secret, on the 30th they will have two images for free so join now.

I printed her out onto Neenah Solar White cardstock and colored her in with Copic markers. I fussy cut her out but she has something in her hand that I didn't care for it. Sometimes placement is everything. I created the background with a circle Post It note that I punched out and inked the paper with distress inks yellow, orange, and purple. I followed her coloring because her bikers are yellow, her dress is orange and there is purple highlights in her hair. 

I used the tutorial called Burst Through on Splitcoast Stampers by Dina Kowal. I thought it was perfect for this image. The patterned paper on the top is by K and Co. The candy stamp on the bottom is by Fiskars and colored in with Copic markers. The pumpkin is by Inkadinkado and I inked it with Colorbox pigment inks and fussy cut it out. The sentiment was part of a prize so I don't know who it is by but I coated the edges with some distress Stickles. I did add some Stickles to the image too on her buttons and bows in her hair. This card is a 5 x 6.5 which is bigger then I usually make but I printed the image out bigger than usual to get some better coloring in.


Thanks for looking.
http://thatcraftplaceblog.blogspot.com/-Halloween
http://getcreativechallenges.blogspot.com/ Halloween
http://craftingfromtheheartchallengeblog.blogspot.com/ AG
http://www.craftyourpassionchallenges.blogspot.com/ AG
http://blog.markerpop.com/ AG With Copic Markers
http://notjustcardschallenges.blogspot.co.uk/ AG
http://our-crafty-corner.blogspot.co.uk/ Getting ready for Halloween
http://thepapergirlschallenge.blogspot.com/ Food
http://thepapernestdollschallenge.blogspot.com/ AG
http://cutedaisymay.blogspot.com/ Hand colored image
http://craftingbydesigns.blogspot.com/ Halloween
http://freshbreweddesigns.blogspot.com/ Spiders
http://thesisterhoodofcrafters.blogspot.com/Dies or punches {punched the circle mask for the background}
http://whimsyinspires.blogspot.com/ Halloween
http://kraftinkimmiestamps.blogspot.ca/ AG
http://www.simonsaysstampblog.com/wednesdaychallenge/simon-says-color-inspiration/-Colors