
I made a border using very old Creative Memories die cuts and then put holly stickers inside the open square. The letter stickers are by The Girl's Paperie. The paper is so old. Thanks for looking.
Showing posts with label The Girls' Paperie. Show all posts
Showing posts with label The Girls' Paperie. Show all posts
Wednesday, January 11, 2023
January Calendar layout Holland Party
Wednesday, May 04, 2022
May Calendar Layout Vitale’s with UT family

Brian’s 2019 calendar May-Family time
BG PPby CM. Doilies (Paper), one by Doodlebug different die cuts from Authentic, K and Co.
Other die-cuts by Spellbinders. Peach sticker by K and Co.Sprayed background by Tattered Angels.
Thank you for stopping by.
Thursday, April 07, 2022
It's Time for a Birthday for a Lady Card

I have a happy birthday card on the inside it says “Time for another birthday”. I cut out the pink frame with my Cricut. I put black behind it to give it a base. The die cut was too big for the card front. I had to cut it down until the die cut fit the Preston-made card base. The clock die cut is by The Girl’s Paperie. The letter stamps are by the Close to my Heart. The heart die cut was on the floor and and the white fit well in between the two words. I just noticed that I used a corner rounder by Creative Memories on the card base. I found some examples on my blog that use a clock and are referring to birthday. have to do with time This card uses die cuts from the same ephemera pack Girly card with a die cut from the same ephemera pack . Other similar cards for a guy are in the 3 different links below.
Deep Red StampsTag card Masculine Pocket watch cards, similar concept ,
Thanks for looking.
I’m entering the happy birthday challenge at Simon Says Stamp.
Sunday, February 07, 2021
Mimi 1st Communion 2 page layout
I have a 2-page layout for today. This is my MIL in her younger years.

All of the labelings are done with alphabet stamps by Lawn Fawn
The die-cuts on the 1st page are by:
Letters by Quickutz
Numbers by The Girls Paperie
Corner punch by Marvy
The patterned paper is vellum by K and Co.
Flowers and brads from my stash


2nd page:
The dry embossed frame is by Provo Craft (Omgoodness! That thing is so old. Happy to use old stash)
The doilies are by Doodlebug, Stampin Up, and Little Yellow Bicycle.
And then the sentiment at the bottom was a recycled bookmark.
Doily paper by Basic Grey

Thanks for looking
Thursday, October 08, 2020
1975 Outdoors and Christmas time Pocket page Scrapbook layout
More 1975
The first card: alphabet stamps on the journal box are by Stampin Up A sticker or two by Karen Foster
The center card, the words, "Outside in 1975", stamps are by Lawn Fawn on a The Girls Paperie die cut that I inked with distress ink
1975 was cut out using my Cricut
The scraps of patterned papers are by The Paper Loft
The blue patterned paper used on 8 of the 9 cards is by Colorbok. (Bok not BoX)
I inked the edges with a brown chalk ink by Colorbox. (Box. Not BoK.)
Seriously. Did these two companies not know of each other when naming their company? SMH

There's not too much to talk about on this pocket page.
The top right card is the only one with anything on it.
The date stickers are by Creative Memories
The title was cut out using my Cricut
The trees are stickers from my stash
The patterned papers are by Daisy D.

Thanks for stopping by and taking a look.
Friday, April 17, 2020
Mimi’s sophomore year layouts
My layouts are of my MIL and will be placed into the family albums.
The alphabet stamps are from Michael’s
The die- cuts are by The Girls Paperie and Cricut Cut flourishes.
The flourish by each of the lists, point to her name.
The flourish by each of the lists, point to her name.
The patterned paper is by K and Co and there’s some old Provo Craft Paper in there too.
I did a little bit of inking but nothing fancy.


I did a little bit of inking but nothing fancy.

I sewed a pocket into the other layout to hold a few ephemera from her school years.


Thanks for looking
Wednesday, March 11, 2020
It's Time for your birthday card
I used stamps by Stampin Up for the sentiment
Ric Rack from Wrights
The patterned paper is by Bazzill and it's the 2" leftover pieces that I end up with when I use a 6x6 pad of paper for a 4x5 1/2' card.
The patterned paper is by Bazzill and it's the 2" leftover pieces that I end up with when I use a 6x6 pad of paper for a 4x5 1/2' card.
The die- cuts are by The Girls Paperie
The die-cut under the clock is also a clock included in the package. I knew I wouldn't use it so I flipped it over. That been my going to thing lately.
Where I die cut and stamp on the back of the paper that I know I won't use the design on the front.

The die-cut under the clock is also a clock included in the package. I knew I wouldn't use it so I flipped it over. That been my going to thing lately.
Where I die cut and stamp on the back of the paper that I know I won't use the design on the front.
Thanks for looking
Wednesday, January 01, 2020
Poinsettia card
I have a lot of Christmas cards to catch up on posting.
The border bunch is by Fiskars. The patterned paper is by My Mind Eye
The circle is glue and glitter around the edges. The flower is unknown. The merry sticker is by The Paperie Girls and the Christmas sticker is by Karen Fosters.


Thanks for looking.
Monday, July 15, 2013
Include a character Christmas Cards All Year Round Mid Month
I hope this post finds you well and ready for some Christmas card inspiration. It is the middle of the month and I wanted to share with you some more Christmas cards that I made for the challenge at Christmas Cards all Year Round.
The challenge this month is:
The challenge this month is:
It's all about Santa
Include anything on your card that has to do with Santa- presents, reindeer, elves, you get the idea.
My first card uses an elf digi from Kenny K's and he's on sale for $1.00. Can't beat that price for such a cute digi stamp.
I colored him in with Copic markers. {See below for the exact markers} The die cuts are by Spellbinders and Copic paper by Cryogen. The patterned papers are from Bazzill, Echo Park, Basic Grey and Recollections. Present embellishments from Recollections and sentiment stickers by The Girls' Paperie.

Skin-E00, E000, E0000, R30. Eyes-B00. Hair-Y17, Y13, Y11, Y28. Reds in the hat and jacket-R39, R27, R24, R22. Greens-YG25, YG63, YG67, G82. Boots and belt-Black 100, W5, W3, W1. Hat C1. Dots-B00 and C00.

Challenges:
http://2sisterschallengeblog.blogspot.com/- Make it sparkle (Glitter presents)
http://catchthebugblog.blogspot.co.uk/- Christmas in July
http://cutitupchallenges.blogspot.com/- Christmas in July (must have die cuts)
http://www.trimmiescraftchallenge.blogspot.com/- Christmas in July
http://sassystudiodesigns.blogspot.com/- Christmas
http://www.southerngirlschallenge.blogspot.com/- No spooled items
http://inkyimpressionschallenges.blogspot.com/-Christmas in July
Next I made this Santa card with a stamp from Inkadinkado. I heat embossed the Santa with Versa Mark ink and Stamp N Plus white embossing powder. Then I inked the Recollections white cardstock with the colors Tea Dye and Fired Brick Distress Inks from Ranger Industries. I sprayed the piece of cardstock with water and let it dry. After it was dry I came back to it with a paint brush and Barn Door Distress Ink where I "colored in" the hat. Something a little different but I like the way it looks. The patterned paper is by Bazzill and Recollections. Border punch by Stampin Up, white cardstock by Recollections and red cardstock and decorative brad by Making Memories. I've had that brad for probably 3 years now. I just think they are too pretty to use on a card. I have hoarder issues.The sentiment sticker is from Hobby Lobby.
Challenges:
http://christmascardchallenges.blogspot.com/- Embossing
http://christmascardchallenges.blogspot.com/- Embossing
http://simplycreatetoo.blogspot.com/- Christmas in July
http://sisteractcardchallenge.blogspot.com/- Anything goes
http://audsentimentschallengeblog.blogspot.com/- Two word sentiments
http://paper-craftingjourney.blogspot.co.uk/- Christmas
http://fabnfunkychallenges.blogspot.com/- Christmas in July
http://www.craftysentiments.blogspot.com/- Christmas in July
http://lejdesignschallengeblog.blogspot.co.uk/- Christmas in July
http://www.lovesrubberstampschallenges.com/- Hoarded item (Brad)
Here I have another Santa card with the Santa stamp also by Inkadinkado. Again I heat embossed the stamp with the products above and then used a circle punch to punch it out. I then layered the circle onto two Spellbinders dies. The background was created by inking my embossing folder (by SU) before putting it through the Cuttlebug using Ranger Distress Ink and kraft cardstock by Oriental Trading Co. I then sprayed it with water and let it dry. Other supplies; the ribbon is vintage from Hubby's grandmother and the tree brad is from Creative Imaginations. The circle punch is from Creative Memories and I inked the edges with more Distress Ink. The sentiment is OOOOLD (2001) by Mrs. Grossman's. The patterned paper is from American Crafts.

Challenges:
http://thesquirrelandthefox.blogspot.com/-Spooled item
http://craftyhazelnutschristmaschallenge.blogspot.com/- Trees please
http://marksfinestpapers.blogspot.co.uk/- Favorite technique-Embossing
http://christmasstampin.blogspot.com/- Kraft with any other color combo
http://craftyribbonschallenge.blogspot.com/- Anything goes with ribbon
http://shellysimagesblog.blogspot.com/- Christmas
http://rubysrainbow.blogspot.com/- Ribbon, embossing and handmade background
http://diecuttindivas.blogspot.com/- Use Ruby Red (cardstock)
http://toptiptuesday.blogspot.com/- Hexagons or circles Tip: Distress Ink on the embossing folder before you run it through and tada a fun background.
Thanks so much for looking.
Wednesday, February 01, 2012
Christmas Cards all year Round
This month at Christmas cards all year round the theme is hearts. You must make five cards throughout the month of February that display a heart or hearts. Link them up to the linky on the blog and you may just win a fabulous prize.
Here is my pop up card with a heart on it. I made two other cards but I was not impressed with them. So unimpressed cards don't get posted ;) lol
Thanks for stopping by and taking a look.

Here is my pop up card with a heart on it. I made two other cards but I was not impressed with them. So unimpressed cards don't get posted ;) lol
Thanks for stopping by and taking a look.

Sunday, December 25, 2011
Gingerbread Woman Christmas Card
Merry Christmas to all.
This week at I Did it Creations Challenge #87 our challenge is "A Gingerbread Christmas" and we are sponsored by Robyn's Fetish.

I painted this gingerbread woman using distressing inks, sprayed with water and applied with a fine tip paintbrush.
The frosting is Liquid Pearls and the button and pockets are Stickles.
The red square is chipboard with sentiment stickers applied.
I wrapped the lace around the patterned paper on the left side of the card

Thanks for looking
Updated7/2021
Wednesday, December 14, 2011
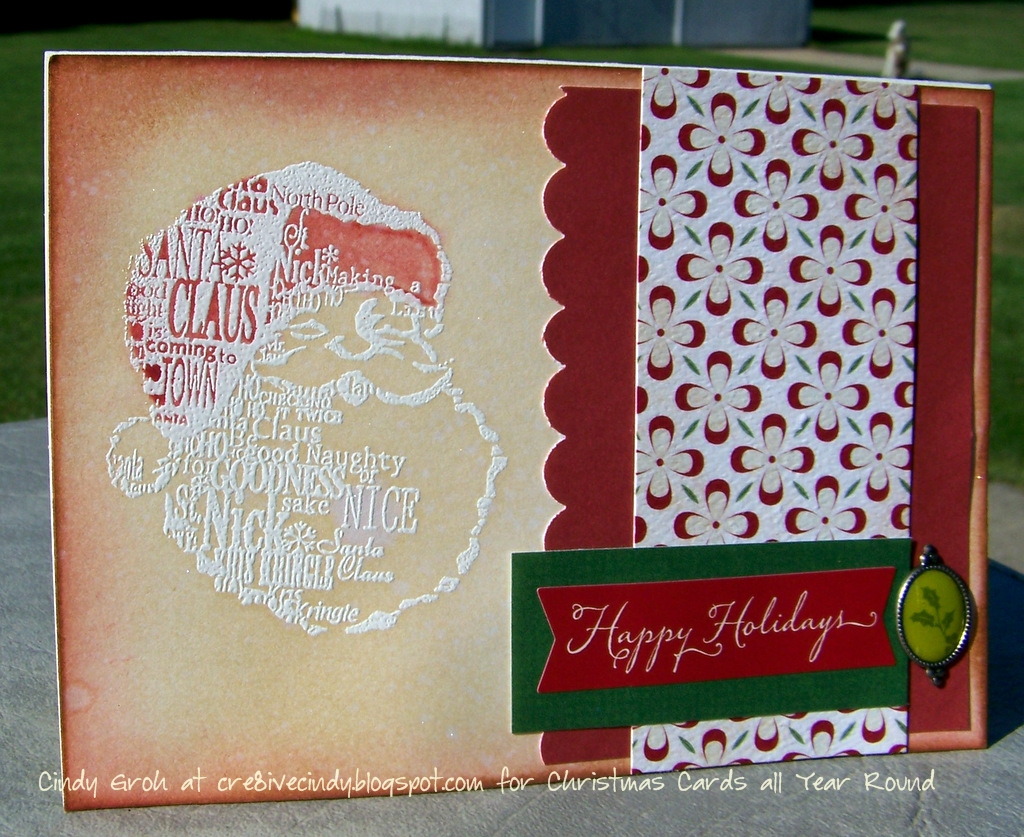
Vintage Christmas card
Don't forget to check out my post where you use a Fabulous Friday Fun tip or product for a chance at a fabulous prize.
I'm going a little old school today with my Christmas card. The Santa stamp is by Inkadinkado which I heat embossed with ink by Versa Mark. The Die cuts are by Spellbinders (rectangle) and Creative Memories (Snowflakes)
Thanks for looking


Challenges:
http://cachallenge.blogspot.com/(TU12/13)-Embossing (Santa is heat embossed)
http://creativecardcrew.blogspot.com/(TU12/13)-Tis the season
http://mytimetocraftchallenge.blogspot.com/(TU#168)-Vintage Christmas
http://useittuesday.blogspot.com/(TU#21)- Holiday {I have had that patterned paper for 3 years}
http://craftybootschallenges.blogspot.com/(M/12-12)-Holiday
http://hookedoncraftchallenges.blogspot.com/(M#14)-Christmas
http://stampandcreateblog.blogspot.com/(M/12-12)-Christmas
http://abcchristmaschallenge.blogspot.com/2011/12/y-is-for-yipeee-christmas-is-almost.html(W/12-7) -Yippee Christmas is almost here
Friday, December 02, 2011
Christmas Card for Fabulous Friday Fun 12-2-11
*Click here for my Challenge with a prize
Welcome to another Fabulous Friday. This week I am going to show you a couple ways I used Liquid Pearls by Ranger Industries.
I have lots of pictures to share with you today. But the first one I want to share is a card I made for the I Did it Creations challenge on 11-19-11. I used White Opal Liquid Pearls on the snow portion of the snow lady. A DT member asked what I used and that is where this post comes in. (Image by Robyn's Fetish-Bella Da Snowlady)

I'm going to use Robyn's Fetish image called Snow Wagon.
Here is a picture of the other supplies I used for this card. I use wax paper to blend all the ingredients for this first technique.

I take the ink pad and flip it upside down on the wax paper.


From there I add Liquid Pearls off to the side of the ink and then spray water by the two.


The paintbrush draws a little bit from each the ink, water, and Liquid Pearls. Mix them together before you begin to paint on to your image.

The next step is to paint in your image using the mixture of the three. I started with Tea Dye ink and Platinum Pearls.

For a bit of shadowing I made another spot on my wax paper using Vintage Photo distressing ink with the Platinum Pearls.

You have to move quickly with this mixture because it dries quickly. When the mixture is wet you can move it around well however, once it is dry, it is what it is. For the wheels, I used Walnut Stain ink with Platinum Pearls and water too. The gears of the wheel could no longer be seen once I painted over them but that was OK-you will see why in a few photos.

I colored in the heart using Barn Door Distressing ink, water, and White Opal Liquid Pearls. I then started into making the snow. Just squirt some into the area you want the texture and use the tip to push it close to the lines of the image and to give it a swirl effect.


You can see in this last one that I went around the lines of the image to give the snow more depth.

Next, I made the ground snow covered by using the White Opal Liquid Pearls.

Here is my final card where you can see I placed glittery chipboard dots in place of the gears on the wheels.

I'm entering this card into the following challenges:
http://delightfulsketches.blogspot.com/(W)-Let it Snow
http://sassycherylschallenge.blogspot.com/(TU#92)-Winter
http://www.craftyourpassionchallenges.blogspot.com/(TU#86)-'Tis the season
http://heartsonginspirations.blogspot.com/(SU#26)-Buttons
http://hookedoncraftchallenges.blogspot.com/(M#13)-Winter Wonderland
http://audsentimentschallengeblog.blogspot.com/(W#42)-Any winter holiday sentiment
http://shellysimagesblog.blogspot.com/(TH)-Snow business
http://bythecuteandgirly.blogspot.com/-(runs from the 1st to the 14th)-Let it snow
http://crazychallenge.blogspot.com/(#95)-Snowflakes
http://www.gingerloftchallenge.blogspot.com/(SA#30)-Winter
This second example will be quick. I used the Christmas Cookie image by Robyn's Fetish.
I painted the cookie with a combination of Tea Dye and Antique Linen Distressing inks and water with Perfect Pearls. Then I colored the frosting of the cookie with a paintbrush using Platinum Liquid Pearls and water. From there I used the White Opal Liquid Pearls and made the frosting swirls. I painted in the dots with Barn Door Red and water because I wasn't sure if my rhinestones would cover the entire circle.


Then like a silly girl I put the rhinestones on with my iRock and thought I should use a Spellbinders die on this cute little cookie. Lol. The rhinestones cracked and dented my Cuttlebug plate. However, my rhinestones sparkle like diamonds now. Maybe I will try and take another picture in the daylight so you can see them better. I thought it was pretty funny.


I'm entering this card into the following challenges:
http://sassystudiodesigns.blogspot.com/2011/12/dare-to-be-sassy-thursday-101.html(TH#101)-A holiday card with some sparkle
http://digistamps4joy.blogspot.com/(W#33)-Merry Christmas
http://divasbydesignchallenge.blogspot.com/(W#16)-Anything Goes
http://www.ibrakeforchallenges.blogspot.com/(W#15)-Vintage
http://thesisterhoodofcrafters.blogspot.com/(W)-Polka Dots
http://citycrafter.blogspot.com/(TU#85)-Santa Clause is coming
http://createmepink.blogspot.com/(W#5) Christmas colors {red, green and gold or silver}
http://www.charismacardz.blogspot.com/(TH#47)-Seeing spots
http://stampingscrappingchallengecentral.blogspot.com/(SU)-Christmas
{I bought the Spellbinder die from your store}
http://stampsfun-creativity.blogspot.com/(MO#75)-Distressing
For this week I am done but for next week I have a few other things to use Liquid Pearls for. Don't forget to check out my FFF special prize due Jan 1st, 2012:)
Subscribe to:
Posts (Atom)