Showing posts with label Liquid Pearls. Show all posts

Saturday, December 17, 2022

Gingerbread Man Easel card


I used a polka dot background stamp by Hero Arts with pink Umbrella ink. The gingerbread stamp by Stamp N Plus. I stamped it onto a Spellbinders die cut before coloring it in with powdered chalk mixed with paint. I gave the icing some dimension with Liquid Pearls. The border is washi tape and the sentiment was typed up on the computer. 


I did not to take into account that there was another design on the other side of the paper, duh!
The circle is punch by Creative Memories. The pink door stopper is a former hair clip.  Thanks for looking.

Thursday, December 15, 2022

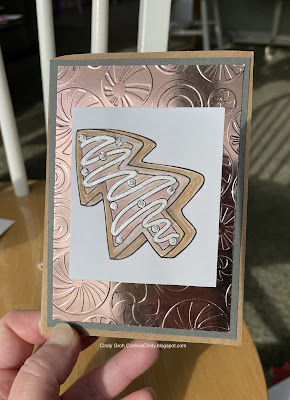
Decorated in pink is a Christmas Cookie Card


 I used the Christmas Cookie image by Robyn's Fetish. ( No longer in business). I watercolor painted the cookie with a combination of Distress inks (Tea Dye and Antique Linen) and a little water mixed with Perfect Pearls. The inside of the cookie is colored with Copic markers. Then I colored the frosting of the cookie with a paintbrush using Platinum Liquid Pearls and water. From there I used the White Opal Liquid Pearls and made the frosting dots.
Here is another card using the same Cookie stamp. You have to scroll down to the bottom of the post. I like that I was able to pull another image out from the drawer.
Thanks for looking.

Tuesday, July 18, 2017

Be the Change Card

My card today is for a graduate. The sentiment stamp is by Unity Stamp Co. Stamped onto a 


with black Hero Arts ink. I colored in some circles with Liquid Pearls. The patterned paper may be by Reminisce and the copper sparkle paper is from my stash. Corner rounder by Creative Memories.


Thanks for looking.

Thursday, February 02, 2017

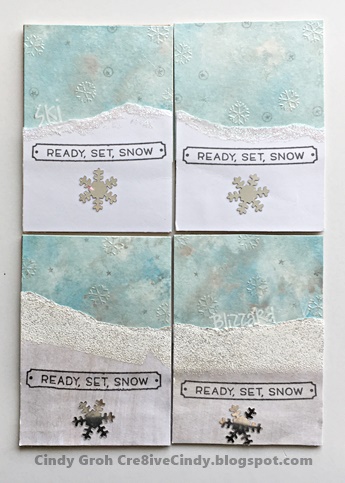
Ready, Set, Snow ATC's

I combined Faber Cassell blue gelatos with white paint and silver Metallic Rub by Viva. I took a paintbrush and smeared the mixture onto the white packaging I had around the house.
Then I stamped and heat embossed snowflakes by Lawn Fawn randomly in the sky.
I stamped some other small circles from the same set with Charcoal ink by Hero Arts.

On the bottom row of ATC's, I combined white paint by Ranger with Perfect Pearls and painted it onto white cardstock. I tore the edge of the white paper and smeared Versa Mark ink on that torn edge. I heat embossed with white glitter powder by Stampendous. 


The sentiment is Lawn Fawn and the silver snowflake is a package of confetti from Dollar Tree.


Thanks for looking.
UPDATED 9-2021

Friday, November 18, 2016

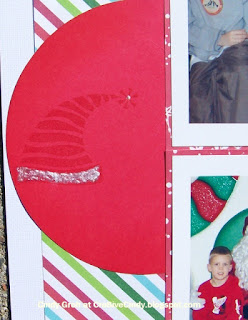
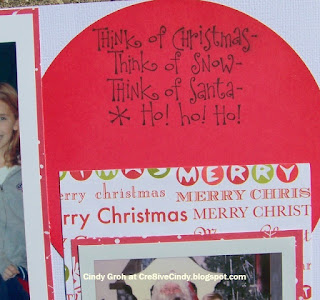
Santa Christmas Layout

I have a layout to share today. I Cricut cut out two red circles. I stamped the Santa hat and then the sentiment in it's own circle. The stamp set and red ink are by Stampin Up. I inked the edges of each circle with distress ink. The photos are each backed with patterned paper and then I adhered everything onto white cardstock. The Santa hat has liquid Pearls on the bottom and a little drop at the top. The stockings at the bottom right are stickers by Jolee's/EK Success.


Thanks for looking.

Monday, February 15, 2016

Manly Monday Chevelle in Red

My Manly Monday card today uses a Chevelle stamp by Deep Red Stamps. You can find it at

or

I stamped it onto Strathmore watercolor paper with black Hero Arts ink. I stamped it on the textured side which didn't turn out as well as I had hoped. Note to self: stamp on the smooth side of watercolor paper. I used Peerless watercolors and distress inks to color the car in. I then couldn't leave it alone and ended up using some Liquid Pearls by Ranger on the front bumper, grill, trim piece above the wheel and head lights. I don't care for the look and probably won't do it again. Lesson learned. If we don't try new things then we can't see how far we can go.

The patterned paper is by Basic Grey. The red cardstock, blue ribbon, and the red cording are all from my stash.


Thanks for looking

Monday, December 07, 2015

Manly Monday Chuggin Along

Welcome back to Manly Monday. I don't have any other blogger's cards today, just my own. I've been a crazy woman scrapping to get some books done that I've been commissioned to do. Then I get to spend the rest of December working on family calendars. Yah! Not really. I won't say I hate making them because hate is a strong word. But I will say I don't like to make them but I love to see one hanging on the wall at my house and also my family's houses. 

Anyway, my card today features a Tim Holtz train stamp that I stamped onto Strathmore watercolor paper with black Hero Arts ink. Then I added some blue ink to the top  of the paper with the image on it and green ink to the bottom. I like the way distress inks make the whole thing more of a scene. 

The clouds of the train have been enhanced with some Liquid Pearls in white. Not a ton of Liquid Pearls but just enough to look at it twice or maybe even run your finger across it to feel if it has texture or not. The background paper is by Die Cuts with a View. The gears border is a die by Tim Holtz in black Recollections cardstock. I made the sentiment with the Lawn Fawn alphabet stamps called Harold and stamped it with white pigment ink by Stampin Up. I also set an eyelet by Making Memories in front of the sentiment.


Thanks for looking.

Scrapbook.com-Use your stamps {Train and sentiment}
Scrapbook.comWarm wishes {1 Sizzix product} **Due by Dec 10th

Monday, September 21, 2015

Manly Monday Taking the Train

Edited April 2021 see the sidebar for an explanation 

In today's card I stamped a Stampers Anonymous/Tim Holtz train stamp onto white cardstock with black Hero Arts ink. I double matted the image with black and then white cardstock. I die cut the gears border also by Tim Holtz leaving a small border for my sentiment. The sentiment is made up of a Lawn Fawn alphabet and white pigment ink by Stampin Up. The clouds on the train have been enhanced with some white Liquid Pearls and the patterned paper is by Adorn It.


Hey there! Hi there! Welcome back to Manly Monday. I'm running a little bit late but better late then not at all. Please click on the blog title above the photo clip to be directed to the masculine card. We have younger male cards today and they are all awesome. Leave the wonderful ladies some love and then check out my card at the bottom. If you like what you see please consider becoming a follower of my blog via Google or maybe Bloglovin or even Instagram.


Thanks for looking


Monday, November 24, 2014

Manly Monday Boat

Welcome back to Manly Monday. I'm typing with gloves on so please forgive me if I make a typing error and don't catch it. It is chilly in my basement where my studio is located and I have to take drastic measures to stay warm sometimes.

I have five wonderful ladies sharing their manly cards today. I hope you will stop by each blog and leave them a comment. Everybody loves comments-well I know I do. Click on the blog name to be directed to the card and then take a look at what I've created for today.


My manly card today uses a Tim Holtz/Stampers Anonymous boat stamp. I used the reflection technique to create the reflection in the water. I enhanced the sky and the water with distress ink by Ranger and then sprayed the image with water since distress products react with water. The cloud is a Unity Stamp Co stamp and I filled it in with Liquid Pearls by Ranger. Then I put it all together with some scrap blue cardstock and Recollections black cardstock and added the American Crafts sentiment sticker.

Thanks for looking.


Challenges:

Monday, July 23, 2012

Manly Monday

This weeks Manly Monday card is a little bit busier then my husband would want it but I think it has to do with the background paper (by Me and My Big Ideas). I really liked the mountains on it so I said I'm doing it. The image is a digital stamp from a company that went out of business. I colored it in with Copic markers (still learning) and the cloud is filled in with Liquid Pearls. The sentiment stamps are by American Crafts and die cut by Spellbinders.
Thanks for looking.


Challenges:


Friday, March 16, 2012

St Patrick's Day card

I have a St Patrick's day card to share today. The image is by The Stamping Boutique I colored in the image using my Copic markers and then used a few Spellbinders dies to matte it. The background of the card is a border stamp that I stamp multiple times to give the look of a background stamp. I then put Liquid Pearls (Platinum) in the circle part of the design. 
Thanks for looking.


Challenges:
http://thepapergirlschallenge.blogspot.com/ -Use stamps to make a background


Sunday, January 22, 2012

Chalk-Ah-Lot Pastel Butterfly Thanks Card

Edited May 2021. See sidebar for explanation 

This week at Chalk-Ah-Lot Cafe our challenge is CHALK DIRECT TO PAPER. So no paint or water or glue or anything just the chalk. I dusted my chalk onto the bottom portion of the card. It's light but it does have these fun streaks in it. I love the way they stand out. The flourish on the card was brushed with chalk and paint. You can find the powdered chalks HERE. They are truly fabulous. I have been using them on everything lately. The butterfly and sentiment stamps are by Stamp N Plus Scrap N. Thanks for looking:)


Challenges:

Thanks for stopping by.

Sunday, December 25, 2011

Gingerbread Woman Christmas Card

Merry Christmas to all.

This week at I Did it Creations Challenge #87 our challenge is "A Gingerbread Christmas" and we are sponsored by Robyn's Fetish.


I painted this gingerbread woman using distressing inks, sprayed with water and applied with a fine tip paintbrush. 

The frosting is Liquid Pearls and the button and pockets are Stickles. 

The red square is chipboard with sentiment stickers applied. 

I wrapped the lace around the patterned paper on the left side of the card


Thanks for looking
Updated7/2021

Friday, December 09, 2011

Liquid Pearls Tutorial for Fabulous Friday Fun 12-9-11

Don't forget to check out my post where you use a Fabulous Friday Fun tip or product for a chance at a fabulous prize.

This week for Fabulous Friday Fun I am continuing on with last weeks projects using Liquid Pearls. I came up with so many examples of ways to use it that I had to break it into two posts. HERE is last weeks post and on to this weeks post.

I have these large flowers that are not paper but more like a Mulberry paper but a little bit stronger. For the first idea, I used the White Opal and a rubber background stamp by Hero Arts.


I sprayed a blob of Liquid Pearls with water and painted it onto the stamp.


I placed the flower on the stamp and pressed down onto the stamp. This is the fun look that I got.


The second flower I painted with just white opal Liquid Pearls. After it dried I used platinum pearls mixed together with a couple drops of ink from a Ranger Industries re-inker, color aged mahogany, on wax paper.


I used my paint brush to mix the two together


Then I added more Platinum Pearls to make the mixture thicker.


I painted the petals of the flower lightly with the mixture to get the following look.


Combining the flowers together along with a circle die cut and an epoxy sticker I layered them on to a journal box. Here is a close up of the flower. I like the way the Liquid Pearls add color and texture to the flowers.


For the third flower, I used the same mixture as above on a clear background stamp.


Here I painted the background stamp.  


Place the flower on top of the stamp to transfer the image. 


Here is the flower after being stamped.


The stamped image didn't transfer completely but I was able to use the flower on a card.
Using a snowflake sticker and a rhinestone for the center I was able to hide the imperfection.


There is another Liquid Pearl aspect to this card. I heat embossed snowflake stamps using clear embossing powder. I wanted to see if the Liquid Pearls would resist an embossed image. Adding a few spritzes of water to the Liquid Pearls and painted the patterned paper. 


Thankfully the sun was shining the day I took these photos. You can really see the snowflakes pop off the paper in these shots.


Well, that's all I have for you today. I hope you have enjoyed the different ways to use Liquid Pearls.

Thanks for looking.