Showing posts with label Handmade banner. Show all posts

Tuesday, August 11, 2020

Gnome Card and 100th birthday banner

I made this card and banner for our grandma’s 100th birthday. 

There was a lot of time making this card. The gnome is a Cricut cut in my stash.
The gnome is an inside family joke
Edited-I did look it up and the gnome is from the cartridge Fresh Picked.

 The brick paper is from Recollections and looks like real brick. 
I made the grass paper from scraps. I inked them with distress ink and cut slits in the top. 
I used dimensional adhesives to give the grass multiple layers. 
The mushroom and flower are stickers by K and Co. 
The lattice on the left was inspired by the heritage photos I'm scrapping.
 I took a vine-like ribbon and weaved it into the lattice die-cut by Cricut. 

That ribbon has been in my stash for probably 5 years

The flowers on the vine were made with a punch from Marvy.
 It felt good to use a lot of old supplies. And have it come out so cute. 

I hadn't been entering challenges but have recently found a few blogs I like. This card is perfect for the summer fun challenge at:


I hoped Siri was correct. I stamped out those numbers. I love how it turned out.


Thanks for looking

Monday, April 27, 2020

Manly Monday Corvette for Hubby's Birthday

This card is a day before my husband's birthday.
I used a stamp by Deep Red Stamps

Classic Corvette

I colored it in with Copic markers
Embossing folder by Darice
I added white paint by Ranger to get the dry embossing to stand out.


Thanks for looking

Sunday, April 20, 2014

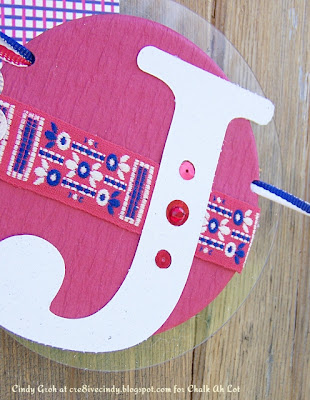
July 4th Up-Cycled with vintage ribbon Banner

There's a new challenge at Chalk Ah Lot which is re-purpose or recycle something with chalk. I choose to use the clear CDs that come on top of the large stack of CDs my department uses to burn patient images to take with them to other doctors or hospitals.


The base of the pennants is a clear CD with a red circle over the center. Oh, wait I actually put some vintage red white, and blue ribbon over the circle first. I used Stamp N Plus red powdered chalk on the heart in the pennant below.


The patterned paper is old and Idk who it's by. I embellished the banner with stickers by K and Co, a vintage bottle cap, corners by Making Memories {very old}, and a square sticker that I cut in half to use as corners by Sticko.


I die-cut the letters out using my Cricut and the Art Philosophy cartridge. Each letter has three circles and I placed a red sequin into each. The largest circle's sequins have a rhinestone in the center.


All this is held together by some red, white, and blue ribbon and ready for the summer to begin.


Thanks for looking.

Challenges:
http://creativecornerchallenges.blogspot.de/ What's in a name? {C for Cricut}

Tuesday, June 25, 2013

Guest Designer at My Stamp Box

Exciting news to share today. I was asked to be guest designer at My Stamp Box. Check out all their wonderful stamp sets.  


I used THIS stamp set. 


I made a banner for my sister's wedding shower. Her colors are purple and yellow and so I made the pennants alternating colors. For each pennant I added a flower or two in the different shades of yellow and purple.  


For this pennant I heat embossed the flower stamped image on vellum and cut it out. To give it a yellow appearance I colored the back with a Copic marker. Same thing for the leaf next to it.


I used the same embossing technique on the S pennant but with some shading in purple. You can get such a different look using your Copics.


For my next project I learned a technique from Jennifer McGuire that worked perfect with this stamp set. Check out the link for a video tutorial she made on this technique.


I stamped the back of the large flower stamp in white craft ink, heat set it; stamped the back of the smaller flower on top of the white in aqua; then stamped the front (normal way of the image) of the smaller stamp with white ink on top of  the aqua. That was a mouth full. 
I masked the flower off and did the same thing with the leaves. It's a fun look.


Thanks for stopping by. Be sure to visit My Stamp Box to view my bio and come back next Tuesday, July 2 (what? it's July next week) to see my other projects using the same stamp set. You will like them.


Other Supplies:
Banner-patterned paper by DCWV, Best Creations and Recollections; cardstock by Recollections and DCWV; rosette die cut by Tim Holtz; pennants, circle and letter dies cut out using my Cricut; ink by Colorbox, Stampin Up, Staz-On, Versa Mark; embossing powder by Stamp N Plus; markers by Copic; ribbon is vintage.
Card-patterned paper by Recollections; cardstock by Oriental Trading Co and Recollections; ink by Stampin Up and Hero Arts; masking paper by Inkadinkado; sentiment sticker by K and Co; twine by We R Memory Keepers; sticker embellishment by Studio G.

Banner Challenges:


Card Challenges:
http://www.thekraftjournal.blogspot.com/- Inks paints or markers with kraft

Sunday, October 28, 2012

ChAlK-Ah-LoT ChaLleNgE 21


We are continuing on with challenge 21 to add orange to your project. You can Link up HERE.

REMEMBER You can use any type of chalk or chalk products on your project. Just tell us about it in your blog post in order to be in the running for the prize of two powdered chalks.

My card is using the scarecrow stamp by Stamp N Plus and a sentiment stamp that you can find information about HERE. I colored in the scarecrow with a combination of powdered chalk and paint by Stamp N Plus. Die cuts are by Spellbinders, patterned paper is by Recollections and Scribble Scrabble and ink by Tsukineko and Ranger Industries.


Challenges:

Wednesday, July 04, 2012

Freedom isn't free July Calendar Layout

Happy Fourth of July! 


This layout is the calendar month of July for my mom's calendar. That's my husband and me last summer. 

The banner was made using Cricut cartridge Country Life (or is it Living? not sure) 
The chipboard pieces are by The Paper Studio from Hobby Lobby and the peace sign sticker by EK Success. 
Cardstock by Coredinations and patterned paper by My Mind's Eye. The stamps in the background are by Stampin up with ink by Close to my Heart. 

Thanks for looking.


Thank you to all of the men and women in the armed forces especially our nephew Aaron who is in active duty and away from his young family for 180 days. God Bless you!

Here's a little history lesson for you. Did you know that John Adams and Thomas Jefferson both dies on July 4, 1826? They did. It was exactly 50 years after the signing of the Declaration of Independence. I find history very interesting. My reading is usually of the historical nature. 

Anyway.......

Monday, February 20, 2012

Manly Monday

Another fun Manly Monday card but this one is to give a shout out to my nephews Spencer and Tyler in celebration of their birthdays today and tomorrow respectively. 


Thanks for looking.

Monday, December 05, 2011

Manly Monday

Click here for the CHALLENGE WITH A PRIZE
It's super easy to qualify. Check out the post and link it up.

This week I have a layout for the 2012 calendars that I have been teaching classes on and have 12 of them to do myself. 20 more days until the big reveal to the family. That makes my stomach turn. Anyway here is July and Hubby said I could use it for Manly Monday.

Supplies:
Star brads by The Paper Studio at Hobby Lobby
Banner made with Cricut cartridge Lyrical letters
Dog tag made with Cricut cartridge Base Camp
Star stamps to make background paper are by three if not four different sets by Stampin Up
Ink by CTMH, Ranger, Stampin Up
All stickers by EK Success
Cardstock by CGull (blue), Recollections (red) and The Paper Co (white)
Thanks for looking


The picture looks like poo but what can I do when the sun won't shine. We have been living under a gray cloud for over a week. Hate it! Why do I live here, I ask myself constantly? Oh yeah, most of my family (even though some I could stand to move away from) and friends are here.
I tried doing lighting in my office and got yelled at for removing lamps from the living room. So I asked for an over my head lighting, just something that would clip onto my bookshelf and I got the look followed by "I put all new lighting in that room. What do you mean there's a shadow?" Lol-whatever. Anyone got any suggestions without spending a ton?

Wednesday, July 06, 2011

Peaceful Banner Wednesday

I'm still messed up from the Monday holiday. Wednesday just doesn't seem right but that's what the calendar says so we'll go with it.
Here's the banner I wanted to show you. The theme of her graduation was Peace Out. The invites we made had a (Unity) bug car stamp and the license plate said peace out. So everything was very groovy for her party.
I wanted to make a banner just because I had only done one before and wasn't pleased with the results. (and the friend who I sold it to hasn't brought it up so I'm thinking it didn't work as planned) So for this one I wanted it to be easy enough I could do it the night before her party. So I printed out these digital pennants that I have to fit the entire 8.5x11 sheet of cardstock. Oh and I also didn't want to fussy cut-just use the old trimmer and call it good. Well that is just what I did and I was proud/happy with the results. Now my niece took the close up shot and I'm thinking she might just be better at close ups then I am:)
There is a crepe paper flower like thing and this is how I made it: I took some wire out of this ribbon that had wire in it. After I accordion rolled the crepe paper (very sloppy like-no perfect inch folds here) I secured the middle with that wire. Then I fanned it out to meet the other side, added adhesive (This and That by American Crafts) to one of the sides and repeated on the other side. You have to do a little fluffing of the shape but that's about it and you are done with that part.
The ribbon was left over from when we made the invitations. All the cardstock is by Recollections.


I used my Cricut to cut out the circles and letters, ribbon by Michael's and the peace punch is by Oriental Trading Co.


So I hope this inspires you to try something new today, even if it's not in your scrap room. 
Thanks for stopping by today. Come back tomorrow for some cards I have been working on.

Monday, December 06, 2010

Friend card

I made this card for a challenge at Paper Variety. The challenge was a tic tac toe board and I chose the three: make a card, with a banner and black, white and red. Thanks for looking.
Supplies: stamps by Maya Road; chipboard and patterned paper by Scenic Route; black label by Making Memories; black paper by Recollections; white cardstock by The Paper Co; ink by Stampin Up; other-eyelets, floss

Monday, November 29, 2010

Calendar layouts from the birthday girl

Well, 20 years ago today I was at a dance convention in Detroit with my mother. Why would I remember such a thing? Because it was my 16th birthday and I was mad that it was on a Sunday and I couldn't go get my license so my mom took me to this convention as a way to make up for it. Like it was her fault or something. lol. So fast forward 20 years and that brings me to today. I need to ask for one thing- my friend is in the hospital and is not doing well. As a birthday "gift" to me could you please say a prayer for her to heal or fight off infection and make a full recovery or for her doctors and/or medical staff to give her the best treatment for her to survive? Or for her to open her eyes and give her husband hope that he so desperately needs. Thank you:)
OK onto scrappy stuff................
This last layout is for a calendar I am making as a Christmas gift. Well, actually I am making several calendars so these pictures may show up again later next month with a totally different layout and papers. Supplies: patterned paper by DCWV; cardstock by Sunborn, stamps by Fawn Lawn, Hero Arts, and CTMH; punches by Martha Stewart and Fiskars; Die cuts by Cricut for Provo Craft and SpellBinders; ink by Versamark, Ranger, and Stampin Up; embossing powder by Stampendous; ribbon by Michael's

This second layout is one I did on Saturday at Sisterhood of scrap for a one-hour crop. It turned out ok considering it only took an hour. We had to include ribbon and rub-ons in our layout and sketch was by Helen. Supplies: cardstock by Sunborn and Scenic Route; ribbon by Stampin Up, chipboard and brad by Colorbok; ink by Ranger and Versamark; Rubons by Imaginisce and American Crafts; tag by Westrim; flower by Prima; stamp by Recollections; embossing powder by Stampendous; patterned paper by MME.

This first layout is for the challenge at American Crafts blog-Inspired by fall. You must use at least two American Craft products in your layout. Supplies by American Crafts: patterned paper, off white paper, burgundy paper, border stamp, letter stamps, ribbon. Other supplies: Leaf stamps by Stampin Up; Ink by Ranger; Ticket die by Tim Holtz; Jute by Lehigh; Hemp by Crafters Square; Orange paper by Creative Memories; Kraft paper is unknown. Sketch used by Jean Marie at Sisterhood of Scrap. I'm also using this LO for the challenge at Lasting memories-layering/3D effects. There are lots of layers of paper and the foam squares under the word "fallin" and under each leaf give the layout a lift.


That's all for now. Happy Monday!