Thursday, September 12, 2013

ATC's - Fall edition


I have a little something different to share today; it's an ATC, well technically 2 of them. I bought a pack of Ranger ATC's at Hobby Lobby and had a chance to work on a few over the holiday weekend. For the holiday weekend we went to our cottage with my Mother & Brother-in-law along with my husbands 93 year old grandmother. It was fun however I lacked good packing skills and so my holiday weekend went something like this-I brought my rubber stamps but didn't bring the scissors to cut them to use; I brought Versa Mark ink and embossing powder but no heat gun; I brought stamps, ink, stickers, rub ons, paper, you name it for this frame that I was asked to put together but I forgot the frame at home; I had these invitations to work on that I brought my paper to use, trimmer, notes I had made but I forgot the template to the invitations at home; and one more I brought my Cuttlebug, plates die cuts and all to die cut my scraps of paper but I left the scraps of paper box at home as well. Therefore, these obstacles gave me playtime to just do whatever with what I had and so I came up with these ATC's to share.

This first one I made by background stamping the base with Stampin Up ink and a Deep Red Stamp that you can find HERE. Deep Red Stamps is a newer company that has many different images to shoose from. They are good quality stamps made here in the USA and you can find them at Oozaks and A Cherry on Top has some too. These two sites are here in Michigan, so to all the Michiganders please support the shops in our beautiful state.

Then I dry embossed it to give it more of the woodgrain affect using an embossing folder by Darice. After that I inked the edges with Ranger distress inks. I played with a few different colors until I got this look. The pie and utensils die cuts are by K and Co. The orange patterned paper is by Recollections however I inked it a ton and therefore it wasn't the same color as when I started. The purple paper is a scrap from IDK where and then the Thanksgiving sticker is by Flair Designs.


For my next ATC I used a background paper that I made with paint blobs all over kraft cardstock. I had forgotten I tried that a few years ago and didn't like it then.So when I pulled it out over the weekend I decided to do a little bit more to jazzy it up. I took my Ranger distress inks and inked it with multiple colors of inks and then I sprayed it with water mixed with gold Perfect Pearls. This peanut has so much sparkle that my husband ran away in fear. (He hates glitter and anything glittery-whatever!) I think the paint is by Plaid and the cardstock by Oriental Trading Co.

The die cuts are from the same pack as the ATC above K and Co. I placed the nut die cut on a Spellbinders Label #5 die that I had inked like the rest of the card. The patterned paper is by Scribble Scrabble-very old from my stash-and the metal sentiment is by Scrapbook Pro-local dollar store find.


Thanks for stopping by and taking a look.

Challenges:
http://ourcreativecorner6.blogspot.com/- Forgotten things {2nd ATC-forgot about the background paper I had made a few years ago}

Wednesday, September 11, 2013

Marianne Designs stamp

So I have a quick post for you today. I'm just going to list some of the supplies I used instead of talking. This way I can get to creating to post more fun stuff. Happy Wednesday. Thanks for stopping by.

Stamp by Marianne Designs
Flowers by Prima and Petaloo, 
Stickers  by Horizon Group USA, 
CS by Cryogen, Neenah and Coredinations
PP by CM and MME
Copic Markers
Spellbinders dies
Washi tape by Darice
Banner die by Stampin Up


Copic marker colors Skin R30, E53, E50, E000, E0000
Hair and bench E43, E44, E47
Top B00, B04 and B06
The other blue in the card B24 and B26


Thanks for looking


Hello

For my card I used a Deep Red Stamp from THIS stamp set.I love how versatile this stamp set is. Super fun for ladies cards, my mom in particular. The supplies I used for this card: cardstock is by Recollections and CGull, patterned paper by My Mind's Eye, with the top portion I dry embossed it with a Darice embossing folder, washi tape separating the two halves is also by Darice. The white lacy die cut in the background was cute out using my Cricut with the Art Philosophy cartridge Font layer size 4". The stamped image is stamped and inked with Ranger Distress ink on a Spellbinders die cut. The hello sticker is by Three bugs in a Rug, flower sticker by Martha Stewart and little brown epoxy circle sticker is by Miss Elizabeth's. The sequin stars are from my stash.

That's my card for today and I thank you for stopping by.


Tuesday, September 10, 2013

Seventy is Heavenly

For my card today I'm using THIS flourishes stamp set by Deep Red Stamps. I used Stampin Up brown ink on the Bazzill cardstock and the card base is by Recollections. The 70 was cut out using my Cricut and then I placed sequins behind it. From there I used foam adhesive on the Bazzill cardstock piece to give it dimension and show the sequins underneath. The little circle letter stickers are by Colobok. I don't how many 70 year old people would agree that it's heavenly but it rhymed so well that I couldn't help myself.

This sequin technique was a challenge for me and I think when I do it again I will choose a number that doesn't have a center/extra piece to recognize which number it is because the center of the O had a hard time adhering to the sequins. The other thing I will do different is turn the sequins over so the indented center will be against the adhesive. I had this one sequin that would not stick to my adhesive which I think would have had it been turned the other way. That's kind of confusing but take a look at a couple of examples I found on my Pinterest board titled SEQUINS.

All of these examples the sequin is the correct way to do it with the bowl face up instead of face down like I have them.

Birthday wishes
Thinking of you
Hello
PTI


Sequins are very "In" right now in the craft world. I found these and a bunch of other colors of sequins at a dollar store-craft section (by the beads and Popsicle sticks) You should give them a try.

Thanks for stopping by and taking a look.


Challenges:
http://polkadoodle.blogspot.com/-Significant birthday
http://www.lovesrubberstampschallenges.com/- Have a sentiment on the front

Monday, September 09, 2013

Manly Monday


Welcome back to Manly Monday where I find masculine (boy, teenager, adult) cards to share with you. Masculine cards can be difficult to create and this will give you some inspiration. I have a ton of links for you  today. So grab a coffee or tea, sit back and enjoy the ride.

Cathy's Card Spot

Claire's Crafty Creations

Sammy Jean

Jess's Crafts

Dee's Designs

Crafting with Cotnob

Happy Glitzy Girl

Michelle at Laughing Ducks

For some reason I couldn't save the photos for the following links. My computer has had an attitude lately and it better stop it or it's going to get replaced. I'm not sure what it was but please visit these blogs as well. You will not be disappointed.

Fiona Mccarthy
Dee's Cards
Jess's Crafts
Crafty Lawyer Creates
Faye Stampin Fluff N Stuff
Wish Craft Cards
Fit Kitty

For my "card" today I have a different product to share with you by The American Tag Co. This tag looking creation is an envelope that would be perfect to send to one of my nephews with a check or cash inside. It will fit into a business envelope for mailing and will be something different for them. Check out the last two photos.

To decorate my "card" I used a background stamp by Deep Red Stamps. You can find it HERE or HERE. I used Stampin Up brown ink for the stamp and distress ink by Ranger for the gears. I cut the gears out with my Cricut and the Indie Art cartridge. The tickets are by SEI, washi tape by Darice and word stickers by K and Co. The letter U is a Lifestyle Crafts alphabet die with Anna Griffin patterned paper that I ran through my Cuttlebug.

Thanks for joining us on Manly Monday. We look forward to seeing you next week.


Sunday, September 08, 2013

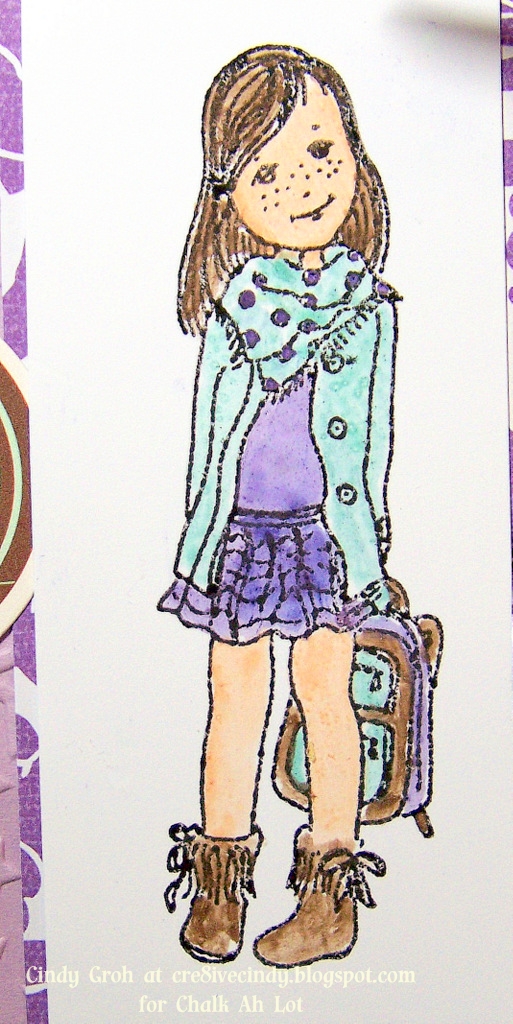
Cu(te) Kiddo heading back to school

I'm posting for the Chalk Ah Lot blog again on this lovely Sunday. The challenge is an image of a person using chalk. My card uses a Stamp N Plus stamp that you can find HERE.  I colored her in with powdered chalk mixed with Elmer's glue and water. Then I painted her in. You can find powdered chalks HERE. I used the colors GEM and FLESH along with Teddy Bear mixed with Dusk. The purple is called Pearl Purple however its not listed on the website and therefore if you were interested in ordering it you would need to call Luann at 715-271-1873.

For the rest of my card I used patterned paper by DCWV, cardstock by Recollections, a die cut by Jillibean soup, embossing folder by Gina Marie and a die by Quickutz.

The black die cut is something new for me, Chalkboard paint by Plaid. I followed the directions for its use however I painted it on watercolor paper instead of the canvas like I was planning on. It still turned out well but I just wonder what it will be like on canvas. I'm not sure how to use it with the powdered chalks yes. It will take some time to play to get use to it. I thought the chalkboard tied into Back to School with the little girl and her backpack. 

So thanks for stopping by and checking out my card. 

Stop back tomorrow for a huge Manly Monday post. Tons of awesome inspiration. 


Challenges:
http://chalknstock.blogspot.com/- Anything goes with chalk {chalk on the little girl}
http://scrapitwithasong.blogspot.com/- Little school girl-the title was my inspiration to use this little girl stamp

Saturday, September 07, 2013

Heartfelt Thanks SNP

Welcome Saturday-I missed you! I'm posting over at the Stamp N Plus blog today with a fun iris folding card using one of their stamps as my guide and a sentiment stamp to finish the card up. Neither one of these stamps is in the web store so if you would like order them call Luann at 715-271-1873. However they have a huge selection of iris folding stamps to choose from which you can start on page 1 right HERE and for some other heart shaped iris folding stamps look HERE or HERE or HERE and definitely HERE.

I made a square card today with a card base from The Paper Studio. The white cardstock is Neenah, red is Provo Craft and kraft is by Oriental Trading Co. The red polka dot patterned paper is by My Mind's Eye. I stamped the iris folding stamp onto the white cardstock with red ink and then cut out the center of the heart to do the folding technique. When I cut it out I didn't do that great of a job so I took a red Copic marker, but it could be any kind of marker, and went around the inside edge of the image with the tip to cover up an left over white areas. That way when the stamped image on white cardstock is against the red patterned paper white cardstock doesn't pop out and give away that I was rushing that day. Both inks used in my card, red for the heart stamp and brown for the sentiment, are by Stampin Up.
 Sorry my photograph isn't the greatest. I was in a rush that day as well and this was the best one out of the ten shots I take of each card.


The brown flower is by Oriental Trading Co and the red and white by Recollections. This card would definitely need extra postage to send in the mail. Usually square cards with a square envelope are extra postage to begin with. However these card bases didn't come with envelopes and I only have rectangle shaped envelopes. In this case the extra postage would not be applied for the envelope shape but more the flowers dimension and not to forget the dimension with all the folds of paper in the heart. Using thin paper is recommended for iris folding because the bulk it creates using cardstock (and it's easier to fold). The patterned paper in my card is just shy of being typewriter thin so even though there are a lot of folds the bulky is kept lower. But then add the flowers on top and it will never fit through the post office sorter. 
Tip: They also say that using tissue paper is a nice fit for iris folding and I;ve heard of a lady who used washi tape to do the folding technique. 


Thanks for stopping by on this glorious Saturday. I have no idea what it's like outside to call it a glorious day but as long as I have power to do my crafts and I don't have to go to work it can do whatever it wants out there. 
Thank you.

Friday, September 06, 2013

Love without Measure

I'm getting a little bit vintage with you today. I used patterned paper by My Mind's Eye and vellum by The Paper Studio. My border die is by Spellbinders, small heart punch by Creative Memories, large heart cut out using Cricut and the sentiment die cut is by Sizzix. Cardstock is by Neenah and Recollections.

I used a ruler stamp from the Sewing Kit stamp set by Deep Red. You can find the stamp set HERE or HERE. All the Deep Red stamps are high quality made in America rubber cling on stamps. Find a large selection of their stamps at Oozak and A Cherry on Top.

I heat embossed the stamp in a gold embossing powder by Stamp N Plus using Versa Mark ink on vellum. Then I colored the back of the vellum with a Copic marker so the vellum wasn't so white looking against all my vintage colored papers and embellishments. I finished the card off with a sticker sentiment by EK Success and two small staples by Ranger/Tim Holtz.

This would be a great anniversary, wedding or husband to wife card. Thanks for stopping by and have a great day.


http://itsallaboutthevintagechallenge.blogspot.com/- Use a metal embellishment {staples}

Thursday, September 05, 2013

Birdcage kind of Love

I think today's card could be used for a couple of occasions such as bridal shower, anniversary, thank you and maybe even a birthday. The shaped card base is from Michael's and the patterned paper in black is by DCWV. The white cardstock is by Neenah and the black by Recollections.

The die cuts are the negative of yesterdays card which you can see just below this post. The frame has another layer that I cut out in white however I didn't end up using the white on yesterdays card. I took the inside piece of cardstock and laid on top of it a netting from some fruit. I then sprayed it with Glimmer Mist and a touch of Smooch spritz. The Glimmer Mist is by Tattered Angels and the Smooch is by Clearsnap. On the die cuts is a bird cage sticker by My Mind's Eye with a rub-on by DCWV for the chain.

I stamped the corners with a rubber stamp by Deep Red Stamps. You can find Deep Red Stamps HERE or HERE. I heat embossed them using ink by Versa Mark and embossing powder by Stampin Up. You can find that flourish stamp set HERE or HERE.

To finish my card I placed a rub-on sentiment by Kaiser Craft over the embossed stamp area. I wasn't sure it would work but was willing to try and it worked great. Those rub-ons are good quality.

Thanks for stopping by.


Challenges:

Wednesday, September 04, 2013

Crochet Background birthday card

Welcome to Wednesday, my favorite day of the week, by far. I made this birthday card to show you THIS stamp by Deep Red Stamps. You can also find it at A Cherry on Top right HERE.

I heat embossed the background stamp with clear embossing powder by Stamp N Plus. I then started bring color into the piece using a Ranger blending tool and distress ink. I sprayed the image with water to dilute the color when I made a spot too dark. This technique works like a charm. Then when it was "all done" I decided to add in the burgundy by using my Fired Brick red distress marker. I think because I layer down so much yellow and orange on the cardstock that the color of the Fired Brick red looks more burgundy then red. Idk, I like it and totally ran with it by adding a burgundy piece of cardstock behind it.

The cardstock is by Coredinations, Recollections and Neenah. The sentiment sticker is by American Crafts, die cut it's on is by Spellbinders, eyelets by Eyelet Outlet and flower by EK Success/Martha Stewart. I inked the edges of the sentiment die as well.

I hope you like today's card and will considering buying Deep Red Stamps the next time you look into buying stamps. They are good quality and stamp beautifully.
HERE's a link where you can view what they have available.


Challenges:
http://blog.oozak.com/- Anything goes 

Tuesday, September 03, 2013

Wedding congrats

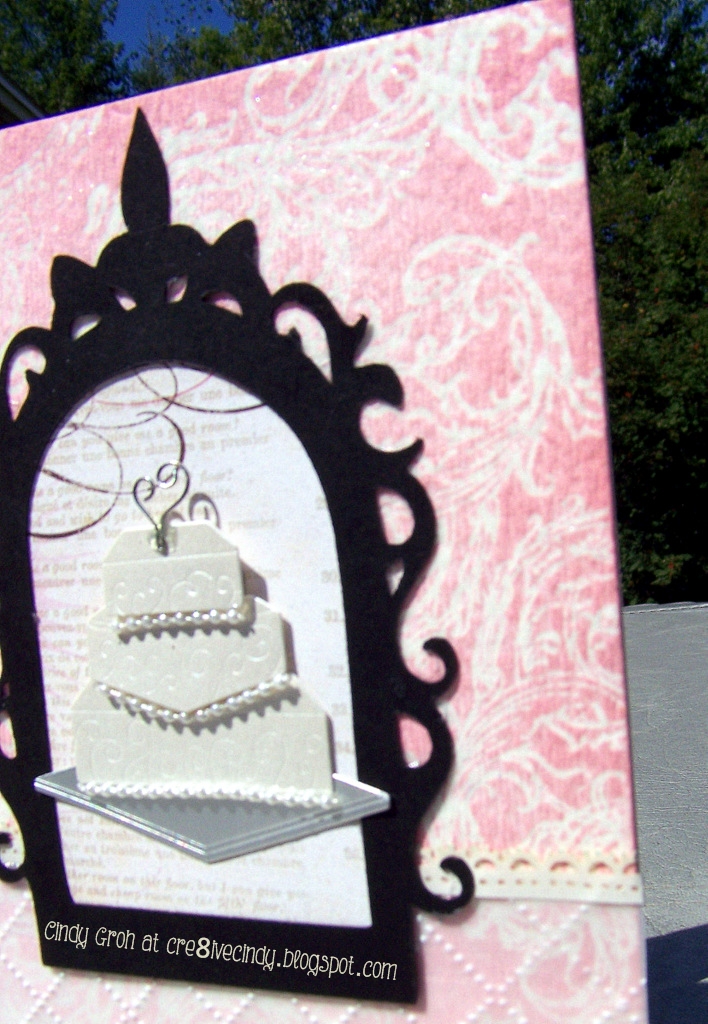
Today's card uses a stamp from Deep Red Stamps which you can see their selection at A Cherry on Top or OOzaks. This stamp is part of  a set of three which can be found HERE or HERE. I used the stamp on the bottom of the set for my card's background. I used this same set on THIS card. Stop by and check it out as well.

I heat embossed the randomly stamped image on watercolor paper by Strathmore. The embossing powder is by Stamp N Plus and ink by Versa Mark. Then I rubbed Distress Stain by Ranger Industries {Color Spun Sugar} over the entire piece of paper. I wiped the embossed areas clean and sprayed water on the paper in areas where I felt the color was too dark. After it dried, with the help of a heat gun, I took an ink blender and Spun Sugar distress ink and inked the edges a little bit darker then the rest of the background.

The vellum on the bottom portion of the card is by The Paper Studio and the sticker in between the background and the vellum is by Mrs. Grossman's {Very old sticker that I just came across this past week.}. The vellum was dry embossed with an embossing folder by Darice. The arched shape is a die cut that was cut out by my Cricut using the cartridge Sophisticated. I placed a piece of My Mind's Eye patterned paper in the center of the die cut and then aligned the Jolee's cake sticker on top of that.

The sentiment is a rub-on by Pebbles that is on Neenah Solar White cardstock and is matted on a piece of Recollections black cardstock.

Thanks for stopping by.


Challenges:

http://justusgirlschallenge.blogspot.com/- Use some distress on your card
http://blog.oozak.com/- Anything goes dies or punches
http://ourcreativecorner6.blogspot.com/- Forgotten things Lacy border sticker}

Monday, September 02, 2013

Manly Monday

Welcome back to Manly Monday. I'm so happy that these 7 bloggers relied back to my request to post a link to their card. I've got some cards for the young males (15 and 18 years old) up to the distinguished males (90 years old). All of these are fabulous cards that you should definitely grab a coffee, sit back and visit each blog for some Manly Monday guy card inspiration. Leave them some love that you saw them on Manly Monday.

Siggi Shop


Cass Creating Now

Anna's Handmade cards

Paper Moments

Anja's Creative corner

From My Craft Room

ScrappEllen

My card today features a stamp by Great Impressions. The image is colored in with Copic markers B91, B93 and B97 along with W1, W3 and W5 and YG03. The image is die cut from a Spellbinders die. The second die is treated with Ranger distress inks as well as the embossed background. The embossing folder is by Cuttlebug and I thought it fit perfectly with the golf theme of my card. The sentiment stamp is by Fiskars stamped with black Hero Arts ink. The tag is a Sizzix die cut that I inked the edges with distress ink. The cardstock in my card is Cryogen (Copic paper), Michael's/Recollections (Blues and black) and Sunborn (grey). The eyelet is from my mothers sewing stash.

Thanks for stopping by and taking a look.


Challenges:
Only five challenges for my card today.

Sunday, September 01, 2013

Christmas Cards all year Round

It's time for a new challenge at Christmas Cards all year Round. This months theme for Christmas cards is Fairies with some sparkle. Love both of these elements for something different when it come to Christmas cards. Be sure to join in on the fun and link up your card.

For my card I'm using an image by Sassy Studios and that can be found HERE. I won her on a challenge blog probably close to two years ago. I finally sat down and colored her in with my Copic markers and then sparkled up her wings with Stickles.

The background patterned paper is by My Mind's Eye and the yellow patterned paper is by Best Creations. The three scalloped circles are die cuts by Spellbinders. The green cardstock scallop circle is dry embossed with a a Darice embossing folder. The star brads are from my stash-can't quite recall who they are made by and  the sentiment is a stamp by Hero Arts. I heat embossed the green Creative Memories cardstock with white Stampin Up embossing powder and Versa Mark ink. Then I used my Peeled Paint distress ink for the edges and a spritz of water with Perfect Pearls in it to give it some extra sparkle. I matted the sentiment onto solar white Neenah cardstock.

Thanks so much for stopping by. Join us at Christmas Cards all year Round for this months challenge fairies and sparkle.


Challenges:

http://christmascardchallenges.blogspot.com/-Something new-using a fairy on an x-mas card
http://pattiescreationschallenge.blogspot.com/- Anything goes include an image
http://flourishes.org/category/challenges/timeless-tuesday/- In Distress (distress inked with an ink blender around the heat embossed sentiment. Emboss~resist technique when I then sprayed it with water}
http://toptiptuesday.blogspot.com/- Intials {C-Cardstock and Copics then G-Green and Glittery paper}


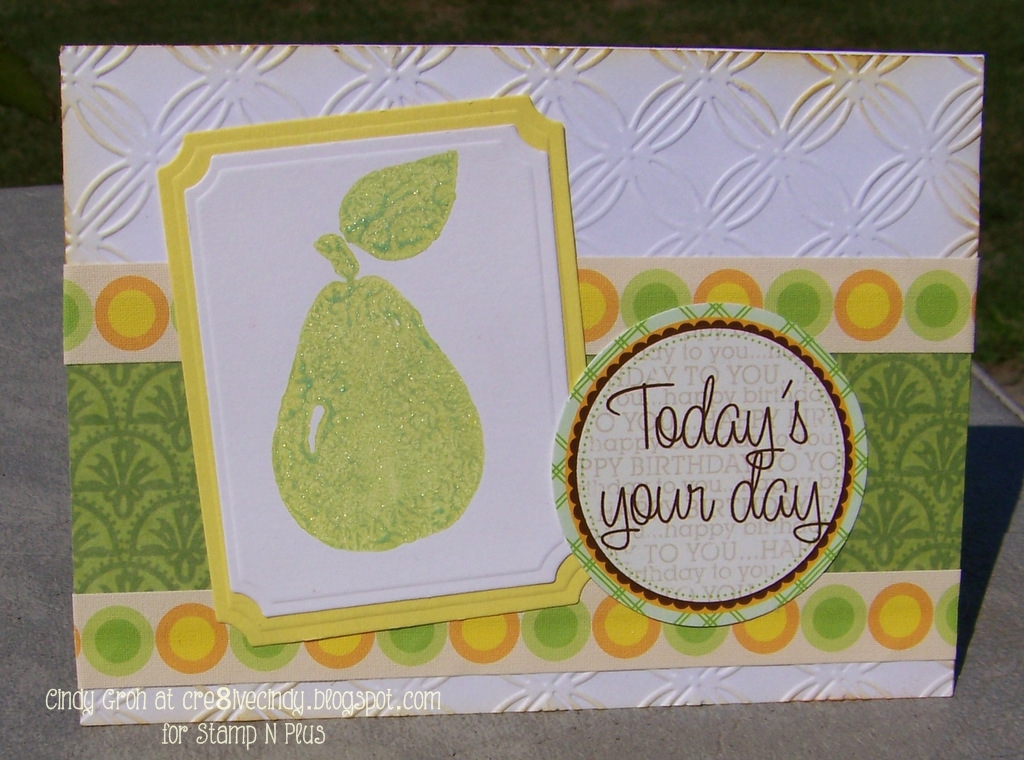
Chalk Ah Lot-Pear flavored Day Card

 Today I'm posting for the Chalk Ah Lot challenge blog. It's a fun place where we play with that at one time everyone had to have to the forgotten product in our craft rooms-CHALK. 

The fortnightly challenge is Anything goes with Chalk
It ends Sept 7th at noon EST
Link up HERE
Our challenge is sponsored by the ever so generous Stamp N Plus makers of Powdered chalk. It's such a fun product to use by coloring in your images, adding extra sparkle or color, creating your own backgrounds, the list goes on. 
Today I used it as ink for my stamp. 
Check out THIS tutorial to see how I do it. 
This pear stamp was pretty easy to do but in retrospect I should have done the stem in a different color. I think that would have created more interest. Oh well-Live and Learn!

I used THIS stamp by Stamp N Plus and I painted on a mixture of Lime colored powdered chalk and paint. Then I stamped it like a normal stamp on my die cut to achieve these results.


For the rest of my card I used a dry embossing folder by Cuttlebug/Provo Craft which I inked the edges with distress ink and a blender both by Ranger. The cardstock for my background and the pear die cut is Neenah Solar white and the yellow cardstock die cut is by Provo Craft. The dies I used are made by Spellbinders. The sentiment die cut is by Elle's Studio and I love the way it can be used for whatever occasion fits your need. That is why I paired-haha-it up with the pear image to be versatile for a birthday, graduation, achievement, encouragement, get well, etc. 

The green patterned paper is by DCWV, which I totally love this Stack and have been hoarding it for at least two years. I'm finally coming around to using it. First step in Paper Addicts Anonymous is to use what you have because you bought it for a reason, like it's pretty or the colors make your eyes sparkle or it was the best deal in the world and you couldn't pass it up because then you would be out of the hoarders club and you're one person away from being president of the club and who wouldn't want to be president of something?! LOL Anyway, I can't remember what the second step is since I'm just barely touching my toes on the first step:) The border tape like sticker is by Imagination Project Gin X and they call it Artistix Cotton Art Tape. Pretty fancy name. It reminds me of a thicker washi tape that's not so translucent. 

So that's my card for the day. Thanks for stopping by to check it out.


Come back tomorrow for Manly Monday. It's stacking up to be Awesome!

Challenges:

http://izazoviislatkisi.blogspot.ca/search/label/Izazovi- Colors, scents and tastes of Summer