Showing posts with label Design Objectives. Show all posts

Monday, January 01, 2024

Manly Monday Musical Christmas Easel Card


I made this card for my nephew and his roommate who are at Western Michigan University and are both in the music program. I was inspired by the Craft Roulette parameters:
Project-square
Color- nest
Element-ladder
Random-add a cat
Obviously a square. The tan colors look like a nest. The bow on the horn looks like cat ears. And then on the inside of the card, there is patterned paper that has a keyboard that one could say looks like a ladder.
The patterned paper on the front is by Me and My Big Ideas. black die cut is by Spellbinders and the other is by Design Objectives. The DO die cut is out of a wallpaper sample.
Check out Craft Roulette. It sure is fun and such a great challenge.

Thanks for looking.

Saturday, March 12, 2022

Gabe Freshman year and 1st year Percussion

I used both sides of a patterned paper by Bo Bunny. I use Design Objectives label dies to make the banner at the bottom on the left. The alphabet and words stamps are by Lawn Fawn. The embroidery floss is by DMC. I’m sure where the freshman sticker is from.

On the right side, the the words at the top we’re. printed using my Cricut markers. The title letters are from my Quickutz and they are on a border  from Sunborn. The last thing is the drum that I cut out using my Cricut. Thanks for looking.

Saturday, May 08, 2021

Cottage 2021 Calendar scrapbook layout


Today I have some of the calendar layouts.

This first layout, the patterned paper is by Die Cuts with a View.
The bottom borders are by Sunborn. The scallop is the negative of where the borders are attached together when you buy them. So you have the border with brown circle that is still attached to the packaging. Then above that is where the next border would have been but I removed it. So this is the negative of the removed scalloped border.

 I can’t think of another way to explain it.
Title die cut is by Cricut.


 For this Fourth of July layout, I used some label die cuts by Design Objective to create a banner. 
The red floss is by DMC
The stamps inside each label are by Lawn Fawn.
The firework diecuts are by Dies...to dies For. 
The glitter paper is by Recollections.
The polkadot patterned paper is by Die Cuts with a View.
The corner at the bottom, is a piece of red card stock cut with decorative scissors for the edge.


This next layout is part of a weekend that my husband and his friends do every year. It was quite cold and for whatever reason they were in the shed with the heater drinking beer. Why they didn’t go into the cottage is baffling to me. But, boys are dumb.

The die cut is by spellbinders and the little man sticker is by Close to my Heart.
The letters stickers are by Current.
The patterned paper is from my stash. 


For the next layout, I used the same letter stickers as the layout above.
The border punch is by Fiskars.
The stickers are from Creative Memories and Stickibilities. 
The pretty green patterned paper is fine Doodlebug.
I would guess that the green grass paper is by Colorbok.


Thanks for looking

Friday, November 27, 2020

Same Martha Stewart Flower sticker for 3 Sympathy cards

I made a handful of cards with the goal to use up a pack of stickers. I love these flower stickers by Martha Stewart so much but it's time to let them go and show others their beauty on a few simple cards.

I used a sentiment stamp by Close to my heart
The patterned paper is unknown right now. 
I'm spending way too much time looking for the manufacturer. 
I have to move on.


The next card,
I cut two 12x12 borders from Sunborn to fit around the edges of the card front 
The die cut under the flower is by Design Objectives. 
It was inked with distress ink before removing the die from the paper.
Sentiment by Hero Arts


Last card,

I'm using more of the packages of Elle's Studio products. 

This pink paper has pretty gold words on it.
The cream-colored die cut is by Spellbinders
The pink die cut is by Design Objectives.
The gold leafy die cut on the right upper side is a Cricut cut leftover from
And matches my 


This card is a fabulous example as to why I dislike using liquid adhesive. It's all warped and not evenly stuck down in places. SMH.
Always learning.

Thanks for looking

Sunday, October 18, 2020

Small Embossed Flower Bouquet cards

Simple card with Making Memories patterned paper and two chipboard exclamation points by Hiedi Swapp.
The dry embossed flowers are by Cuttlebug.
I inked them with distress ink
I'm not sure where the doily square die cut came from.


This second card...
I liked it better without the big bulky brad sentiment.
It was a soft card like the one above when it was just the embossed flowers
And then I went in and added 
This a metal embellishment that doesn’t match well
Oh well, moving on.
That is a small embossing folder is by Cuttlebug 
I lightly inked it with distress ink.


The die- cuts are by Design Objectives and Spellbinders.
The patterned paper is by Creative Memories-brown
 Making Memories-floral and
 Die Cuts with a view-green

Thanks for looking.

Saturday, October 10, 2020

Pink embossed butterflies with a pretty flower card

We need some pink in between all this blue layout stuff.!
I have to say, when I was looking at this card to write this blogpost I was clueless about the manufacturer for the leaves stamp on the tips of the die cut. 
But then, for whatever reason, I lifted my head and this stamp set was the first one on a peg.  Quite often stamp sets get moved around as I'm looking through them.

The leaves stamp comes from the Sincere Sentiments designed by SCDesign by Simonne Clay from the Cardmaker and Papercraft magazine. I bought it on Mercari with a bunch of other things to make my purchase worth the shipping cost. There are a lot of nice sentiments, see picture below.

Then, here's my next thing. The circle in the center is by Elle's Studio. I won these products years ago so I put them on my desk so I will see them and maybe use them. It worked because I used one here and on an upcoming card. 

The other details of the card are:
 The white and pink die cuts are by Design Objective Designs. 
The pink ink for the leaves is from Scrapbook.com. It's their own line of products called Umbrella. 
To finish up, the center circle is from a Jillibean Soup and the butterfly background embossing folder is by Gina Marie. I did put a little bit of distress ink on some of the butterflies


My craft room has a half wall (3'x6') and a wall (5'x5') with pegboard for my stamps. 
When people come into my craft room for the first time, they say it looks like a store. Also, they've no idea that the packages on the wall are stamps. Most people think of stamps as rubber on a woodblock.

Here's a picture of the stamp set


Elle's Studio Leftovers


Thanks so much for looking.

Thursday, May 21, 2020

Just a Note Cards with Labels and Eyelets

I'm still chugging out more TY and TOY cards for everyone. 
I've also sent out a few birthday cards for kids that weren't able to have their birthday party because of the stay at home order.

So for these cards:
I used stamps by Hero Arts and Stampibilities for the sentiments
The musical note die-cuts are by Cricut.
The patterned paper is by Prima
The first card uses die-cuts by Design Objectives.
Look at all those eyelets, Oh Yea!
I used Spellbinders labels, called grommet tags, for the second card
The center die-cut was embossed and then inked in the center.
I did that more when I had my Cuttlebug
I'm still learning on my Gemini which plates to use with what.


Thanks for looking

Saturday, April 25, 2020

Deep Red Stamps Tea time with a friend

I used stamps by Deep Red Stamps called

Tea Time

The sentiment is by Stampendous
The die- cuts are by Design objectives with eyelets by Eyelet Outlet
The patterned paper is by Recollections


Thanks for looking

Monday, April 20, 2020

Manly Monday Green Kenny K Image Boy Image Card

I used a stamp by Kenny K colored in with Copic Markers
The sentiment is by Recollections stamp with Hero Arts ink
The die- cuts are by Design Objectives 
The patterned paper is by Memory Box


Thanks for looking
Here are some other cards using the same stamp.
Boy in orange

Friday, February 21, 2020

CTMH Blue and Red flower cards

I made these just after I made this Yellow Flower card otherwise I would have posted them together.
The blue flower is layered with a scalloped square die-cut by Spellbinders in blue cardstock. Underneath that die-cut is a die-cut by Design Objectives in patterned paper by DejaViews. The die-cut with the sentiment is a smaller version of the Design Objectives die. The sentiment is a stamp from Forever in the Time stamp set.


The red one I fussy cut out leaving a white border the red square like die cut it with a by Design Objectives. The patterned paper is by Pebbles. The heart in the center is a punch by Creative Memories. The two pieces of tan paper were leftovers from a different project.


Thank you for looking.

Wednesday, March 13, 2019

Baby Girl Shower Invations

I have a sore arm from typing. Here are the details:
Stamps: dress stamp is by Unity Stamp Co. You're invited by Magenta. Background stamp by Hero Arts.
Patterned paper by Provo Craft.
Ribbon: from stash
Die cuts: Spellbinders and DO Crafts


Thanks for looking.

Sunday, June 18, 2017

Sit back and Relax card

 The background of this card is in embossing folder by quickutz. I inked the folder with paint mixed with powdered chalk.  The reading is from May parts the diecut behind the bottle cap is by DO crafts. The sentiment is by unity stamp company  and is stamp on a Gina Marie designs diecut. The lemon is a doodle bug sticker. 


 I am now doing my blog posts using the voice activation on my iPad. I haven't figured out how to make companies with start with capital letters. I'm still learning. Doing posts this way is really helping the pain in my wrists that I incur from typing. 
 Thanks for stopping by and taking a look. 

Wednesday, June 14, 2017

Let's all Dance Like a Daisy Bottle Cap card

 The title of this post is a small child's song that I used to know and this card reminded me of it. The embossing folder is by Darice and I put Perfect Pearls powder on the daisies.  The die cut behind the bottlecap is by DO Crafts and the other is by Spellbinders. 


Thanks for looking.

Monday, September 26, 2016

Manly Monday Anchor

Manly Monday card today has an anchor stamp which is sponge stamp that I was able to get a good impression with regular Stampin Up navy blue ink. Die cut the image with a Spellbinders die. Die cut a Design Objectives die for behind and with the same die, cut out blue foam by Tiny Crafts. Adhere the three die cuts together.

Stamp a card base by Recollections with a Hero Arts background stamp with blue Stampin Up ink. Cover the top left corner with navy cardstock and cover the seam with Creative Memories patterned paper that has been cut with a swirly paper trimmer.Die cut the arrows and sentiment from Cricut and adhere all the parts together.


Thanks for looking.

Sunday, July 03, 2016

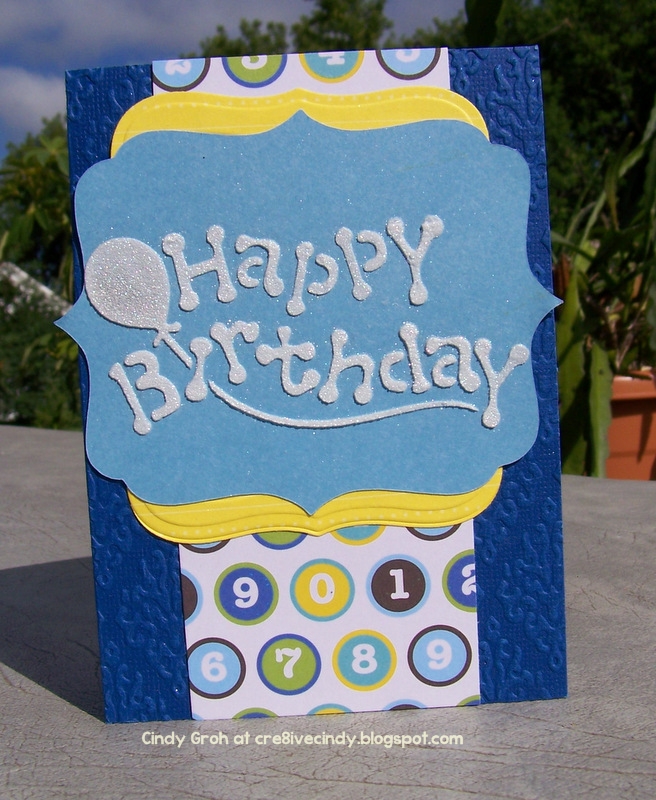
Happy Birthday Stencil Card

My card today is the subject of most cards that I send out. The blue background cardstock is by Cordinations and I dry embossed it with a The Paper Studio folder. I layered a piece of patterned paper in the middle of the card. That patterned paper is by Studio G and I found a pack of differnt birthday designs at Meijer for $1.00. What a steal. 

The yellow die cut is by Design Objectives with yellow cardstock by Bazzill. The blue die cut is a Cricut cut from the Storybook cartridge. The sentiment and balloon are made using a metal stencil. I taped the die cut down to my work area and then the stencil on top of it. Then using a palate knife I applied white embossing paste to it. Remove the stencil right away and wash the paste off completely. Once the paste dried I adhered the die cut to the rest of the card.


Thanks for looking.

Friday, May 06, 2016

Baby Elephant baby Cards

I have two baby cards to share today. The elephant stamp is by Fiskars and I've stamped it with Memento black ink and colored it in with Copic markers. 

I die cut the elephant with a Design Objectives die. The background paper, the strip in the center and the light green squares are all patterned papers by Creative Memories. The darker green/sage patterned paper is by Making Memories. I didn't die cut those squares because I don't think I own regular square dies. I just cut them with my trimmer. The tag and the eyelet are unknown.


I die cut the elephant for the blue card with a Dreamweaver Stencils nesting die. This card uses blue cardstock by Recollections and patterned paper by Making Memories. The ribbon and the charm were decorations at a baby shower that I went to and kept for this sort of reason. I love this card and it was so simple to make. Bonus!


Thanks for stopping by.

Wednesday, May 04, 2016

Just for You Shaker Card

For my card today, I die cut the Design Objectives flower out of  SU cardstock, I stamped in red (Stampin Up ink) the Fiskars sentiment stamp on the label die by Clearly Besotted. There is a stamp that matches the die but I find it challenging to get the stamp and the die to match up for a perfect or even semi perfect stamped image that lines up with the die. It's an art form that I haven't mastered yet.

I used 3M dimensional adhesive and transparency film for the shaker by placing the red cardstock paper with the transparency upside down to prepare for the next step. I taped the transparency to the red cardstock, then adding the dimensional adhesive around the flower shape all the way to the edges of each piece of the flower. I poured the sequins and shaker stuff inside the bowl like opening that I made with the dimensional adhesive. I removed the release paper of the dimensional adhesive and adhered a piece of white cardstock to be the background of the shaker. As to close up the "bowl". I adhered dimensional adhesive to the rest of the red panel before adhering it to the polka dot paper (Studio G). Wow, I hope I said that correctly.

The sequins and beads in the shaker are unknown and the gold strips of sequins came off an old dance costume. What else will or can I use 4 totes full of costumers for? Maybe, when my niece gets older and can fit in them, she will be as fond of them as I am.


Thanks for stopping by to take a look.

Friday, March 18, 2016

Boy Teddy Bear Duet

I have two baby cards for you today. They are similar so I figured put them together in one post.

The bear stamp is by Stampin Up and it is stamped with Tsukineko brown ink and colored him in with Copic markers. I fussy cut the image out with a small white border around him and adhered him to two Cricut cuts. The first one in white patterned paper by The Paper Studio is from Close to My Heart Art Philosophy (Square 7) and the blue and brown patterned paper by Deja View is on the same cartridge as Square 5.

There are a lot of layers to this card. Starting closest to the card base is a light blue cardstock by Recollections. The white on top of that is the same patterned paper the bear is on. The darker blue paper is by Paper Pizzazz and the brown with circle like stars is by The Paper Studio. The sentiment is on Stampin Up grey cardstock and is made using Lawn Fawn stamps and brown ink. I think I should put an exclamation mark at the end. Hmm. 


The next card I stamped and colored the same way but I didn't cut him out. Instead I die cut the image with a Design Objectives die and inked the inside with distress ink. The die behind it is same paper as above and same cartridge (Square 3). The embossing on the brown cardstock is a Gina Marie folder called Fluff. That brown cardstock is by Coredinations. The blue grid patterned paper is by Basic Grey and the white paper is same as above. The sentiment is a stamp by Fiskars stamped in brown ink and the epoxy sticker is by Sticko/EK Success.


Thanks for looking.

Tuesday, February 09, 2016

It's a Girl Stroller Card

Here's a little bit of pink to brighten your day. The ribbon is by Offray and The Paper Studio from Hobby Lobby. Stroller stamp is by Stampin Up and colored with Copic markers. Background paper by The Paper Studio and behind the image is a My Mind's Eye journal box. I die cut the image out with a Design Objectives die and then inked the inside with distress ink by Ranger. I die cut the same shape out of white fun foam to give it dimension. The flourish was cut out with my Cricut and the flower is from my stash.


Sunday, January 10, 2016

Baby Rocking Horse Card

My card today features a rocking horse stamp by Stamp N Plus. I stamped it with Stampin Up ink and then die cut the image with a Design Objectives die. I inked the inside of the image while the paper was still in the die with distress ink. I die cut the two Spellbinders dies that are behind the image. The card base is by Recollections, the teal paper closest to the card base is by Studio G and the background paper on top is by SEI. The ribbon is from my stash but the sentiment is a vellum sticker by K and Co that I placed on to white cardstock. 


Thanks for looking.