Showing posts with label banner. Show all posts

Monday, June 22, 2026

Manly Monday Ride a bike cards

This is my 4500 post!
I colored the leaves and tree branches in with Copic markers

This first card uses a cloud embossing folder by Stampin Up. I inked it with Distress Ink. I created the grass with my Copic markers. 


Darice tree embossing folder colored with Copic markers. I also used the markers to extend the grass from the Creative Memories grass patterned paper. The banner die is by Sizzix and the happy stamp is by Lawn Fawn. 

Wednesday, February 22, 2023

KCTC February calendar layout

This is my nephew and his dad, my brother, at the KCTC. end of the year ceremony. I think it stands for Kent County Training Center. Idk. I'm guessing. He went there as a high school student to learn about law enforcement.
So, I made the background with scraps of cardstock and added a few stickers at the bottom by Creative Imaginations. The pennants/banner were cut out with my Cricut. I stamped the letters with Stampin Up alphabets stamps, with SU ink. I sewed the banner on with embroidery floss. Thanks for looking.

Saturday, March 12, 2022

Gabe Freshman year and 1st year Percussion

I used both sides of a patterned paper by Bo Bunny. I use Design Objectives label dies to make the banner at the bottom on the left. The alphabet and words stamps are by Lawn Fawn. The embroidery floss is by DMC. I’m sure where the freshman sticker is from.

On the right side, the the words at the top we’re. printed using my Cricut markers. The title letters are from my Quickutz and they are on a border  from Sunborn. The last thing is the drum that I cut out using my Cricut. Thanks for looking.

Tuesday, December 21, 2021

'Tis The Season Banner card

The background is a Stampin Up stamping wheel the same color as cardstock. The sentiment is a Cricut cut and inked. The banner is a punch from Stampin Up that I was able to match with a Hero Arts pennant stamp set. The trees were a Cricut cut. I sewed the top of the banner with my Husqvarna sewing machine.
Thanks for looking.

Wednesday, November 24, 2021

November Calendar Layout Two Little Indians

This calendar layout is from my brother's Nov 2020 calendar. Aren't my Mom and I cute? She couldn't understand why we were dressed this way (costume party at the living center) She passed away in 2019-failure to thrive due to dementia. I miss her but I should say I miss the Mom from before 2013. She's in a better place and I would hate to have her be around when Covid hit America and life as we knew changed. You know what I'm talking about.
The background paper is by Colorbok and the patterned paper frame is by Accord Publishing. Stickers on the side are by The Paper Studio. The wood leaf is by Maya Roads. The word Thankful is by a Lawn Fawn alphabet stamp set.Thanks for looking

Saturday, May 22, 2021

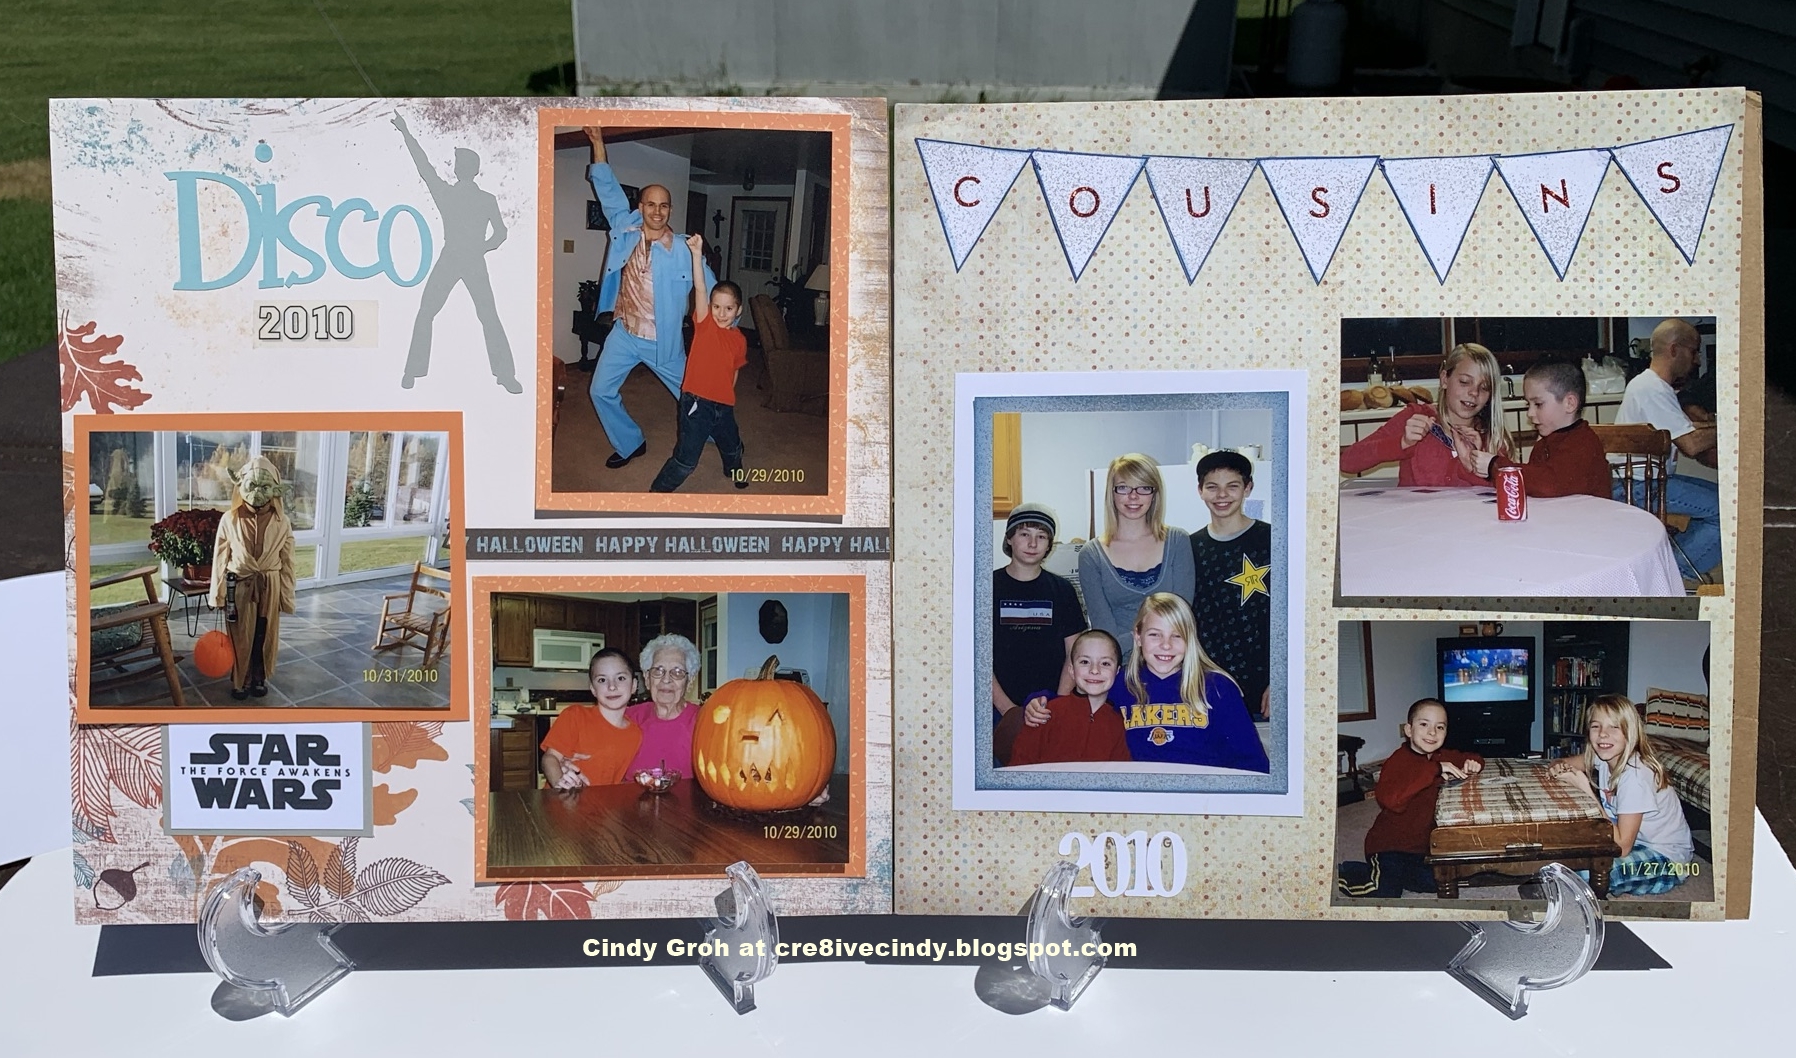
Cousins Layout with a Banner


When it comes to blogging, I'm putting too much pressure on myself. I have 70+ drafts in my blogger account that I can post but haven't because I haven't completed the written portion where I talk about the project. 
The pictures are there but for most, that's it. Therefore, for the next little while, I will be chatting less in order to post more. I may not even give a supply list. Anyway, this was a calendar layout that I repurposed to make a 2-page layout for my nephew's graduation scrapbook. The title banner has a little bit to it. The pennants were cut out using Cricut, then sprayed with Glimmer Mist by Tattered Angels and inked with distress ink. Finally, the alphabet letter stickers are by Making Memories. The years, the left side is a stickers by SRM and the right side is a die-cut that I welded the white cardstock 2010 together using the font Don Juan and my Cricut. The patterned paper on the left is by Stampin Up and the paper on the right is by Imaginisice. On the left side layout there is a strip of words between the two pictures that is from Imaginisce.
<ClicK> Have you ever thought, why did they call their company Tattered Angels, SRM- what does that stand for, Lawn Fawn, Basic Grey, Cosmo Cricket, Bug-a-Boo stamps, Echo Park, Spellbinders, studio Calico, Sizzix, Bazzill. I could go on. But I won’t. If you think of other company names please leave in the comments OR if you know why or where do these companies come from leave me a comment. I have three examples of company names that I can’t understand. 
Colorbox has closed and Colorbok LLC 
 Thanks for looking

Saturday, May 08, 2021

Cottage 2021 Calendar scrapbook layout


Today I have some of the calendar layouts.

This first layout, the patterned paper is by Die Cuts with a View.
The bottom borders are by Sunborn. The scallop is the negative of where the borders are attached together when you buy them. So you have the border with brown circle that is still attached to the packaging. Then above that is where the next border would have been but I removed it. So this is the negative of the removed scalloped border.

 I can’t think of another way to explain it.
Title die cut is by Cricut.


 For this Fourth of July layout, I used some label die cuts by Design Objective to create a banner. 
The red floss is by DMC
The stamps inside each label are by Lawn Fawn.
The firework diecuts are by Dies...to dies For. 
The glitter paper is by Recollections.
The polkadot patterned paper is by Die Cuts with a View.
The corner at the bottom, is a piece of red card stock cut with decorative scissors for the edge.


This next layout is part of a weekend that my husband and his friends do every year. It was quite cold and for whatever reason they were in the shed with the heater drinking beer. Why they didn’t go into the cottage is baffling to me. But, boys are dumb.

The die cut is by spellbinders and the little man sticker is by Close to my Heart.
The letters stickers are by Current.
The patterned paper is from my stash. 


For the next layout, I used the same letter stickers as the layout above.
The border punch is by Fiskars.
The stickers are from Creative Memories and Stickibilities. 
The pretty green patterned paper is fine Doodlebug.
I would guess that the green grass paper is by Colorbok.


Thanks for looking

Tuesday, August 11, 2020

Gnome Card and 100th birthday banner

I made this card and banner for our grandma’s 100th birthday. 

There was a lot of time making this card. The gnome is a Cricut cut in my stash.
The gnome is an inside family joke
Edited-I did look it up and the gnome is from the cartridge Fresh Picked.

 The brick paper is from Recollections and looks like real brick. 
I made the grass paper from scraps. I inked them with distress ink and cut slits in the top. 
I used dimensional adhesives to give the grass multiple layers. 
The mushroom and flower are stickers by K and Co. 
The lattice on the left was inspired by the heritage photos I'm scrapping.
 I took a vine-like ribbon and weaved it into the lattice die-cut by Cricut. 

That ribbon has been in my stash for probably 5 years

The flowers on the vine were made with a punch from Marvy.
 It felt good to use a lot of old supplies. And have it come out so cute. 

I hadn't been entering challenges but have recently found a few blogs I like. This card is perfect for the summer fun challenge at:


I hoped Siri was correct. I stamped out those numbers. I love how it turned out.


Thanks for looking

Wednesday, November 04, 2015

My Utah Family's 2011 Christmas Card Layout

This is a Christmas card from my Aunt and her family for another layout in my Christmas card books. She actually sent two cards which worked out great since the letter was on the backside of the photo. I had to trim everything down but I made it work for this 8.5 x 11 size paper. The patterned papers are by Me and My Big Ideas, Sunborn, and Craft Smith. The cardstock is by Recollections and the number stickers are by Me and My Big Ideas. I used the Cricut to for my die cuts. The Cricut Craft Room has a freebie in there called Cricut Fonts and Basic Shapes. The circle on the top left is an uppercase O that I cut out with the outline tab. The tabs that I wrote on are from the Art Philosophy cartridge. The buttons are from my stash and the marker I used to write on the tabs is by CM.


SB.com Scrap with Scraps
SB.com Cricut cuts the two tabs and the circle on the left upper corner
Grand Divas-Sketch-THIS ONE CLOSED IN 2018 AND THE ONE BELOW IN 2017 BUT BOTH OF THE SITES HAVE GOOD LO'S TO CHECK OUT.
Picture This-Photos, buttons, scraps, and die cuts
UPDATED PICS, LABELS, TITLE, LINKS, AND SPACING ON 10-7-21

Thursday, July 03, 2014

Statue of Liberty Stamp with a chalked background card

My card today uses a Statue of Liberty stamp by
I stamped the image with Versa Mark ink onto white cardstock and heat embossed it with Stampin Up silver embossing powder. From there I die-cut the image out with a Spellbinders die and while the paper was still in the die I inked the top with blue and the bottom with green distressed inks.

To create the background for my card I mixed it together to paint with powdered chalk both by Stamp N Plus. I used two different stencils by Tim Holtz/Ranger and applied the mixture to the watercolor paper using a cosmetic wedge. You have to be careful not to swipe the wedge over the stencil but rather tap up and down. The watercolor paper is by Strathmore and the paper behind it is by Color Aid. 

I embellished the card with pre-made die cuts by Studio G and ribbon by Martha Stewart. 

Thanks for looking.


Challenges:
http://craftyribbonschallenge.blogspot.com/ Anything goes with ribbon
http://www.drsdesignsblog.blogspot.com/ Banners, Pennants, and Flags

Sunday, April 20, 2014

July 4th Up-Cycled with vintage ribbon Banner

There's a new challenge at Chalk Ah Lot which is re-purpose or recycle something with chalk. I choose to use the clear CDs that come on top of the large stack of CDs my department uses to burn patient images to take with them to other doctors or hospitals.


The base of the pennants is a clear CD with a red circle over the center. Oh, wait I actually put some vintage red white, and blue ribbon over the circle first. I used Stamp N Plus red powdered chalk on the heart in the pennant below.


The patterned paper is old and Idk who it's by. I embellished the banner with stickers by K and Co, a vintage bottle cap, corners by Making Memories {very old}, and a square sticker that I cut in half to use as corners by Sticko.


I die-cut the letters out using my Cricut and the Art Philosophy cartridge. Each letter has three circles and I placed a red sequin into each. The largest circle's sequins have a rhinestone in the center.


All this is held together by some red, white, and blue ribbon and ready for the summer to begin.


Thanks for looking.

Challenges:
http://creativecornerchallenges.blogspot.de/ What's in a name? {C for Cricut}

Wednesday, December 08, 2010

Peace & Joy Card

It sparkles so much prettier in real life. I hate that the sun goes down so early nowadays. anyway. I did this card for the Tuesday Triggers: All That Glitters at Moxie Fab. I really like the silver and purple color combo and that is why I used silver embossing powder for the polka dots on the gray paper. Both the Gray and light purple paper are sprayed with a mixture of Perfect Pearls and water to give them that extra sparkle. The twine used on the banners is actually silver and glittery made by Inkadinkado.


Supplies: Cardstock by Sunborn; ribbon unknown; fiber by Inkadinkado; embossing powder by Stampendous, stamps by Fawn Lawn, Clear Dollar Stamps, Technique Tuesday, Hero Arts, Stampabilities and Stampin Up; banner by Cricut cartridge Lryical letters; ink Versamark, Ranger and Memento; Perfect Pearls by Ranger.

This card is for the following challenges:
Simon Says-nontraditional Christmas colors
Sweet Stampin Challenge-Make your own Background paper (polka dot paper)
Creative Card Crew-Anything goes
Papertake Weekly-non red and green card
One Stitch at a Time-Old stash- paper is about three years old and ribbon is about 5 years old but all the letter stamps are new and the cartridge to make the banner is new.
Thanks for looking

Sunday, September 26, 2010

ATC (Toucan Scraps)


Update ~ 1-8-21 
Many of the links were no longer blogs or challenge sites.
I removed them from the posts but do not rewrite the post
I made the ATC for the challenge at I Did It Creation challenge blog. Our sponsor this week is Toucan Scraps. The lovely paper you see in my ATC is from them. I have found a new love for paper crafting with these ATC's. They are so fun to make and if you haven't tried one yet you should. The size of an ATC is 2 1/2 x 3 1/2. Your ATC for this challenge must have Toucan Scraps paper or an image by them and is due by October 2nd at noon EST. There is an ATC freebie in the Stitchy Bear & I Did it Creations Crafting Boutique. Join in on the fun for your chance to win a fabulous prize. See my sidebar for other DT creations and check out all the deets that I may have missed 

Thanks for stopping by.

Monday, June 28, 2010

For you card with a banner and Neapolitan colors

I made this card with the sketch from 365 cards and the colors remind me of Neapolitan ice cream for the challenge at Design Dollies.

Thank you for looking.

Friday, January 01, 2010

January Calendar LO Brrr...It's cold The 'Rents at the cottage

 
I hope everyone had a great NYE. I have made a few resolutions that I intend to feature on a lo this weekend. This calendar page layout is for our house calendar. I've decided to post the LO on the first of each month. I don't have the word January on it because it is on the lower half. This is my Dad and stepmom up at their cottage on Jan 09. I usually don't use a picture from that month from the previous year. It just worked out this way. I do try to put pictures in of whose birthday it is that month or the main holiday of that particular month. I only use pictures from the previous year and try to get most of the nearby family in the pictures.
Supplies-felt mittens by AC; floss by DMC; Cricut Cuttin Up and paper by Urban Lilly. I cut the snowflake out of the remainder of the paper and used 3-d adhesive to give the page dimension. The letters are on the same paper as the rest of the lo. The paper gradually got darker so it worked out nicely to only use one piece of 12x12 paper for an 8.5x11 LO. TFL
Updated 11-1-22