
The patterned paper is by My Mind’s Eye. I used my Cricut to make the title. The wreath is a sticker by EK Success. I covered it with Modge Podge to seal in the glitter from shedding. I added a gold circle to the center of the wreath and adhered the word “in” to it. Thanks for looking. HAGD!
Showing posts with label Mod Podge. Show all posts
Showing posts with label Mod Podge. Show all posts
Wednesday, July 12, 2023
Tuesday, May 02, 2017
Container Cards
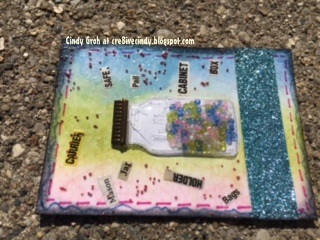
I made these for an April ATC Swap for the theme: containers. I inked watercolor paper by Strathmore with blue, pink and green distress inks and sprayed them with water before setting them aside to dry.
I went to the recycle basket upstairs and looked for the different words that were describing containers; cabinets, carrier, box, bags, can, jar and even a safe. I cut them up and glued them on with Mod Podge.
The mason jar is a Jolee's sticker. In the past, I've opened the jar from the back with a razor blade and filled the jar with beads. HERE is an example of doing just that. But for some reason I wasn't able to do that this time. Instead I cut the back off the sticker and replaced it with white cardstock. I adhered the cardstock to the card base. I put down a glop of Glossy Accents and beads on top of it before I adhered the jar on top.
I thought the cards needed something more so I put more Mod Podge on the card and added these tiny beads. I drew lines and patterns around the edges with blue and pink CM markers. I added the Forever in Time glitter tape to the bottom and inked the edges with black distress ink.


Thanks for looking.
Thursday, April 20, 2017
Princess Vanellope Cards
I stamped a Stampin Up background onto white cardstock with Worn Lipstick distress ink. I inked the edges with the same pink and Peacock Feathers ink using an ink blending tool (Ranger). On pink thick mulberry paper by Darice I applied Dreamweaver Stencils white embossing paste to a stencil of a trophy. After it dried, I cut it out and inked the edges pink. I found some words in a magazine, which then, of course, I found better ones after I finished these cards. I added the words with Mod Podge and added some glitter on top of it. I got a little crazy with the glitter obscuring the words on two of them.
On white cardstock, I inked up a Stampin Up roller that looked to me like a checkered flag, with Bermuda Bay SU ink and rolled it several times before I was able to get it in a somewhat straight line. Not really but it is what it is. I cut it out and added the border on top of the card base before adhering the trophy to the left.
I printed the image of Princess Vanellope von Schweetz, a racer/glitch in the game Sugar Rush from the movie Wreck it Ralph. I found the image on Vintage Images.org and printed it out onto Canon photo paper. I also printer her out onto regular cardstock and liked the glossy much better. I trimmed down the image and matted black behind it. I popped the image up with 3M dimensional tape. The chipboard crown is either from Tim Holtz or Maya Road. Either way, I painted it gold with Adirondack Metallics Acrylic paint before adding the it behind her image. I added the key from my stash to the bottom.
On white cardstock, I inked up a Stampin Up roller that looked to me like a checkered flag, with Bermuda Bay SU ink and rolled it several times before I was able to get it in a somewhat straight line. Not really but it is what it is. I cut it out and added the border on top of the card base before adhering the trophy to the left.
I printed the image of Princess Vanellope von Schweetz, a racer/glitch in the game Sugar Rush from the movie Wreck it Ralph. I found the image on Vintage Images.org and printed it out onto Canon photo paper. I also printer her out onto regular cardstock and liked the glossy much better. I trimmed down the image and matted black behind it. I popped the image up with 3M dimensional tape. The chipboard crown is either from Tim Holtz or Maya Road. Either way, I painted it gold with Adirondack Metallics Acrylic paint before adding the it behind her image. I added the key from my stash to the bottom.


Thanks for looking.
Tuesday, October 25, 2016
Celebrate Hot Air Balloon
For today's card I used a circle stamp from Lawn Fawn's Let's Bokeh. I started at the bottom with the lightest color of green ink and moved up from there with darker green ink. The balloon and banner die cuts are by Studio G. I covered them with Mod Podge to see what it would look like and didn't care for it. But it is what it is. I liked the die cuts with the background so I put it together. The green cardstock is by Sunborn and the black and white patterned paper is unknown.

Thanks for looking.
Tuesday, August 30, 2016
Vintage ATC's
I have some vintage ATC's (Artist Trading Cards) using Deep Red Stamps to share today.
The first one uses the Grunge Stars and Stripes stamp. I colored the back of the stamp with blue and red distress markers and sprayed it with water before stamping it onto this ATC base from Ranger Industries. I decided not to use that ATC base for my base and instead cut the piece down to the size of the flag. The red cardstock that I did use for the base is from Stampin Up and it has been heavily sprayed with Krylon gold glitter spray.
The Victorian alphabet playing card embellishment is a sticker by Melissa Frances. The words (USA and the other says Freedom) were a digital freebie from Memory Works with Simple Stories. The star is a button that I sanded the top with an emery board. I inked it and all the other pieces with Vintage photo distress ink.

This next one is very involved. Here's what it looks like all finished.

To get there I first had to experiment with what colors of ink will show my stamping best on a sewing pattern. Here are my results:
1.) Stamp - Crochet Background

2.) Left stamp is Esprit Parfumerie and to the right is Damask Background

3.) Stamp - Ville de Saint Denis

4.) Stamp - Esprit Parfumerie

5.) Stamp - Damask Background

6.) Stamp - French Swirls background

7.) Stamp - Crochet Background

8.) Stamp - Ville de Saint Denis

9.) Stamp - Ville de Saint Denis

I used #5 & #6 on the ATC to the left and #2 along with some Crochet backgrounds stamped in Chocolate Chip for the ATC on the right.
To make the background of the ATC I need to start by saying this, I have a container of Mod Podge gloss by Plaid that I've never really known what to do with it. I went online and Googled it for ideas on what it's used for none of which seemed to appeal to my project.
So I took the sewing pattern paper that had been stamped and ripped them into small pieces. I painted the base paper, which was a piece packaging, with the Mod Podge using a sponge brush. I crumpled up the paper and layered them onto the base randomly but with the edges of the pattern sticking up. On top of that layer of messy sewing pattern paper, I put down another layer of Mod Podge and layered more paper until I was out of that color. I finished with one more layer of Mod Podge before putting them to the side to dry over night. I wish I would have taken a picture of the bases before adding all the other things on top of it but was exhausted by the whole process that it slipped my mind.
The woman stamp is called Victorian Evening Dress that I stamped with black ink by Hero Arts on Strathmore watercolor paper. I colored her in with distress inks and a water pen and hand cut her out. I added an oval journal and the clock die cut by The Girls' Paperie. The words are stickers by Pebbles and Creative Imaginations. The metal corners are unknown.


Last one. The music paper is pretty but I wanted to do a little bit more with it. I used a stencil by Tim Holtz that reminded me of music gauges on older tape players. I added the distress inks with a blending tool in random areas. I cut the piece down to the size of an ATC and inked the edges with more distress ink.

I stamped the Vintage 45 Record stamp onto similar colored cardstock with Hero Arts Charcoal colored ink and cut them out with the Creative Memories circle cutting system. I colored in the word Sun and the rays on the record with SU watercolor colored pencils. I inked the edges with distress ink. The tickets are die cuts by Maya Road. The words on the left ATC are stickers by Stickibilities and Crayola. On the right ATC, the word Play is die cut by K and Co and the sticker (on) is by Creative Imaginations.
After I put the ATC together, I stepped back and thought that it looked too clean. I took out my fancy sanding tool (an emery board) and sanded everything down so it didn't look so clean.

That's all for right now. Coming up I do have a bunch of stuff to share with you. My absence from blogging was taken for me to do a little soul searching as to why I blog the things I make. I won't bore you with my thoughts but I will say I am back.
Thanks for stopping by.
Monday, March 19, 2012
Manly Monday
Funny thing about posting to your blog-you have to take the pictures off your camera. Who would have thought?
This week I used wrapping paper and Mod Podge to create my card. I crippled the paper because it already had creases in the middle of the map and then smoothed it back out using the MP. The label is from Martha Stewart and the rub on by The Paper Studio. Cardstock be Recollections.
PS My husband didn't think the ribbon was very manly but I chose to post it anyway.
Thanks for looking


Challenges:
http://simonsaysstampandshow.blogspot.com/ -Handmade background
scrapitgirl-Going green by recycling (wrapping paper)
http://craftingwhenwecanchallenges.blogspot.com/ -One for the boys
http://kennykkraftygirlzchallenges.blogspot.com/ -One for the boys
Subscribe to:
Posts (Atom)