Wednesday, October 19, 2016

Love tag

For this tag I heat embossed a Hero Arts background stamp using Versa Mark ink and WOW! embossing powder. Then I inked it with distress ink and sprayed it with water mixed with Perfect Pearls. 

The flower is chipboard by Maya Road-maybe, that I painted with Ranger's Crackle Paint (Fired Brick). Once it dried I inked the edges with a dark brown distress ink. The center of the flower is a Spellbinders die cut which shows another way to use the smallest die cuts that no one ever knows what to do with. The love sentiment die cut is by K and Co and the rope around the hole at the top is by Wyla Inc. I should have set the hole with a heavy duty eyelet but it is what it is. 


I hope the recipient likes the tag. Thanks for looking.

Tuesday, October 18, 2016

1st Birthday Layout for Zac

I have an easy layout to share today. The star background paper is by Best Creations. The title is a die cut that I cut out with my Cricut and the Stamping cartridge. The green frame under the title was painted with Pebbles paint. The patterned paper under the frame is by Basic Grey-I think. The cupcake is a Cricut cut from the First Few Years cartridge. The blue die cut is foam by Tiny Crafts.


Thanks for looking.

Sunday, October 16, 2016

Complete Recovery Card

This card came together after making a different card with similar products. Those 6x6 pads of paper are not ideal for my card size which is 4 x 5 1/2. I use the Recollections card bases because they come with an envelope and that makes it easier with out wasting a ton of time, in my opinion.

The patterned paper is by Prima. The border die cuts and the white oval die cut are both by Spellbinders and the cardstock is by Recollections. The blue oval is a Sizzix die cut out of Color-Aid colored paper. The stamp is by Stampin Up with black ink by Hero Arts.


Thanks for looking.

Saturday, October 15, 2016

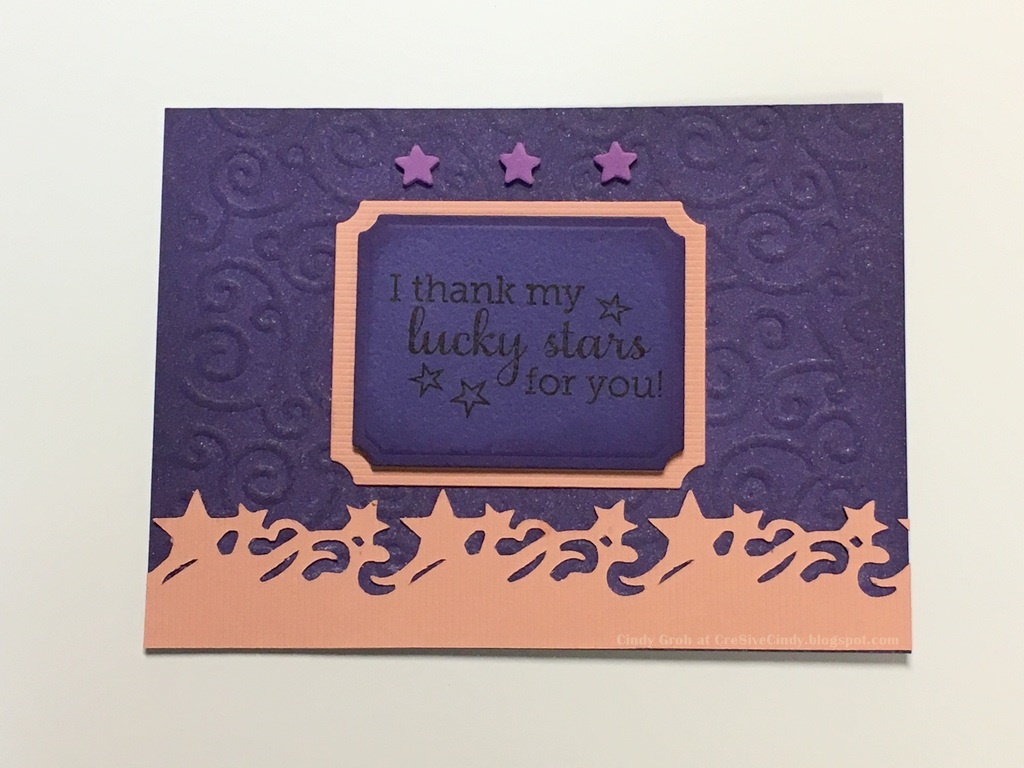
Lucky Stars Card

My card today is not your normal card for it doesn't open and close. It's purple cardstock that I dry embossed and then sprayed with water and Perfect Pearls. I inked the edges of the cardstock and the purple rectangle die cut with Dusty Concord distress ink. The sentiment stamp and it's black ink are by Hero Arts. The rectangle die cuts are by Spellbinders. The peachy color cardstock is by Bazzill. I cut the bottom border with my Cricut and the Ribbons and Rosettes cartridge. I die cut some purple foam by Tiny Crafts with a Lawn Fawn stars and arrows dies. The second picture shows the back of the card to write my message.


Friday, October 14, 2016

Laugh Tag

I have a tag to share today. I stamped on gray cardstock a Lawn Fawn border stamp with blue ink by SU and then added Glossy Accents to some of the holes in the pattern. The patterned paper at the bottom is by My Mind's Eye and I used a Fiskar border punch on the top of the patterned paper. I added rub-on flowers by American Crafts to the left of the patterned paper. The sentiment is a die cut by K and Co. I added ribbon from Joann's around the top of the stamped border and then added dollar store rope through the hole at the top.


Thanks for looking.

Tuesday, October 11, 2016

Joy to You and Yours

This Christmas card uses an old stamped image that I borrowed at a crop. I'm not sure the manufacturer but I stamped it with brown SU ink and colored it in with with paint and powdered chalk mixed together. I used a Spellbinders die to die cut the image out and I inked the inside with red distress ink. The background paper is by SU and the red is by Die Cuts with a View. The sentiment is stamped with Versa Mark ink and heat embossed with red embossing powder by Ranger on kraft colored cardstock The kraft cardstock and green behind it are are both by CM.


Thanks for looking.


Friday, October 07, 2016

Sketches in Thyme Project Life

It's my turn on the Sketches in Thyme Project Life blog using the following sketch:


I'm working on these pocket page (We R Memory Keepers) books for my brothers-in-law. Each boy will gets a book with pictures from their childhood. There are 5 boys. Yes 5. (Ugh!) Therefore, my layouts for these books aren't like uber detailed for two reasons: 

First - I have a deadline and I really want to meet that goal-I'm not sure if it's really possible to get them all done by Christmas but I'll try. 

Second - They're boys and according to my husband, when he looks at a page he doesn't see the same things as I do. He sees the pictures and the memories that go with them not the embellishments. He doesn't like the pages when they're too busy so I keep them plain and simple.


The grid patterned paper is by October Afternoon and the green is by Making Memories. I stamped the train and stars (The Paper Company) and the numbers and letters (Lawn Fawn) with Hero Arts black ink. The arrow and the number 6 are Cricut cuts.

All the different patterned papers on this page are by Making Memories. I circle cut a photo and added some birthday stickers to the right upper card.


Thanks for looking.

Wednesday, October 05, 2016

Stampendous Birthday

I was trying new color combinations for the card today. The background is the card base and is by Recollections. The flower and sentiment are stamps by Stampendous. The flower is stamped with Colorbox pigment ink and the sentiment with Hero Arts black ink.

I matted the flower with aqua paper by Hot off the Press and then yellow cardstock by Bazzill. The patterned paper that the sentiment is on is by Die cuts with a View. The punched the edge with a border punch by Fiskars.


Thanks for looking.

Tuesday, October 04, 2016

Friend Michelle Christmas Card Layout

My layout today is one for the Christmas card book(s) that I'm always working on. I'm a little behind with these books but they are a work in progress. I've noticed people are sending less and less cards these days which makes me think this book series could come to an end one of these years. Big bummer. I really like seeing their kids grow from year to year.

The background paper is unknown but the paper for the die cuts are by Hot off the press. I welded the leaves together in Cricut Craft Room from the Art Philosophy cartridge. The poinsettias flowers are by Prima and I've placed a enamel dot in the center. The cream colored enamel dots are by Fiskars and the pinkish ones are by Cloud 9. The bird sticker is by American Crafts, the ribbon by Offray and the 2013 is cut out using the same cartridge as mentioned above. 


Thanks for looking.

Sunday, October 02, 2016

Christmas card layout

Here's another layout for my Christmas card book(s). I followed the sketch at the bottom.

 The tree background paper is by Making Memories as well as the strip of green under the photo and behind the red chipboard swirl. The red patterned paper behind the photo is by Die cuts with a View. The white cardstock is by Recollections and the green corner piece by Sunborn. I inked that corner piece with distress ink. 

The Joy tag is by Jolee's/EK Success. The red chipboard has been painted red with paint by Studio Calico.


Thanks for looking.

Saturday, October 01, 2016

Sunflower Cart

On my blog today are some fall seasoned cards using powdered chalk and paint by Stamp N Plus. The image is dry embossed with an embossing folder by Darice and I painted over the design with a mixture of chalk and paint.  There's not a ton of difference between the two until the assemble. I used yellow cardstock behind the first and orange behind the second. I die cut the Spellbinders sentiment out of orange cardstock by Coredinations and adhered it to the front of the card.


For the second one I chose to forego the sentiment and instead added some die cuts by Lawn Fawn out of glitter paper by Die Cuts with a View.


Thanks for looking.

Friday, September 30, 2016

Calendar Layout Family in the Fall at the cottage


I have a calendar layout to share today. The title die cut "Family" is a Cricut cut from the cartridge Cricut Sampler. The leaves are stamps by Studio G that I inked with Colorbox pigment ink and let dry before cutting them out. The only patterned paper I know is the striped paper by MME. 

I received a bunch of paper (a lot on this layout) from my mom who would cut off the strips at the top which had the manufacturer's name on it. Oh well, what can you do? I'm not one to complain about free paper. 

The border punch on the left (by EK Success) is cut with Bazzill cardstock. My favorite part about this layout is I was able to use a bunch of scraps and get them out of my way. 

Thanks for stopping by. See you tomorrow.

Thursday, September 29, 2016

YIPPIE! Card

Today's card is very Stampin Up and by that I mean the aqua cardstock under the white, the embossing folder, the yellow mosaic ink, stamp and matching punch, and the aqua stamped character are all by Stampin Up. Ink color is called Daffodil Delight and the aqua is by Colorbox. The sentiment sticker is Pebbles.


Easy-peasy today. Thanks for looking.

Wednesday, September 28, 2016

Destiny Card

I made this card for a sweet lady who (or is it whom?) my husband fondly refers to as "The English Chick" because she taught English at the same high school. She accepted a new job and I wanted her to know we care.

The black paper is by Die Cuts with a View, black ribbon by Doodlebug and the black ink by Hero Arts. The stamp and the star brad at unknown. The star background is a The Crafter's Workshop stencil. I taped the stencil to my cardstock by Strathmore and applied silver embossing paste (Dreamweaver Stencils) over top.


Thank you for stopping by.

Tuesday, September 27, 2016

Deep Red Stamps Merry Christmas

I stamped the Merry Christmas Deep Red Stamps image onto Strathmore watercolor cardstock with Hero Arts black ink. I colored the image in with distress inks and added some iridescent paint in a few areas. I trimmed it down and inked the edges with red distress ink before adhering it to a green patterned paper by Pink Paislee.

I almost always work on a piece of cardstock or patterned paper and then add that panel to the card base. This embossed border is a reason why I do that. If I were to emboss the card base you would be able to see it inside the card. Although the border might not be the best example because it might look really nice on the inside but when using brads I don't want the prongs sticking out when the recipient opens the card. Just personal preference.

This embossed border is by Darice. The patterned paper is unknown. The snowflake sticker on the left is by We R Memory Keepers. I cut a Spellbinders die called Dahlia out of Die Cuts with a View green cardstock. I inked the edges with Forest Moss distress ink before adhering the sticker to it.


Thanks for looking.

Monday, September 26, 2016

Manly Monday Anchor

Manly Monday card today has an anchor stamp which is sponge stamp that I was able to get a good impression with regular Stampin Up navy blue ink. Die cut the image with a Spellbinders die. Die cut a Design Objectives die for behind and with the same die, cut out blue foam by Tiny Crafts. Adhere the three die cuts together.

Stamp a card base by Recollections with a Hero Arts background stamp with blue Stampin Up ink. Cover the top left corner with navy cardstock and cover the seam with Creative Memories patterned paper that has been cut with a swirly paper trimmer.Die cut the arrows and sentiment from Cricut and adhere all the parts together.


Thanks for looking.

Thursday, September 22, 2016

Fall Stencil ATC's

These ATC's were for last month but I didn't get a chance to blog about them. For the background paper of these cards I used old packaging because I wasn't sure what I was doing at the time and didn't want to waste good paper. That "waste good paper" statement makes me laugh. What project do I think deserves "good paper"? Silly.

I added acrylic paint to white embossing powder and applied it to a Dreamweaver Stencils fall leaves stencil. After they dried, I covered each one with Perfect Pearls gold, bronze and copper. I liked the gold the best (left side). 

The leaf is a punch that I covered with Scattered Straw Crackle Distress paint (Ranger). After they dried, I stamped the word fall using My Stamp Box letter and Close to my Heart orange ink. I tied raffia in a bow around the stem of the leaf and covered the center with a leaf punch. Lots of leaves but they turned out pretty.


Thanks for looking.

Wednesday, September 21, 2016

Purple Arrows Thank you Card

I'm really into arrows and love this arrow embossing folder by Provo Craft. After I embossed the purple cardstock (The Paper Studio), I covered it with Perfect Pearls (Ranger). I die cut the two scallop circles (Spellbinders). One out of polka dot patterned paper and the other out of white cardstock. 

The center stamped image...I guess you may call it a flower, was stamped with multiple Colorbox cat eye pigment inks on a mint cardstock (Recollections). After it dried, I cut out the stamped image using the matching die cut (Sizzix). I die cut a label (Tim Holtz with Sizzix) and stamped an American Crafts sentiment with Hero Arts charcoal ink. 

I found the two strips of paper in my stash that happened to go together perfectly without having to cut them. I adhered the polka dot die cut behind the strips of paper and then layered the other two on top of that. I finished by adhering the sentiment. 


Have a great day and thanks for looking.

Tuesday, September 20, 2016

1950's Decade ATC's

I made these ATC's for a decades swap on Scrapbook.com. I stamped the Deep Red Stamps Jukebox image onto Strathmore watercolor cardstock with Hero Arts black ink. I colored the image in with distress inks and a few areas with distress markers. I fussy cut the image out and went to work on the background.


I daubed distress ink colors: Picked Raspberry, Mustard Seed, Spiced Marmalade and Ripe Persimmon, onto my craft sheet. I sprinkled the area with some powdered chalks such as gold, sunshine yellow and fluorescent colors pink orange and yellow. I had a bottle of iridescent paint that was almost empty which made it easy for me to splatter some onto the work area along with the inks and chalks. I sprayed the area generously with water and swirled the paint, inks and chalks together but just a little bit. I wanted to see what was going to come out of this witch's brew. I took some packaging that was white on one side and swiped it through the mixture in different areas and at different angles.


After I did the initial paper swipe, I thought that I should stop with this piece of paper now and grab another piece of paper to see what we will get next. So I played some more with other papers and noticed that the first one didn't have a good showing of yellow. 

When the colors get all mixed together yellow loses to the darker colors. I decided that while the paper was still drying I had time to sprinkle on some bright yellow (think sunflower) powdered chalk on top. You have to have a light hand when adding something at this point of the "make your own background" craziness or you'll have to start over. Ugh! Not happening. I put some chalk onto a tool to scrape off pictures that has a flat surface and tapped a little off with the one hand as the other moved around. I think it turned out really pretty. It's sad sometimes that all the hard work on the background gets covered it up with stuff. I wish I could become "one" with white space.  (Hard work is really more like a little kid playing with paints)


Here's a look at all three. The sentiment stickers are by Stampabilities, the music note is a Cricut die cut that I wrote on with a ZIG Millennium pink pen and the small stamp in between the notes/under the 1950's writing is a stamp by My Sentiments Exactly that I stamped with Hero Arts ink.


Sorry for the long post. Thanks for coming by.

Monday, September 19, 2016

Manly Monday Off we Go!

I'm trying to work Manly Monday back into my blog and here's my new one. The stamp is by Great Impressions Stamps and it is called Old Fishing Truck. If you're looking for unique guy stamps that have to do with transportation check out these couple that I really like:

VROOM -This one would make the in-law men smile big

Anyway, I stamped the truck with Hero Arts black ink onto Strathmore watercolor cardstock and colored the truck in with distress inks and a water pen (both by Ranger). The edges of the truck are inked in red. I layered two Spellbinders dies behind the truck. The red is patterned paper by Die Cuts with a View and the grey cardstock by Recollections.

The cloud embossing on top is a Stampin Up folder on off white cardstock. The bottom of the card is Basic Grey patterned paper and then I covered the seam between the two halves with an old Creative Memories sticker. The sentiment die is cut out using my Cricut and the When I was a Kid cartridge.


Thanks for looking.

Sunday, September 18, 2016

Maple Leaf card

The background paper is by GCD and I inked all the edges with distress ink. The larger red leaves are old die cuts from Creative memories that I stamped with a canvas background stamp by Stampin Up. I punched the other leaves out with a CM punch. I inked all the edges of the leaves.

The bottle cap is by Molson Canadian that my husband flattened. I punched a circle (CM) out of burgundy cardstock and adhered the cap to it with Glossy Accents (Ranger). The white is a Spellbinders die. I kept it nice and white to match the cap.


Thanks for looking.

Saturday, September 17, 2016

Vector Flourishes Cards

I made a few different anniversary cards with Deep Red Stamps Vector Flourishes. I stamped one and then turned the stamp upside down to stamp it again underneath the first. I used ink by Hero Arts, Love die cut by SU that I colored with silver powdered chalk, Offray and The Paper Studio ribbon, some patterned paper by Craft Paper and K and Co, cardstock by Provo Craft and Recollections and a border punch on one by Martha Stewart.


Thanks for looking.

Friday, September 16, 2016

Softball Card

I have a funny story to tell today. Disclaimer: I've been told I'm not a very good story teller-reader beware.

I send a lot of birthday cards because I can remember as child my aunt, who lived out of state, would always send a card and a gift. I looked forward to it every year. Also at my mom's house, a birthday was a big deal. Streamers, balloons, happy birthday signs, cake and ice cream with whatever I wanted  for dinner. This was a standard birthday affair back then. We actually looked forward to each others birthday because it was such a big deal and a fun atmosphere. 

My cousin lives on the east side of the state and he and his wife have three children. I send the two older ones a birthday card every year, even if I'm late, I still send it. I didn't think they knew who was sending these cards but I thought, oh well I'm family and it's a nice thing to do. 

Recently we had to attend a visitation and my cousin introduced his children to me. They kind of looked at me like a kid normally would until I said "I'm the lady that sends you a card on your birthday." For that I received a smile and an "Oh". So I asked my niece what she likes to do and she plays softball hence my card today. Later on I was talking to just their mother and she said that the kids look forward to receiving the birthday card, even if it's late, every year. That totally made my day.

The background is dry embossed with Darice folder. The bats and the sentiment stamps are by Stampin Up. The helmet is a patterned paper by Accord Publishing and the softball is a sticker. All of the pieces are inked with distress ink and matted with brown cardstock. I used foam adhesive under the sentiment.


Thanks for looking.