Sunday, October 13, 2013

Special Day Fall Card

I'm posting for the Chalk Ah Lot challenge which is Embossing with chalk. 

My card features a Rose Block stamp and sentiment stamp by Stamp N Plus. I stamped the Rose Block stamp with Hero Arts black ink on white cardstock by Neenah Solar White. I mixed powdered chalk and paint together and painted the image in using a variety of colors. You can see all the coloroptions Stamp N Plus has in their website www.powderedchalk.com. The sentiment stamp is stamped with Versa Fine pigment ink onto Cosmo Cricket patterned papers Nutmeg pad. The edges of the patterned paper have been inked with Ranger Distress ink. 

I dry embossed the kraft cardstock by Recollections using a Dreamweaver leaf stencil. After I ran it through my Cuttlebug I inked the edges with Ranger Distress ink and sprayed the whole piece with a combination of water and Perfect Pearls also by Ranger Industries. I do love sparkle.  The ribbon is by Offray which adhered to my patterned paper card front so you wouldn't see the ribbon attached on the inside of the card.

Thanks so much for stopping by.


Challenges:
http://craftitudechallenges.blogspot.co.uk/- Anything goe swith the leter "S" {Stamping}
http://jwscrapshack.blogspot.ca/- Fave technique {I love to ink edges w/ Distress inks}
http://chalknstock.blogspot.com/- Anything goes with chalk

Saturday, October 12, 2013

Stamp N Plus

My card is being posted at the Stamp N Plus Blog today. 

My leaf stamp is stamped onto a Cricut die cut from the Art Philosophy cartridge at 2" with Versa Fine pigment ink. I adore that cartridge for all the wonderful shapes I'm able to cut out. The leaf stamp can be order by calling 715-271-1873 and the sentiment can be found at the Stamp N Plus online store. I used distress inks around the edges of the die cut and the sentiment as well as the background patterned paper. My patterned paper is by K and Co which I used a Fiskars border punch on. The ribbon is vintage from my MIL and that's about it.

Thanks for stopping by.


Challenges:


Stamp N Plus

Today is my Mom's birthday so I thought this card was fitting.

I used my Cricut to create the focal point of my card today. The die cuts are from the cartridge Art Philosophy. I cut two layers in white cardstock and then sprayed the top one with glimmer mist. Then when assembling it I used foam adhesive on the top flower looking die cut to give the card some dimension. The patterned paper for this card is by The Paper Studio (polka dots) and Recollections (floral). The ribbon in the middle is by Karen Foster. 

The sentiment is one by Stamp N Plus that I put together. I love how versatile this stamp set is. It's a must have for stampers, card makers and scrapbookers. Check out the picture below and order one today.


Phone number to call and order this sheet of rubber stamps is 715-271-1873. Tell Luann that Cindy sent you.

Friday, October 11, 2013

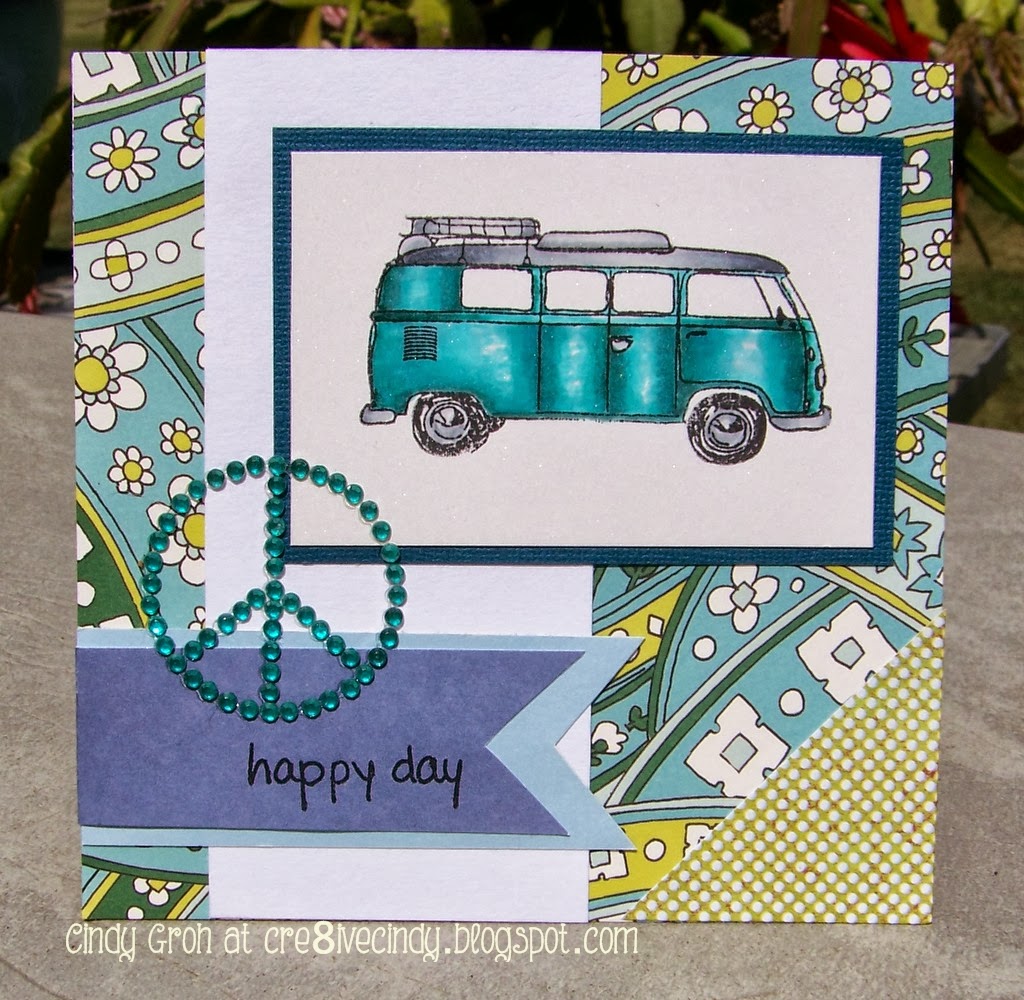
Peace Out

Real quick post today: Blue bus stamp is by Inkadinkado stamped with Memento Black Ink and colored in with Copics on Cryogen paper. The background paper is by Anna Griffin with the corner patterned paper by Prima. The rhinestone peace symbol is by The Paper Studio and the sentiment stamp is by Stampendous.  The cardstock  papers are all scraps that I found and pulled together.
Thanks for looking.


Thursday, October 10, 2013

Happy Birthday

My card today features a stamp by Marianne Designs and the happy birthday stamp by Stampendous. I colored the little girl in with Copic markers on Cryogen paper that I die cut out with Spellbinders dies. The orange patterned paper is by Creative Memories and the blue cardstock is by Sunborn. The sentiment paper is glossy paper by Ranger Industries that I used alcohol inks on and then stamped the sentiment in Hero Arts black ink. That banner die cut is by Stampin Up. The flowers are by The Paper Studio, Queen and Co and Making Memories. The buttons are by Stampin up and Bo Bunny with the brads by Bo Bunny as well. The embossing folder is by Darice and the twine is by We R Memory Keepers.

Thanks for looking. I have a new card from now on. I just needed a little time to work on CE credits, clean my house and make some meals. My Mr always likes me to try and be domestic. I'm much better at making cards and scrapbooks though:)


Challenges:
http://crafterscafeblogchallenge.blogspot.com/- Fave craft item-Die cuts {flowers too}
http://www.craftindesertdivas.com/- Anything goes with a sentiment
http://craft-deebowz.blogspot.com/p/challenge.html- Anything goes with handmade bow {twine on button at the bottom}
http://inkychicks.blogspot.co.uk/- Two different die cuts {label 1 and banner}
http://papertakeweekly.blogspot.com/- Two by two {two of the same die cuts}
http://colourq.blogspot.com/- See colors below


Wednesday, October 09, 2013

Blog break

I'm taking a few days off from blogging while I create some more cards to post. Check back Friday or for sure Saturday for something new. Hugs

Monday, October 07, 2013

Manly Monday Kenny K Dude Holding a Beer

Today marks week 20 that I've been requesting other bloggers to share a link to their manly card. It has become so successful. I'm so happy for the fabulous response to these posts and also to see that there are more manly digital images coming out for us to buy and use. I have found a few favorites within just this bunch of cards; the guy on the train, the teenager and the guy playing video games are great finds. There are a ton more out there that I don't even know about but would love to hear about. Give a shout out in the comments field of some digi companies that have good male images.
My card today features a Kenny K digital stamp that fits perfectly for some guys in our family. I'm going with a simple design and a sentiment that I can stamp a simple Happy Birthday on the inside. 
I printed this guy out on Strathmore watercolor paper and then colored him in using distress markers and a water pen. I love the look of the distress markers and they are so easy to use. For the foam on the beer, I used Opal White Liquid Pearls.
For the rest of my card, I used the following supplies: die cuts by Spellbinders, brad by Eyelet Outlet, embossing folder by Darice, sentiment sticker by Sticko/EK Success, and distress ink on the second die cut and the background. (Updated 12-13-22)

Please stop by the blogs listed below. There is some amazing talent out in Blog-Land. These ladies have all brought something different to the table. I'm sure you will be inspired and pinning away. Speaking of Pinterest, you may want to check out my Guy Cards Pinterest board too.

Hand Crafted Especially for you


Sunday, October 06, 2013

Chalk Ah Lot Embossed card

I'm posting for the Chalk Ah Lot blog today and we have a new theme this fortnightly. 

The theme is embossing with chalk.

I did a double set of embossing on my card. Let's start with the black background. The thick cardboard is packaging from ironically an embossing folder. I embossed it with a Daricce folder and my Cuttlebug. I then mixed powdered chalk Stardust by Stamp N Plus with water and painted it onto the embossed area. It needed something so I dried it with a towel and hit with my heat gun to kind of start all over. Next layer I toned down on the water and increased the chalk. Alright...maybe. I hit it with the heat gun and went over it again with an even mix of water and chalk and let it air dry. But then I got impatient and hit it with the heat gun so I could finish my project. 

I tied this ribbon around the black base and made it into a bow. Then I matted the black onto some purple patterned paper by Recollections and adhered a Spellbinders die cut to the center of my card. My card base is purple cardstock by Bazzill that I folded at the top.

For the second type of embossing I used a flower basket stamp by Stamp N Plus that can be found HERE. I heat embossed the stamp on water color paper by Royal and Langnickel with Versa Mark and silver Stampin Up embossing powder. I very lightly mixed the powdered chalk with a tiny bit of water and painted the image in. I would dab the image with a towel if I didn't like the color and reapply the chalk in different areas. After it was how I liked it I fussy cut it out and adhered it to my card. 

No sentiment on the front which is odd for me but I think it is more appealing without something else added to it. Thanks for stopping by.


Saturday, October 05, 2013

I was published:)

Happy Saturday and National Cardmaking Day. Here is a card I made and was published. 


Look at that. I made the cover with this card.


UPDATED WORDING, LINKS, PICTURES 10-25-21 (I was unable to make the pictures bigger due to the quality.)
THE INFORMATION BELOW IS WHAT I HAD POSTED BUT ISN'T RELEVANT SINCE SNP WENT OUT OF BUSINESS.
However, I like to keep the information on my blog as my scrapping and cardmaking timeline. 


I'm posting over at the Stamp N Plus blog today with my publication in Just Cards Magazine. The sentiment and the flower stamp are both by Stamp N Plus. I don't need to explain how I made my card since it is explained in the magazine. 

I hope everyone has a fabulous day making cards and stop back tomorrow for my Chalk Ah Lot post. 

Friday, October 04, 2013

Spooky Tree Halloween Card

Halloween challenges seem to pop up all over the place so I thought I would see what I could come up with using this stamp by
You can find the tree stamp HERE. I heat embossed the stamped image using Versa Mark ink and Stamp N Plus gold embossing powder on Royal Langnickel watercolor paper. Then I used distress ink and a water pen to color in the tree and an ink blending tool to make the background. The papers in my card are by Imaginisce, cardstock by Coredinations and the brad is by Around the Block. 

Thanks so much for stopping by.


Challenges:
http://cardmakinmamas.blogspot.com/- Trick or Treat
Crafting by Design- Anything goes

Thursday, October 03, 2013

Perfect Day

Very quick post today as I am getting ready to head north for some fun girl time. 
My card today is brought to you by

The butterfly stamp can by found HERE and the border stamp can be found HERE. 
I heat embossed the butterfly, used distress inks on it and covered with some pink powdery pearl stuff. lol
PP-Crate Paper
Die cut-SEI
Stickers-K and Co, American Crafts and Creative Memories
Ribbon-American Crafts
Ink-Stampin Up and Versa Mark
Embossing powder-Stampin Up

How's that for quick? I hope you have a fabulous weekend. I will be offline from today until Sunday night. I hope to get a lot of scrapbook pages done and eat eat tons of great food. Peace Out!


Wednesday, October 02, 2013

Prickley Pear Rubber Stamps

Prickley Pear Rubber Stamps: A Super Cute Card from a New Found Friend!: Recently we gave away packages of our latest Fall release, packed full of red rubber stamps, clear stamps and dies to three lucky winners! 

Here's a sneak peek:

Wreath and mailbox for Christmas Cards all year Round

This month at Christmas Cards all year Round the theme is:

Getting ready for Christmas 

I have two cards to share today. 

The first one, I use  THIS mailbox stamp onto Strathmore watercolor paper with Hero Arts black ink and colored it in with distress markers and a water pen both by Ranger. I created the snow by applying  Opal White Liquid Pearls also by Ranger in a circular motion while I squeezed the bottle. 

On the background paper, which is by DCWV, I used an ink blender and distress ink to create an overcast on the edges of  patterned paper. After I was happy with the shading I spritzed the whole piece with water mixed with Perfect Pearls in gold. 

Other supplies include: houndstooth patterned paper by We R Memory Keepers, sentiment sticker by American Crafts and ribbon by Offray.


Challenges for the above card:
http://www.craftysentiments.blogspot.com/- Favorite coloring technique {distress markers and water pen}
http://blog.oozak.com/- Anything goes

I stamped the SNP wreath image onto watercolor paper by Royal and Langnickel Essentials using Memento green ink. I colored it in with distress markers and a water pen, both by Ranger. After it dried I used the Creative Memories cutting system to cut out the circle shape and then matted it on to two Spellbinders die cuts, one with Karen Foster patterned paper and the other in a cream cardstock by Recollections that I inked the edges with distress ink and an ink blender. 

The patterned paper in the background has also been inked with the ink blender and distress ink. The top patterned paper is by October Afternoon and the bottom is by K and Co. I overlapped the two ribbons that are by Michael's and Offray. The sentiment is a sticker by Cloud 9 that I matted on the same off white cardstock. 


Thanks so much for stopping by to take a look. It's almost time to really start working on those Christmas cards and gifts if you haven't done so already. Why not join us at Christmas Cards all Year Round for the fun challenge Getting ready for Christmas. 

A side challenge for this month is to make five Christmas cards either the same or different and blog about it and link up for a chance at another prize. This will really get you moving towards those Christmas cards. 

Challenges for the wreath card:
http://www.craftindesertdivas.com/- Anything with a senitment
http://inkychicks.blogspot.co.uk/- Use two different die cuts {Circle and scalloped circle}


Thank You!!


Tuesday, October 01, 2013

Guest Designer at TTCRD

Happy Tuesday to everyone. I was selected to be the guest designer at 


They are a Tuesday weekly challenge of Anything Goes with a 2 entry limit. I love to see what crafters post on their blog. 

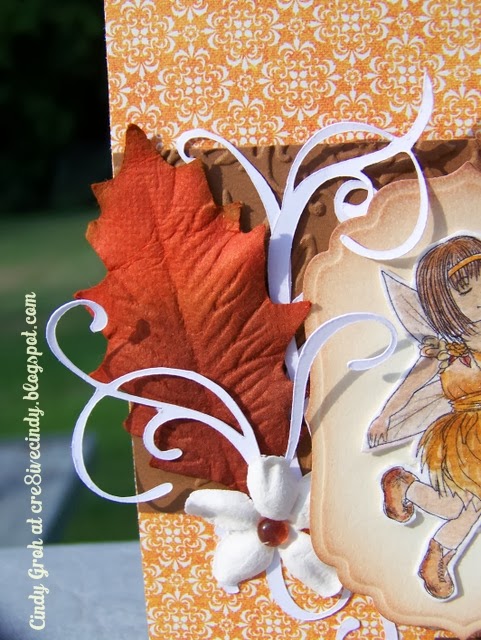
For my project I made a standard 4x5.5 off white card. The fairy image is by 


and I love that she could be used for any season. I love her in fall colors but in the spring she might make an appearance in pastels. For this card I printed her out on Strathmore watercolor paper and then colored/painted her in with Ranger distress inks and markers with a water pen. I love coloring images this way for something different then the Copic markers that I'm not really that good at:) After she was colored in and dry I fussy cut her out and adhered her to a Spellbinders die that had been inked with distress ink and using an ink blender.

The background paper is by Pink Paislee and the dry embossed piece of brown cardstock is by Bazzill. The embossing folder is by Darice. It's really too bad that all my card elements are over the embossing because it really is quite beautiful with a fall flourish and leaves. 

The flowers and leaf are by Prima and the centers of the flowers are from my LSS. The flourishes are cut out using my Cricut and the Cricut Craft Room. These flourishes are for an upcoming card class I will be teaching and my Cricut doesn't cut the greatest on these tiny intricate shapes. The flourishes I used on this card were the poorly cut ones of the bunch that I cut and carved to embellish my card. I love to recycle:)

The sentiment is a stamp by K and i Memories/Hampton Art with ink by Stampin Up.

Thanks so much for dropping by and checking out my card. Be sure to join in at Through the Craft Room Door for Anything Goes sponsored by Fitztown.


Challenges:
http://www.craftindesertdivas.com/- Anything with a sentiment
http://inkychicks.blogspot.co.uk/- Two different die cuts