Monday, March 14, 2016

Manly Monday Deep Red Dino

Today I used a Deep Red Stamps dinosaur stamp. I stamped the dino onto Strathmore paper and colored it in with Peerless watercolors. I fussy cut the image out and then it sat it my "need to be finished" bag. Sometimes I just feel like stamping and playing with my stamps. I don't always use them right away but they do eventually get used. 

You can find the dino stamp at:

or

The background was another one that didn't make the cut at the time I made it but was given new life with this dino image. The stencil is by The Crafters Workshop, cardstock is a speckled greyish color by Stampin Up and the spray is by Tattered Angels. The rocks are stickers by Not so Cute Stickers and the sentiment die cut is by Die Versions. I did die cut a green piece of fun foam by Good Old Values to go behind the white die cut to give it more dimension.


Thanks for looking.

Sunday, March 13, 2016

Thank You Cross Card

Today's card uses a background stamp by Hero Arts. I heat embossed the Hero Arts stamp with Ranger's copper embossing powder. I inked the paper with distress ink and an ink blender tool and watercolor paper all by Ranger. The green cardstock is by Stampin Up and the ribbon with that cardstock is a Cricut cut from Stamping cartridge (Award-Blackout-Shift). The inside white circle has been embossed with the swiss dot embossing folder by Provo Craft. I used the Creative Memories cutting system to create the large circle and the circle silhouette circle too. The thank you is a stamp by Clear Dollar stamps that were stamped with brown Stampin Up ink.


Thanks for looking.

Saturday, March 12, 2016

The Groh Family Rocks Calendar Page Layout


I have a new layout today. I'm pretty sure the red paper is by My Mind's Eye and the star paper is by Paper Patch. I'm not sure about the stripe paper but the cardstock is by Recollections. The black border on the right side is a Fiskars border punch. For the title the glittery stickers are by Making Memories and the word family is a Cricut using the Home Accents cartridge. Thanks for looking.
UPDATED PHOTOS AND FONTS SIZES 5-7-22

Friday, March 11, 2016

Friend Background Card

Today's card took me a long time to do but I think it turned out so pretty which makes it worth it. The background stamp is by Hero Arts and I have heat embossed it with Versa Mark ink and white embossing powder by Stampendous onto Strathmore watercolor paper. I used Peerless watercolors and a water pen by Ranger to color the image in. I think I messed up on the bottom or I just didn't like it so I covered it with some ribbon from my stash. The sentiment is also a Hero Arts stamp. It is stamped with their black ink onto Color-Aid paper.


Thanks for looking.

Thursday, March 10, 2016

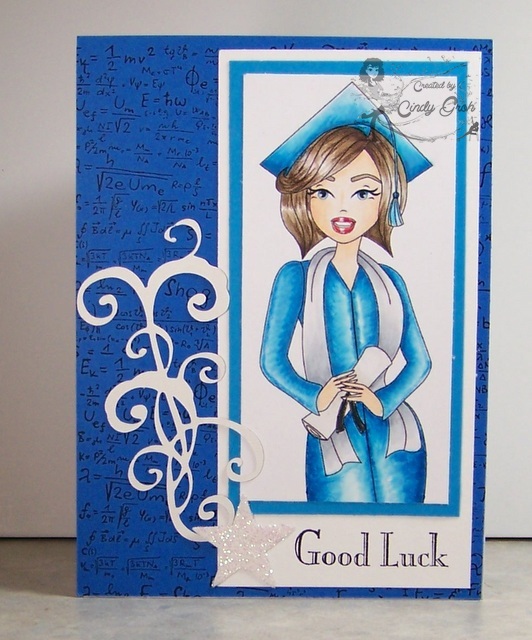
Good Luck card

Today's card is brought to you by Sassy Studio Designs. They are sponsoring a challenge at Open-Minded Crafts that is Luck/St. Patrick's Day. I'm not really keen on making and sending St. Patrick's Day cards so I went with the luck possibility.

I'm using Sandra's Graduation Sassy for this graduation card wishing someone good luck. I printed her out onto Cryogen cardstock and colored her in with Copic markers. I then cut her down and matted her onto blue cardstock and the white. I left a small piece of white at the bottom for my sentiment which is by TPC Company stamped with Hero Arts black ink. I die cut the star from a Quickutz die and covered it with white glitter. The flourish is a Cricut cut out of Die Cuts With a View cardstock. 

The background on the blue cardstock is a Deep Red Stamp called Quantum Background. I stamped it twice, on top and bottom with black Hero Arts ink.


Thanks for looking.


Wednesday, March 09, 2016

Let it Snow

Today I'm sharing a Sassy Studio Design card for the sponsorship at Crafting by Designs. The challenge theme is monochromatic. I used the Let It Go Sassy. I printed her onto Strathmore watercolor paper and colored her in with Peerless watercolors. I did color in her cape with Stardust powdered chalk mixed with paint. I die cut the image out with a Spellbinders die and inked the inside with distress ink and an ink blending tool both by Ranger. I added the image to the card with foam adhesive on the top and the bottom to fit over the rick rack.

The top patterned paper is by American Crafts and the bottom is by Basic Grey. The rick rack in the center is by My Mind's Eye and the snowflake stickers are by Jolee's/EK Success. The sentiment is by The Paper Studio.


Thanks so much for looking.

Tuesday, March 08, 2016

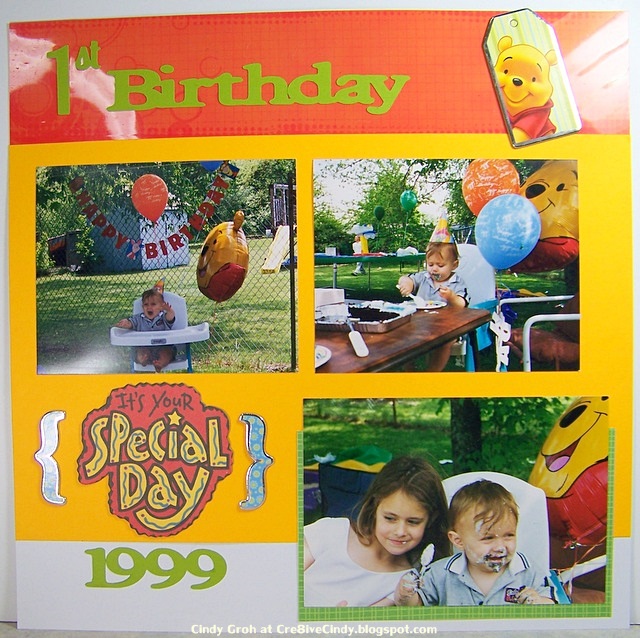
Pooh's 1st Birthday Layout

Here is another layout for my nephew's scrapbooks. The white cardstock is by The Paper Co and the other cardstock is by Recollections. The top strip is a transparency by Fancy Pants and the Pooh chipboard pieces are by Sandy Lion. The title is a Cricut cut using the K-12 and the Plantin' Schoolbook cartridge. The special day chipboard is unknown.


Thanks for looking.

Monday, March 07, 2016

Manly Monday Go Team

My guy card today is football theme. The blue and white cardstock is by Recollections and the patterned paper is by American Tradition Designs. The helmet is chipboard by Paper Accents that I painted with Making Memories blue paint. The football stamp is by Mark's Finest Papers. I stamped it onto Strathmore watercolor paper and colored it in with Peerless watercolors. Then I fussy cut the image out and placed it under the sentiment which is a dry embossed white cardstock with an embossing folder by Darice.


Thanks for looking.

Sunday, March 06, 2016

29 Again? Birthday Card

Today's card is a little different from my normal cards but I had to try something new to keep it real. I'm not one to do a rainbow colors. 

I stamped this background stamp by Hero Arts with Versa Mark ink onto Ranger's watercolor paper. I heat embossed it with white embossing powder. I used an array of different colored Ranger distress inks with water and a wide paint brush to create the colorful background. The flowers are Lawn Fawn stamps that I stamped and colored with Copic markers. I fussy cut them out and adhered them to the card with foam adhesive. The sentiment is by Paper Smooches stamped with Hero Arts black ink onto white cardstock by Recollections.


Thanks for looking.

Saturday, March 05, 2016

Generations Layout

Today I have a fun colored layout of baby nephew. The background paper is by Recollections and green patterned paper on the side is by Doodlebug, yellow cardstock is by Bazzill and then the green cardstock used on some of the circles is by Bo Bunny. The title and side title are Cricut cuts using the Cricut Basic font cartridge. The circles are cut with the Creative Memories cutting system.The circle stickers are by Momenta and the word Grandpa is by K and Co.


I hope you like it. Have a great day.

Friday, March 04, 2016

Hoot Hoot Hooray Card

It's never too early to start graduation cards. They are like wedding cards, always nice to have hanging around the house. Nobody wants to stop at the store on the way to the event and buy a card for $5-$6. Plus this guy is so cute. How can you resist him?

The black background paper has been dry embossed with a Fiskars texture plate. I ran it through my Cuttlebug with a different sandwich of plates and it worked. I matted the embossed piece to a blue patterned paper. I die cut the frames with a pink shimmery piece of cardstock by Recollections and then the inside piece I think is by October Afternoon.

To finish up I added the owl sticker by Jolee's and placed a grad cap brad on top. This was a challenge but I think it turned out awesome. The sentiment is a Cricut from the Straight from the nest cartridge.


Thursday, March 03, 2016

Autry James Layout

This little guy was born in October as stated  and they sent this in November and then a Christmas card in December. Can you say Super Mom! The pennants are made up with a bunch of scraps I found in my drawer. I tend to start my layouts by going to my scrap folders first. It gives me a place to start and I hate to throw the scraps away.

Pennants from left to right: patterned paper by Prima; next is an Anna Griffin stamp in Hero Arts Cornflower shadow ink on a gray SU cardstock; Coredinations brown cardstock; blue strips is My Mind's Eye; the dark color underneath is a green by Basic Grey; leaf patterned paper by Prima; glitter paper by Recollections; blue cardstock by Recollections that has been stamped with a Hero Arts stamp with Charcoal HA ink. The background paper is really old and from my aunt's stash that she gave me. The date and ink are by Stampin Up.


Thanks for looking.

Wednesday, March 02, 2016

Celebrate with Schlitz

Today's wacky holiday is Old Stuff Day so what a great day to do a bottle cap card. This Schlitz cap has been manually depressed by my husband. I'm not sure how he does it but the caps usually pass my quality control. I glued the cap onto a light brown cardstock circle punch by EK Success. I used Glossy Accents to adhere the cap to the cardstock by putting the adhesive on the caps highest points that will be in contact with the cardstock and then I set a punch on top of it to dry. I usually do a bunch at a time and sometimes forget that I'm doing that project. I'll see my punches all over my tabletop and start putting them away until I notice what is underneath. Silly.

The light brown cardstock as the background is cardstock by Sunborn. I stamped it with circle stamps by Stampin Up and then inked the edges with distress ink and an ink blender. The middle kraft cardstock is by Oriental Trading Co. The canvas stamp is also by SU and I ripped the edges of the cardstock at the top  and bottom. The bottle cap is secured to a Spellbinders die cut out of Bazzill cardstock . The same cardstock was used on the sentiment but for this die cut I used my Cricut and the CTMH Art Philosophy cartridge. The sentiment stamp is by Fiskars.


Thanks for looking.

Tuesday, March 01, 2016

You Are Amazing Card

My new card today is in recognition of the holiday World Compliment Day. It was put in place in 2001 to spread joy and positivity. How fun is that?

Anyway my card has a little bit different background for you to check and be the judge of it. I dry embossed some brown cardstock with a Fiskars embossing plate that was a brick type pattern. I then covered it with the Tarnished Brass Distress Stain dabber. I made the stain uneven by choice but I'm not sure I love the results. You know sometimes you try something new to "step out of the box" and sometimes it's a huge success and sometimes not. Live and learn.

The background and the frame are pink cardstock by Recollections. The frame is a Cricut cut from (I think) the CTMH Art Philosophy cartridge. The image is by Newton's Nook that I stamped onto Strathmore watercolor paper with Hero Arts black ink. I colored in the image with distress ink and a water pen both by Ranger Industries. I die cut the image with a Spellbinders die and inked the inside with a light distress ink. I believe the gingham patterned paper is by My Mind's Eye and the sentiment die cut by Studio G. I added pink rhinestones by TPC Studio to each center of the flowers and on the sentiment flower.


Thanks for looking.

Monday, February 29, 2016

Manly Monday Dinosaurs

Today my card is for a younger male but still suits the Manly Monday theme. The patterned paper is by Making Memories and the black and cream colored cardstock is by Recollections. The dinosaurs are Stampendous stamps on Strathmore watercolor cardstock with black Hero Arts ink. I painted them in with olive and forest green distress inks and a water pen both by Ranger. I punched them out with an EK Success punch and then punched out the next largest circle in an olive green cardstock. I die cut the tags with a Sizzix die and my Cuttlebug. The brads and stamps are unknown but I believe the black ink is Hero Arts.


Thanks for looking.

Sunday, February 28, 2016

AU Football layout

Another layout done for the nephew book. There is a bunch of Cricut cuts on this one so I'll start there. I arranged the stars on the Cricut Craft Room to be evenly spaced out because I was using it as a stencil. I cut the stars background by using the Ribbons and Rosettes cartridge. I did so in multiple colors for future layouts. It took me some time to plan it out and I really liked the look. I used the Creative Memories Total Sports cartridge for the year. The name in the bottom right area had to be blurred out but it was cut out using the Don Juan cartridge. 


I noticed on the pictures that everything orange was from AU. I looked up the AU logo and found it was for Auburn University. I liked the look of the logo but was having trouble finding this font in my collection of cartridges.


There was no short supply of problems while trying to find a similar look. I ran into simple things like the opening of the U wasn't wide enough to fit the A inside. I tried manipulating the letter by stretching it in all the right places and was unsuccessful. It looked weird. Then I noted the tops and bottoms of the letters are square not rounded like in the layout below. Another thing going on with this long process was I wanted a shadow to go behind the letters and that wasn't always an available option as shown here. So I ended up using the Lyrical Letters cartridge Jumbo font. I made two of the same size and off centered them behind. It doesn't look exactly like the real logo but I really gave it a Girl Scout try. 


Moving on, the football helmet is a chipboard embellishment by Paper Accents that I colored orange Smooch Spritz. I was having trouble getting them unclogged to work properly. I opened the bottle of an orange spray, poured it on the helmet and worked it through with my finger, Worked wonderfully and took much less time then mixing some red and yellow paints together to make an orange acrylic paint. 


The orange paper is by C-Gull and I placed it on the this funny angle for something different. The blue starry background was sprayed with a blue Smooch Spritz.


Thanks for looking.

SB.com-Sports
SB.com-Cricut with hat


Friday, February 26, 2016

Bella Bride Card

"Happy Friday!
The image below called Bella Bride Sassy will be free for 24 hours on our Sassy Studio Designs Facebook group!! That means that after 24 hours the image will be removed from the group and you will no longer be able to receive it for free. If you miss it - you can still purchase the image in the Sassy store at regular price. If is not in the store, which I don't think this one is in the store, than you will have to wait until it pops up again. 

This beautiful bride by Sassy Studio Design was printed onto X-Press It cardstock and colored in with Copic Markers. I did add Stickles to the flowers on her dress and her bouquet. The sentiment sticker is by Sticko, the glitter hearts by Making Memories and the ribbon is by Hobby Lobby. The heart patterned paper is by Sassafrass and the top patterned paper is by Basic Grey.


Thanks for looking

Thursday, February 25, 2016

Deep Red Stamps Friends Card

Today's card was published in April's Scrap and Stamp Arts Magazine. I love today's card so much that I hope you do too. 

I stamp the sentiment with bird stamp by Deep Red Stamps with Versa Mark ink and heat embossed it with white embossing powder by Stamp N Plus. I took some Fantasticks and colored it the areas you see below and love the results. It was at this time that I realized that the rest of the image needed to be inked to be better visualized. So I applied the Pumice Stone distress ink with a ink blending tool to darken the cardstock. It did just that and I was happy with the way the distress ink left a halo effect around the two parts. I think the white space is a beautiful exaggeration of the bird and the flower to the right. 

Once the image was dry I matted it onto a piece of Die Cuts with a View purple cardstock. The patterned paper is by Quick Quotes and it also has been matted onto a piece of purple cardstock. The card itself is a little bit bigger with a width of 6 inches by 4.25 inches.

This Deep Red Stamps can be purchased at the Deep Red Stamps online store.


Thanks for looking.

Wednesday, February 24, 2016

Sketches in Thyme Project Life Feb

This week at Sketches in Thyme Project Life we were to follow this sketch:


I followed the sketch loosely starting a Becky Higgins Project Life card. I stamped the letters on the white part of the card are by Lawn Fawn, the other letters are Stampin Up and the postage stamp is by Rubber Stamps of America (That's an old one). I used different colored Stampin Up inks. The journaling at the bottom is written with a green gel pen by CM. It talks about how these cards were left over from the card drive and to use in 2016. 


Then instead of using the tag on a layout or a pocket page I used it on the basket the cards are in. That way come next November I will know what these cards and not have to guess. They say if you tell yourself you will remember such things, you more then likely won't. So here it is on my wire basket. 


It goes to show that these sketches can be used for other things then what they were intended for.

Thanks for looking.

Tuesday, February 23, 2016

Wedding Wishes

For today's card I used a bunch of stamps by Stampin Up and then the bottom left corner is a stamp of the bride and groom which is by Stampendous. I stamped each with Versa Mark ink and heat embossed them with Ranger's platinum embossing powder. Then I punched out each image with an EK Success circle punch along with the next size up to shadow the punch with the image or sentiment.

I love this patterned paper by Prima so much that I didn't want to cover it up so I used two pieces of vellum for my middle section. The closest vellum to the patterned paper is self adhesive and it is by Forever in Time. It has a tan hue to it. Then the vellum on top is by The Paper Studio and because I can never hide the adhesive well I did this; I applied regular adhesive behind the circles but for the edges I used Creative Memories clear photo corners to keep them close to the layer underneath. They are hard to see unless pointed out. I did want to mention that I did adhere the sentiment circle with 3D Zots.

I hope you like the card today.


Thanks for looking.

Monday, February 22, 2016

Manly Monday Chess Edition

I made this card for my nephew who likes to play chess. I die cut the pieces from Cricut freebie cut called Chess Pieces in black and grey Provo Craft cardstock. The background paper is by Me and My Big Ideas and that is covered in the middle with black cardstock by Recollections. 

The tags are vellum by The Paper Studio that I cut with a Sizzix die. The die was too long so I cut off the bottom. Then for the rest of the tags to match the first one I placed the new vellum piece onto the die and used the negative of the first cut on top. This gave me the chance to line upthe new and old and enabled me to get the same cut. (*fingers crossed*). This lining up the papers is easier to do when you can see right through the paper. I did take the negative piece out once it was lineup and ran the new vellum through the Cuttlebug. I felt lucky that it worked. After three tags were cut, I ran the vellum tags through the Xyron and placed them onto the black cardstock. I made the black cardstock a little bit shorter then the tags so the checkered patterned wasn't lost.

The brads are by We R Memory Keepers and the sentiment sticker is by Simple Stories.


I hope you like today's card. See you tomorrow,.