Tuesday, August 30, 2016

Vintage ATC's

I have some vintage ATC's (Artist Trading Cards) using Deep Red Stamps to share today. 

The first one uses the Grunge Stars and Stripes stamp. I colored the back of the stamp with blue and red distress markers and sprayed it with water before stamping it onto this ATC base from Ranger Industries. I decided not to use that ATC base for my base and instead cut the piece down to the size of the flag. The red cardstock that I did use for the base is from Stampin Up and it has been heavily sprayed with Krylon gold glitter spray.

The Victorian alphabet playing card embellishment is a sticker by Melissa Frances. The words (USA and the other says Freedom) were a digital freebie from Memory Works with Simple Stories. The star is a button that I sanded the top with an emery board. I inked it and all the other pieces with Vintage photo distress ink. 


This next one is very involved. Here's what it looks like all finished.


To get there I first had to experiment with what colors of ink will show my stamping best on a sewing pattern. Here are my results:

1.) Stamp - Crochet Background 


2.) Left stamp is Esprit Parfumerie and to the right is Damask Background


4.) Stamp - Esprit Parfumerie

5.) Stamp - Damask Background


7.) Stamp - Crochet Background  


I used #5 & #6 on the ATC to the left and #2 along with some Crochet backgrounds stamped in Chocolate Chip for the ATC on the right. 

To make the background of the ATC I need to start by saying this, I have a container of Mod Podge gloss by Plaid that I've never really known what to do with it. I went online and Googled it for ideas on what it's used for none of which seemed to appeal to my project.

 So I took the sewing pattern paper that had been stamped and ripped them into small pieces. I painted the base paper, which was a piece packaging, with the Mod Podge using a sponge brush. I crumpled up the paper and layered them onto the base randomly but with the edges of the pattern sticking up. On top of that layer of messy sewing pattern paper, I put down another layer of Mod Podge and layered more paper until I was out of that color. I finished with one more layer of Mod Podge before putting them to the side to dry over night. I wish I would have taken a picture of the bases before adding all the other things on top of it but was exhausted by the whole process that it slipped my mind.

The woman stamp is called Victorian Evening Dress that I stamped with black ink by Hero Arts on Strathmore watercolor paper. I colored her in with distress inks and a water pen and hand cut her out. I added an oval journal and the clock die cut by The Girls' Paperie. The words are stickers by Pebbles and Creative Imaginations. The metal corners are unknown.


Last one. The music paper is pretty but I wanted to do a little bit more with it. I used a stencil by Tim Holtz that reminded me of music gauges on older tape players. I added the distress inks with a blending tool in random areas. I cut the piece down to the size of an ATC and inked the edges with more distress ink.


 I stamped the Vintage 45 Record stamp onto similar colored cardstock with Hero Arts Charcoal colored ink and cut them out with the Creative Memories circle cutting system.  I colored in the word Sun and the rays on the record with SU watercolor colored pencils. I inked the edges with distress ink. The tickets are die cuts by Maya Road. The words on the left ATC are stickers by Stickibilities and Crayola. On the right ATC, the word Play is die cut by K and Co and the sticker (on) is by Creative Imaginations.

After I put the ATC together, I stepped back and thought that it looked too clean. I took out my fancy sanding tool (an emery board) and sanded everything down so it didn't look so clean.


That's all for right now. Coming up I do have a bunch of stuff to share with you. My absence from blogging was taken for me to do a little soul searching as to why I blog the things I make. I won't bore you with my thoughts but I will say I am back.

Thanks for stopping by.

Sunday, August 07, 2016

Sketches in Thyme Project Life

It's my day to post on the Sketches in Thyme Project Life blog with this weeks sketch.


I followed the sketch almost exactly with some circles that have been stamped with various Tim Holtz, The Paper Company and Inkadinkado stamps. The green ink is by Tsukineko and the blue by Stampin Up.


The layout consists of patterned paper by Making Memories, Little Yellow Bicycle and Die Cuts with a View. The border punch is by EK Success and brown cardstock by Coredinations.


The squares above and below the center picture were made like this:

I pulled out some old CM stickers where the color on the outside square matched my patterned paper but the center did not. There are two sets of squares in the pictures below. One where the dark center comes out as an individual sticker and the other is one whole sticker.


 I cut the square in half

I stamped the blue cardstock 

Punched out a circle 

Covered up the dark orange square with the stamped circles 

And here it is from left to right how I changed something that I had on hand to fit my colors/layout 

Here's a close up the final product on my layout


Thanks for looking

Saturday, August 06, 2016

Thanks Card


This is an older card I made and thought it was appropriate for the upcoming fall season. The flower diecut is by K and Company. The background paper is by My mind's eye  I inked the edges with distress ink as well as the frame diecut. The frame and square diecuts are from my Cricut. The thanks die cut is by clearly besotted. 


Thanks for looking.

Sunday, July 31, 2016

Wedding Day Card

I have another wedding card for my post today. The black and white cardstock are both by Recollections. The patterned paper is by Colorbok and I've wrapped gold Martha Stewart cording around the bottom of it. The embossing folder is by Darice. The sentiment stamp by Great Impressions has been heat embossed using Versa Mark ink and Stamp N Plus gold embossing powder. I covered the white cardstock with gold powdered chalk also by Stamp N Plus.


Thanks for looking.

Saturday, July 30, 2016

Rock Star ATC's

The theme for this ATC (Artist Trading Cards) swap is Rock Star. I dry embossed with a Fiskars embossing plate with music notes on it. I inked it with distress ink minis in theses wild colors that I had patterned paper that matched. After I embossed the watercolor cardstock, I took the Black Soot distress ink over the top of the raised pattern. I've never been successful with this technique, even though I use a light hand, I still manage to get ink where I don't want it. 

The guitar stamp is by Stampabilities, which is sold at Hobby Lobby. I stamped it onto white cardstock with black Hero Arts ink. I fussy cut the image out and then I wan't sure where I was going next with this ATC. So, I played with some glitter and made a huge mess. I made the green glitter green by adding Dreamweaver Stencils Metallic FX to a white-ish glitter. After adding three glitter colors to the guitars, I covered the each with Glossy Accents by Ranger. The die cuts with the #1 in each are by Sizzix. The stamps are by Fiskars and inks by Colorbox and Ranger. The rhinestones are by TPC and the star brad is by Making Memories.


Tons of products today. Thanks for sticking with me on this post. 

Friday, July 29, 2016

Summer ATC's

Hey peeps! I have a set of summer ATC's (Artist Trading Cards) using Lawn Fawn fish stamps. I used alcohol inks by Ranger to create the background on gloss paper. The dock is made from scraps of Making Memories patterned papers and the pole is Coredinations cardstock. The fishing hooks are white cardstock that I hand cut (not on the first try). The fishing line is black glitter. The fish were stamped with Hero Arts black ink onto watercolor paper and colored in with distress inks and a water brush. I fussy cut the fish out. The sun is a punch by Creative Memories.


Thanks for looking.

Friday, July 15, 2016

Christmas Candle Card

Another Christmas card today. The stamps are unknown but the candle was colored with colored pencils. The polka dot paper is by Recollections, the ribbon by Pebbles and the holly die cuts by Spellbinders. I die cut some foam of the same color to give the dies some dimension.


Thanks for looking.

Monday, July 11, 2016

Manly Monday Hang in There

Welcome back to Manly Monday. This frog stamp is so cute especially in multiple colors. I colored onto the rubber of this frog stamp with distress markers before stamping him onto white cardstock. I colored the eyes in with yellow powdered chalk which I applied with a Q-Tip. 

The sentiment is a Cricut cut from the Wild Card cartridge. I cut out of white cardstock and inked with Peeled Paint distress ink. The brown background paper is by Hot off the Press. The dragonfly is a Michael's/Studio G stamp that I fussy cut out. The last part of my card that borders on the not so manly part is the ribbon. The green ribbon is by Stampin Up and the brown by The Paper Studio. 


Thanks for looking.

Sunday, July 10, 2016

Be Merry Card

I have a Christmas card to show you today. I die cut the snowman from the Winter Woodland Cricut cartridge using scraps. I do know the greenish colored patterned paper in the hat and scarf is by Making Memories. The blue background paper is by Color-Aid, the green circle patterned paper is by Deja Views-it's very old and then the sentiment is an Imaginisce stamp in green Memento Ink. Now that I look at the snowman more I believe the blue patterned paper is by Deja Views. I think I will add some black ink to form some eyes. Maybe.


Thanks for stopping by and taking a look.

Saturday, July 09, 2016

Happy Day Layout

I do love this layout with its bright colors and simple design. The yellow background paper is by Die Cuts with a View. There is a super hero in the right lower corner that I covered up with the blue and red cardstock. 

I die cut everything else with my Cricut. The balloons are from George and Basic Shapes and the chevron stencil is by Heidi Swapp. I applied a rainbow of distress ink with an ink blending tool on top of the white layer. I adhered the two layers together and tied a bow of baker's twine around the bottom. I used some 3M foam adhesive under the balloons with the string of baker's twine tucked underneath it. The bottom of the twine is taped to the back of the red cardstock. The curl in the string just happened. Nothing fancy or any special adhesive to curl it. 

The Happy Day cut is from the cartridge The First Few years which was a freebie in Cricut Craft Room. I would really like to get that cartridge. It's on my wish list. The 1st die cut is an oval by Small Talk and Frames and I welded the 1st from the font cartridge Doodletype inside of it. The word birthday is a stamp by Lawn Fawn with black ink by Hero Arts.


Thanks for looking.

Friday, July 08, 2016

Friends Stencil Card

For my card today, I used a metal stencil and applied Dreamweaver Stencils white embossing paste over it. After the paste dried, I placed the stencil over the word and covered it with silver powdered chalk. The die cut is a Cricut cut from the Art Philosophy cartridge that I inked with Broken China distress ink (Ranger). The black cardstock, flower and the flower's glittery center are by Recollections. The edges of the black cardstock have been die cut with a Sizzix die, and then, over those scalloped edges, is a Memory Box die cut.


Thanks for looking.

Thursday, July 07, 2016

Sketches in Thyme Project Life

I have a pocket scrapbook layout for today. It's my day over at Sketches in Thyme Project Life and this is the sketch for this week:


I'm endlessly working on books for my husband's brothers. My  pages are kind of plain but there are 5 boys total and things need to get done. A little motto for me this year:

"It doesn't have to be perfect. It just has to get done." quote by me- at least I think it's original. 

Anyway, for this card I used patterned paper for the background by Die Cuts with a View. I'm not sure about the yellow cardstock or the paper behind the photo but I did use a circle punch by Stampin Up and then alphabet stamps by Oriental trading Co with black ink by Hero Arts. The pencils and ruler, that I cut in half to have something for both sides, are stickers by EK Success.


The upper left patterned paper is by Bazzill and the rest is either by Die Cuts with a View or Crate Paper. I used the same small letter stamps and black ink as above. On the third card, the ink is distress ink Mustard Seed (Ranger) and the number stamps are by Stampin Up. In this layout, I used stickers by The Girl's Paperie, Echo Park, Crate Paper, and Jolee's. On the yellow circle with the 8, there are eight candles stamped by Hero Arts and then there is a butterfly stamp by Cloud 9 Designs behind the celebrate sticker.


Thanks for looking. I hope to see you tomorrow.

Wednesday, July 06, 2016

Pink Flowers Card

This card is crazy busy for me but I had to try something different for a change. The flower is a Stampin Up stamp and die combo that I stamped with Memento black ink and colored in with Copic markers. The following die cuts are by Spellbinders: pink oval; the pink decorative thingy's coming out from the flower; and the white scallop oval die cut. The white die cut is an old upholstery sample  and it was no problem to die cut it out with my Cuttlebug. I then inked the edges pink. 

The leaves on the left are from the same stamp as the flowers and are stamped in green on green cardstock. The other leaves are by Elizabeth Crafts Designs. I inked those leaves green with distress ink and then painted them with clear crackle paint by Ranger.

The rest of the card goes like this:
*sentiment sticker by Pebbles
*border punches in the center by EK Success
*background patterned paper by Stampin Up
*I inked that patterned paper with pink distress ink


Thanks for looking.

Tuesday, July 05, 2016

Chilly Days Card

This card kind of makes me giggle because the background in this photo is beautiful and sunny unlike the card's title. 

The background is blue cardstock by Recollections and has been dry embossed with a Provo Craft folder. I inked the raised areas of the embossing with distress ink but I wasn't very happy with that look so I didn't continue throughout the background. The green cardstock is by Stampin Up and the blue on top of the green is by Bazzill. 

The snowman stamp by Paper Smooches was stamped with black Versa Color ink and heat embossed with clear embossing powder. I colored him in with powdered chalk mixed with paint. I die cut the image out with a Spellbinders die and inked the inside of the die cut with distress ink and an ink blending tool. I matted a lighter green scallop die cut behind the image before adhering it to the card base and finished by adding the sentiment sticker (Sticko/EK Success) as shown. 


Thanks for looking.

Monday, July 04, 2016

Manly Monday Soccer Card

Manly Monday card today is the last of my soccer cards. The die cuts, sentiment and goal with soccer ball are Cricut cuts from the Creative Memories Total Sports cartridge. The green patterned paper is by American Traditional Designs and the off white paper is unknown. It did take a little bit of time to put the die cuts together. I kept it clean and simple so the focus is on the die cuts.


Thanks for looking.

Sunday, July 03, 2016

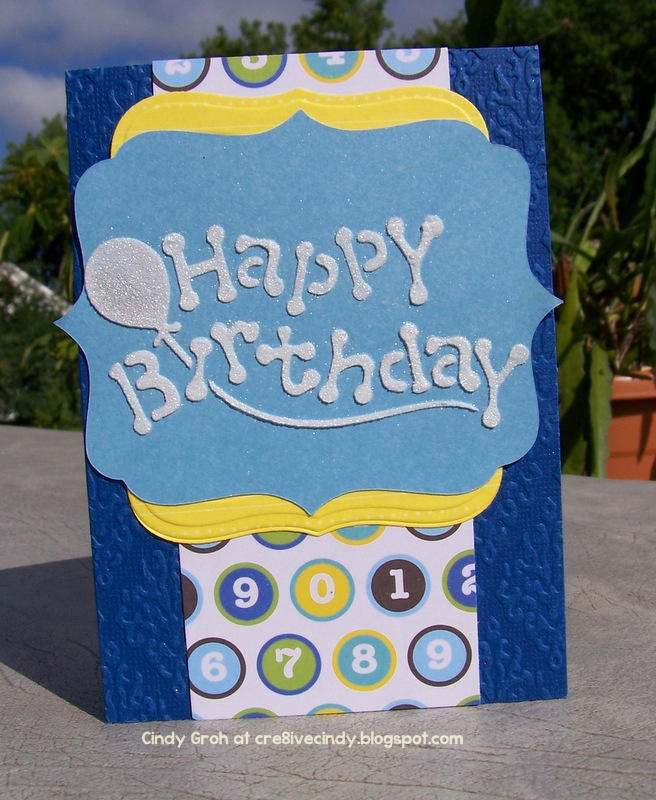
Happy Birthday Stencil Card

My card today is the subject of most cards that I send out. The blue background cardstock is by Cordinations and I dry embossed it with a The Paper Studio folder. I layered a piece of patterned paper in the middle of the card. That patterned paper is by Studio G and I found a pack of differnt birthday designs at Meijer for $1.00. What a steal. 

The yellow die cut is by Design Objectives with yellow cardstock by Bazzill. The blue die cut is a Cricut cut from the Storybook cartridge. The sentiment and balloon are made using a metal stencil. I taped the die cut down to my work area and then the stencil on top of it. Then using a palate knife I applied white embossing paste to it. Remove the stencil right away and wash the paste off completely. Once the paste dried I adhered the die cut to the rest of the card.


Thanks for looking.

Saturday, July 02, 2016

Shell Thank You Card

I have a nice and easy to put together kind of card today. The background patterned paper is by Crate Paper and I adhered a piece of white cardstock that has been dry embossed with The Paper Studio folder. The patterned paper to the left of the shell is by Creative Memories and to the right is brown cardstock by Coredinations. The seashell stamp is by Stampin Up, box stamp around the shell is by Fiskars and the thanks circle stamp is by American Crafts. I stamped them all with Colorbox chalk ink. The seashell was trimmed to a square but the sentiment is on a Clearly Besotted die cut.


Thanks for looking.

Friday, July 01, 2016

It's Great to be 8 Card

Toady I have a birthday card to share. The octopus stamp is by Inkadinkado and I have white heat embossed the image onto white cardstock. I used a Spellbinder's label die to cut it out and inked the inside with Peacock Feathers distress ink (Ranger). I sprayed the die cut with water mixed with Perfect Pearls (Ranger) and wiped off the ink that was left on the embossing. 

On a piece of white cardstock, I stamped the sentiment using the Harold alphabet stamp set by Lawn Fawn. Underneath the sentiment, I inked a stencil by The Crafter's Workshop with Twisted Citron and Peacock Feathers distress ink and an ink blending tool (Ranger). On the right side, I layered two pieces of patterned paper (Cosmo Cricket) before adhering them down and then added an 8 sticker (K and Co). I adhered the image to the card with foam adhesive by 3M.


Thanks for looking.